Installing the Apps Managed Package
This document describes the steps required to install and configure the Apps Managed Package.
Pre Installation
1 - Install dependent packages
Pitcher Zero - Install the dependent or higher version for Pitcher Zero
2 - Remove deleted components
This step is only valid while upgrading to Pitcher Apps 0.102
Set up → Custom Metadata Types
Search → Lightning Builder (PCH__Lightning_Builder__mdt)
Now click delete (as per the screenshot below) for the below fields, which are deleted from the package but still available in the subscriber org -
Field 1 (Managed - Installed Deleted) -
Label Name - Actions: Custom Controller Class
API Name - PCH__Actions_Custom_Controller_Class__c
Field 2 (Managed - Installed Deleted) -
Label Name - Actions: Custom Controller Class
API Name - PCH__Actions_Custom_Controller_Class__c

Now there should not be any error related to these fields during the upgrade.
3 - Skip the upgrade version
This step is only valid while upgrading to Pitcher Apps 0.91
Only if the “method does not exist copyShareRecords” error occurs
If the below error occurs -
If the below error is Apex compile failure, Details: Apex class AccountExecutionTriggerHandler: line 84, column 21: Method does not exist or incorrect signature: void copyShareRecords(String, String, List<PCH__Account_Execution__c>) from the type PCH.SYS_Utility Apex compile failure.
Then skip the update to Apps 0.91 and directly update to Apps 0.99
Installation
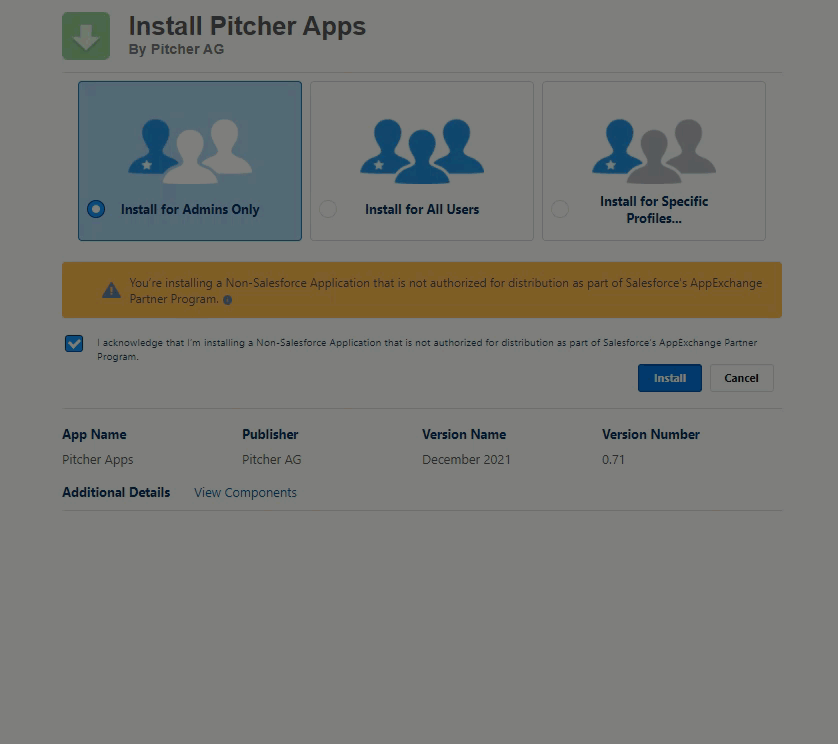
Follow these steps to install/upgrade the package:
Enter the package installation link obtained from your Pitcher representative. This should redirect you to the login page of Salesforce.com. For Sandbox organizations, swap http://login.salesforce.com with http://test.salesforce.com in the URL.
Select Install for Admins Only Install for All Users, or Install for Specific Profiles, depending on the need.
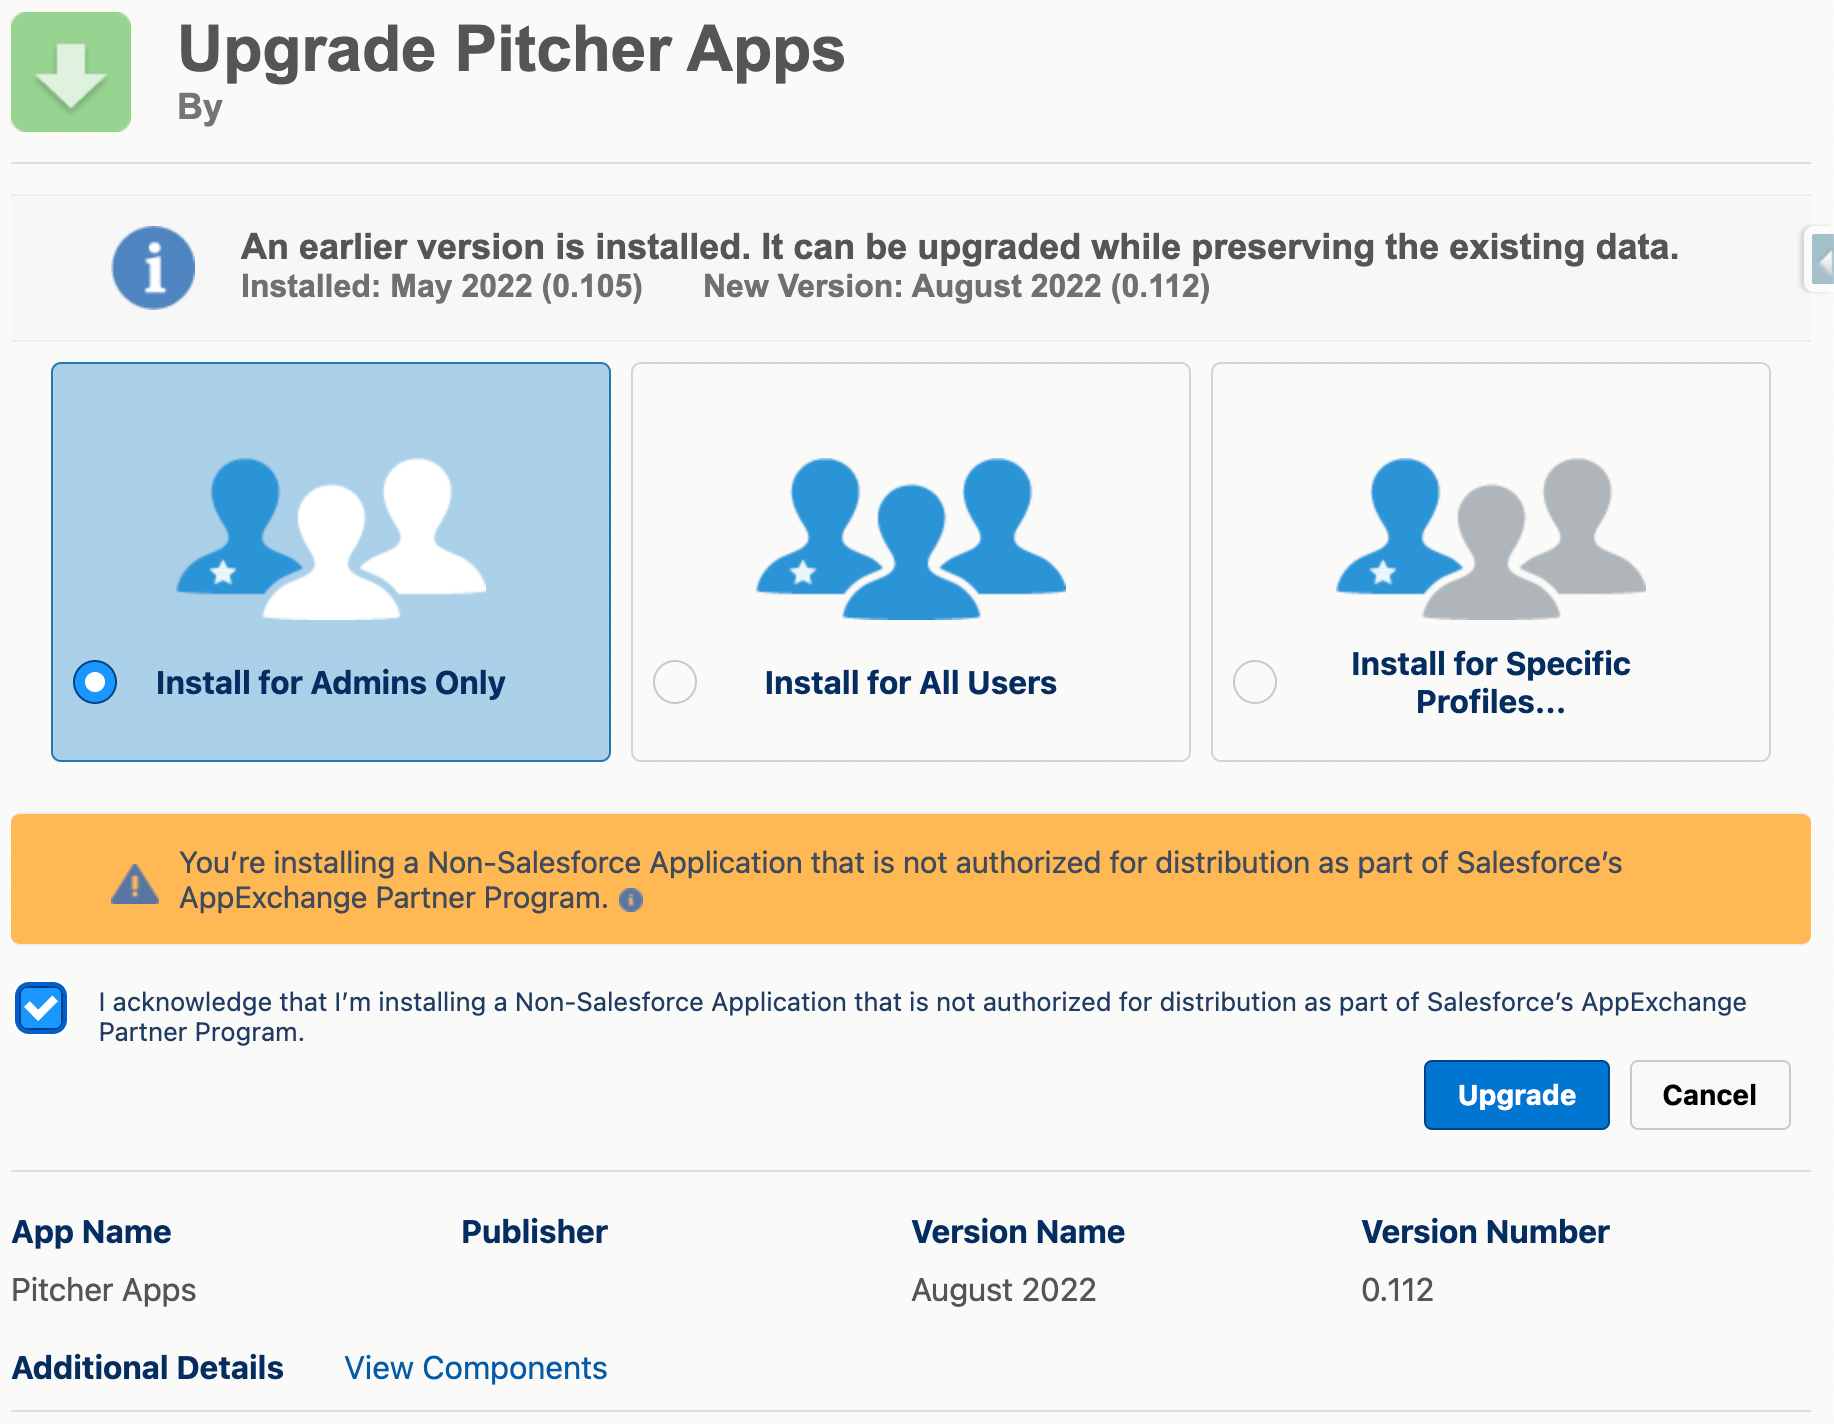
On the Approve Third-Party Access dialogue that appears, use the checkbox to grant access to the Sentry application and click Continue to begin the installation.
To verify the package components before installation/upgrade, click on the “View Components” link
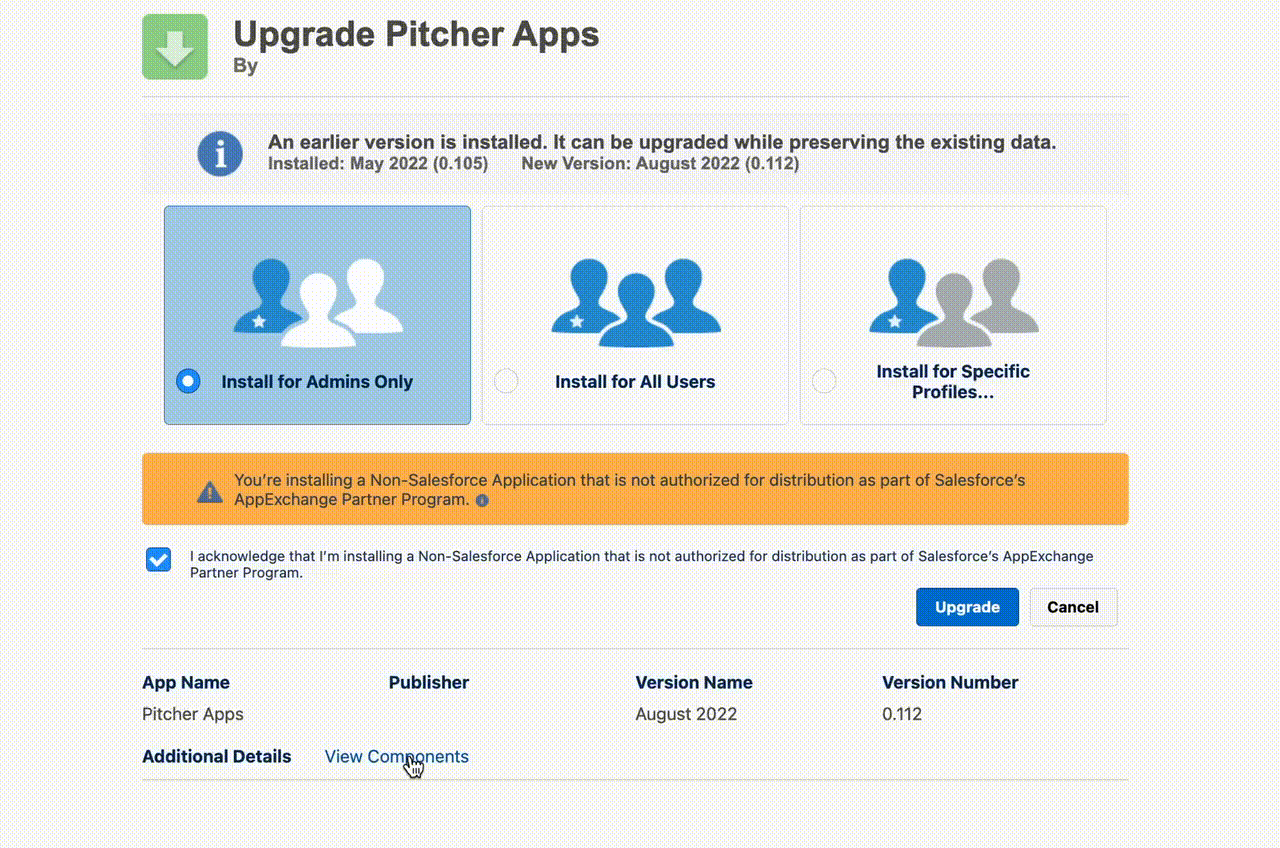
Check the acknowledgement and click Install to proceed.
Once installation completes, the following screen appears:
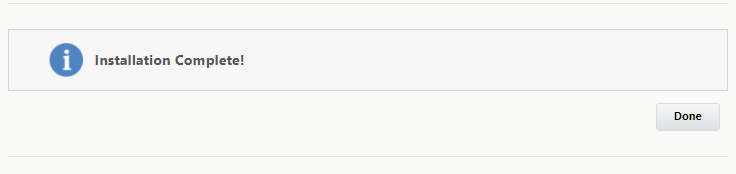
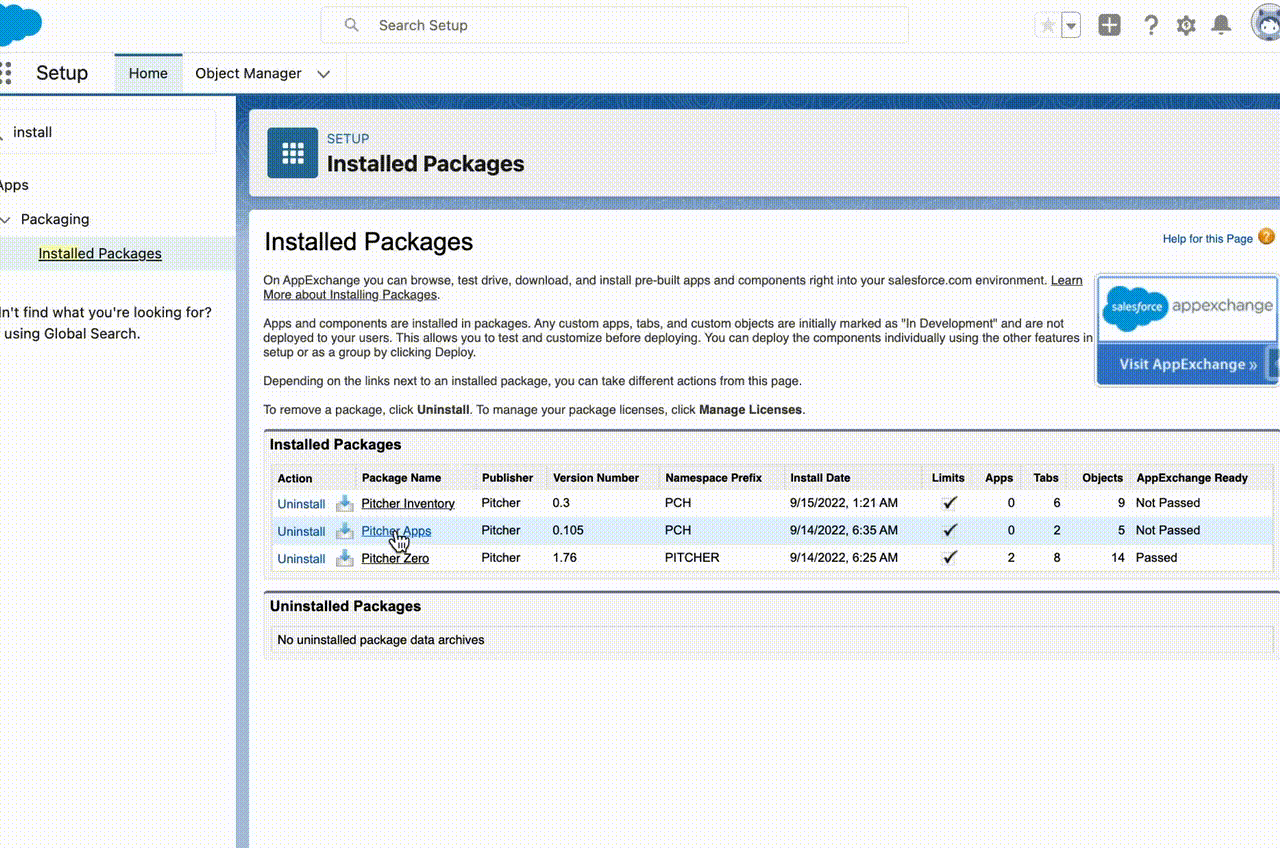
To confirm the successful installation, check the installed packages, on the Setup > Apps > Packaging > Installed Packages page.
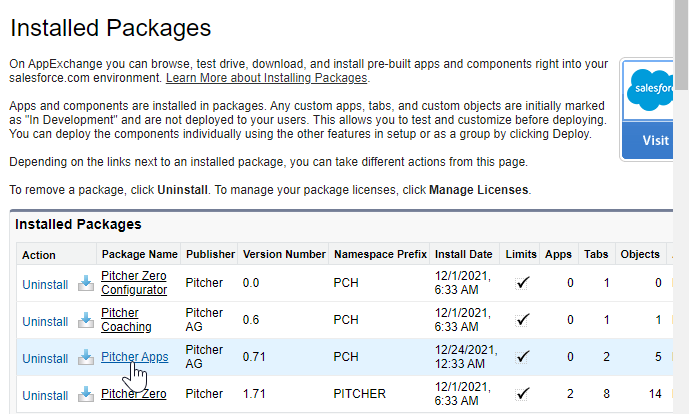
The Installed Packages Page
To verify the package components after a successful installation/upgrade, follow the steps shown below -
Post Installation
After the Pitcher Apps Managed Package gets installed in the org, you need to perform the following steps:
Step 1 - Assign Permission Sets
Assign the permission set PITCHER-Apps Rep to the users who will be using Pitcher in the field.
Assign the permission set PITCHER-Apps Operations to the users who will be handling Admin operations.
Step 2 - Sentry Configuration
Add the following values to the Pitcher Apps Custom Settings as per your business requirement. You can add these values for specific users or profiles or default Organization-level values.
Sentry: DSN = DSN URL
Sentry: Debug = Checked
Sentry: Environment Name = [Respective Environment name where this package is installed]
For reference here are the values that need to be added to the custom metadata.
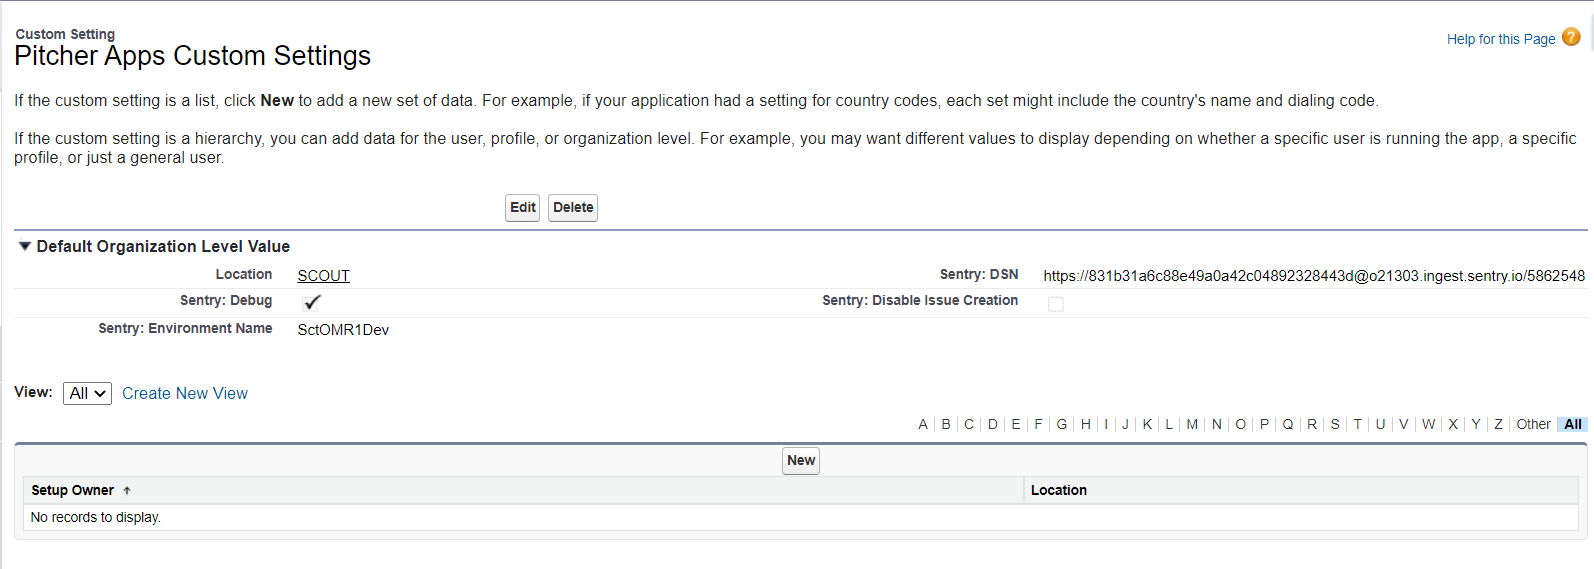
The Custom Settings Page
Step 3 - Schedule Apex Jobs
SCH_ApexSharingManagerFullSync
Only follow this step, if the customer wants to set up the “Salesforce Apex Sharing” feature (which copying share records from the parent object (like
Account) to the child records (likeTag) object.Only applies to Apps v0.109.0.0 or above
Login to destination org.
Go to the Developer Console.
From the Debug menu, click Open Execute Anonymous Window.
Paste the following apex code based on the scheduled time as per customer need:
For 1 AM use the following code:
CODEPCH.SCH_ApexSharingManagerFullSync mgr = new PCH.SCH_ApexSharingManagerFullSync(); System.schedule('PCH.SCH_ApexSharingManagerFullSync || Everyday 1 AM', '0 0 1 * * ? *', mgr);For 12:10 AM use the following code:
CODEPCH.SCH_ApexSharingManagerFullSync mgr = new PCH.SCH_ApexSharingManagerFullSync(); System.schedule('PCH.SCH_ApexSharingManagerFullSync || Everyday 12:10 AM', '0 10 0 * * ? *', mgr);
Click Execute.
Verify under Setup > Scheduled Job that the apex job
PCH.SCH_ApexSharingManagerDeltaSyncis scheduled to run daily at the respective time.
SCH_ApexSharingManagerDeltaSync
Only follow this step if the customer wants to set up the “Salesforce Apex Sharing” feature (which copies share records from the parent object (like
Account) to the child records (likeTag) object.Only applies to Apps v0.99.0.0 or above
Login to destination org.
Go to the Developer Console.
From the Debug menu, click Open Execute Anonymous Window.
Paste the following apex code to schedule the job to run every 15 min:
CODEPCH.SCH_ApexSharingManagerDeltaSync apexShareMgr = new PCH.SCH_ApexSharingManagerDeltaSync(); String sch1 = '0 0 * * * ?'; System.schedule('PCH.SCH_ApexSharingManagerDeltaSync || Every 15 mins || Job 1', sch1, apexShareMgr); String sch2 = '0 15 * * * ?'; System.schedule('PCH.SCH_ApexSharingManagerDeltaSync || Every 15 mins || Job 2', sch2, apexShareMgr); String sch3 = '0 30 * * * ?'; System.schedule('PCH.SCH_ApexSharingManagerDeltaSync || Every 15 mins || Job 3', sch3, apexShareMgr); String sch4 = '0 45 * * * ?'; System.schedule('PCH.SCH_ApexSharingManagerDeltaSync || Every 15 mins || Job 4', sch4, apexShareMgr);Click Execute.
Verify under Setup > Scheduled Job that the apex job
PCH.SCH_ApexSharingManagerDeltaSyncJob 1/2/3/4is scheduled to run every 15 min.
SCH_ObjMappingManager
Only follow this step, if the customer wants to set up the “Object Mapping” feature (which copying records to big object)
Login to destination org.
Go to the Developer Console.
From the Debug menu, click Open Execute Anonymous Window.
Paste the following apex code based on the scheduled time as per customer need:
For 1 AM use the following code:
CODEPCH.SCH_ObjMappingManager mgr = new PCH.SCH_ObjMappingManager(); System.schedule('PCH.SCH_ObjMappingManager || Daily 5 AM', '0 0 5 * * ? *', mgr);For 12:10 AM use the following code:
CODEPCH.SCH_ObjMappingManager mgr = new PCH.SCH_ObjMappingManager(); System.schedule('PCH.SCH_ObjMappingManager || Daily 12:10 AM', '0 10 0 * * ? *', mgr);Click Execute.
Verify under Setup > Scheduled Job that the apex job
PCH.SCH_ObjMappingManageris scheduled to run daily at the respective time.
SCB_TransactionObjectSyncCountBatch
Only applies to Apps v0.101.0.0 or above
Login in destination org, access setup
Go to Apex classes, click the Schedule Apex button
Set SCB_TransactionObjectSyncCountBatch, weekly, everyday at 6AM
Alternatively, you can use the below code in the developer console → Execute Anonymous:
PCH.SCB_TransactionObjectSyncCountBatch b = new PCH.SCB_TransactionObjectSyncCountBatch();System.schedule('PCH.SCB_TransactionObjectSyncCountBatch || Daily 6 AM', '0 0 6 * * ? *', b);
SCB_TransactionObjectSyncDaysBatch
Only applies to Apps v0.101.0.0 or above
Login in destination org, access setup
Go to Apex classes, click the Schedule Apex button
Set SCB_TransactionObjectSyncDaysBatch, weekly, everyday at 7AM
Alternatively, you can use the below code in the developer console → Execute Anonymous:
PCH.SCB_TransactionObjectSyncDaysBatch b = new PCH.SCB_TransactionObjectSyncDaysBatch();System.schedule('PCH.SCB_TransactionObjectSyncDaysBatch || Daily 7 AM', '0 0 7 * * ? *', b);
Step 4 - Sharing Setting (OWD) for Apex Managed Sharing
Only follow this step if the customer wants to set up the “Salesforce Apex Sharing” feature (which copies share records from the parent object (like
Account) to the child records (likeTag) object.Go to Setup > Sharing Setting > Edit.
Based on the current client environment, change the Default Internal Sharing to
Privatefor the following objects:AccountTag__c
Now, go to Setup > Custom Metadata Types > Apex Managed Sharing Setting
And check the
Activecheckbox forTagrecord.
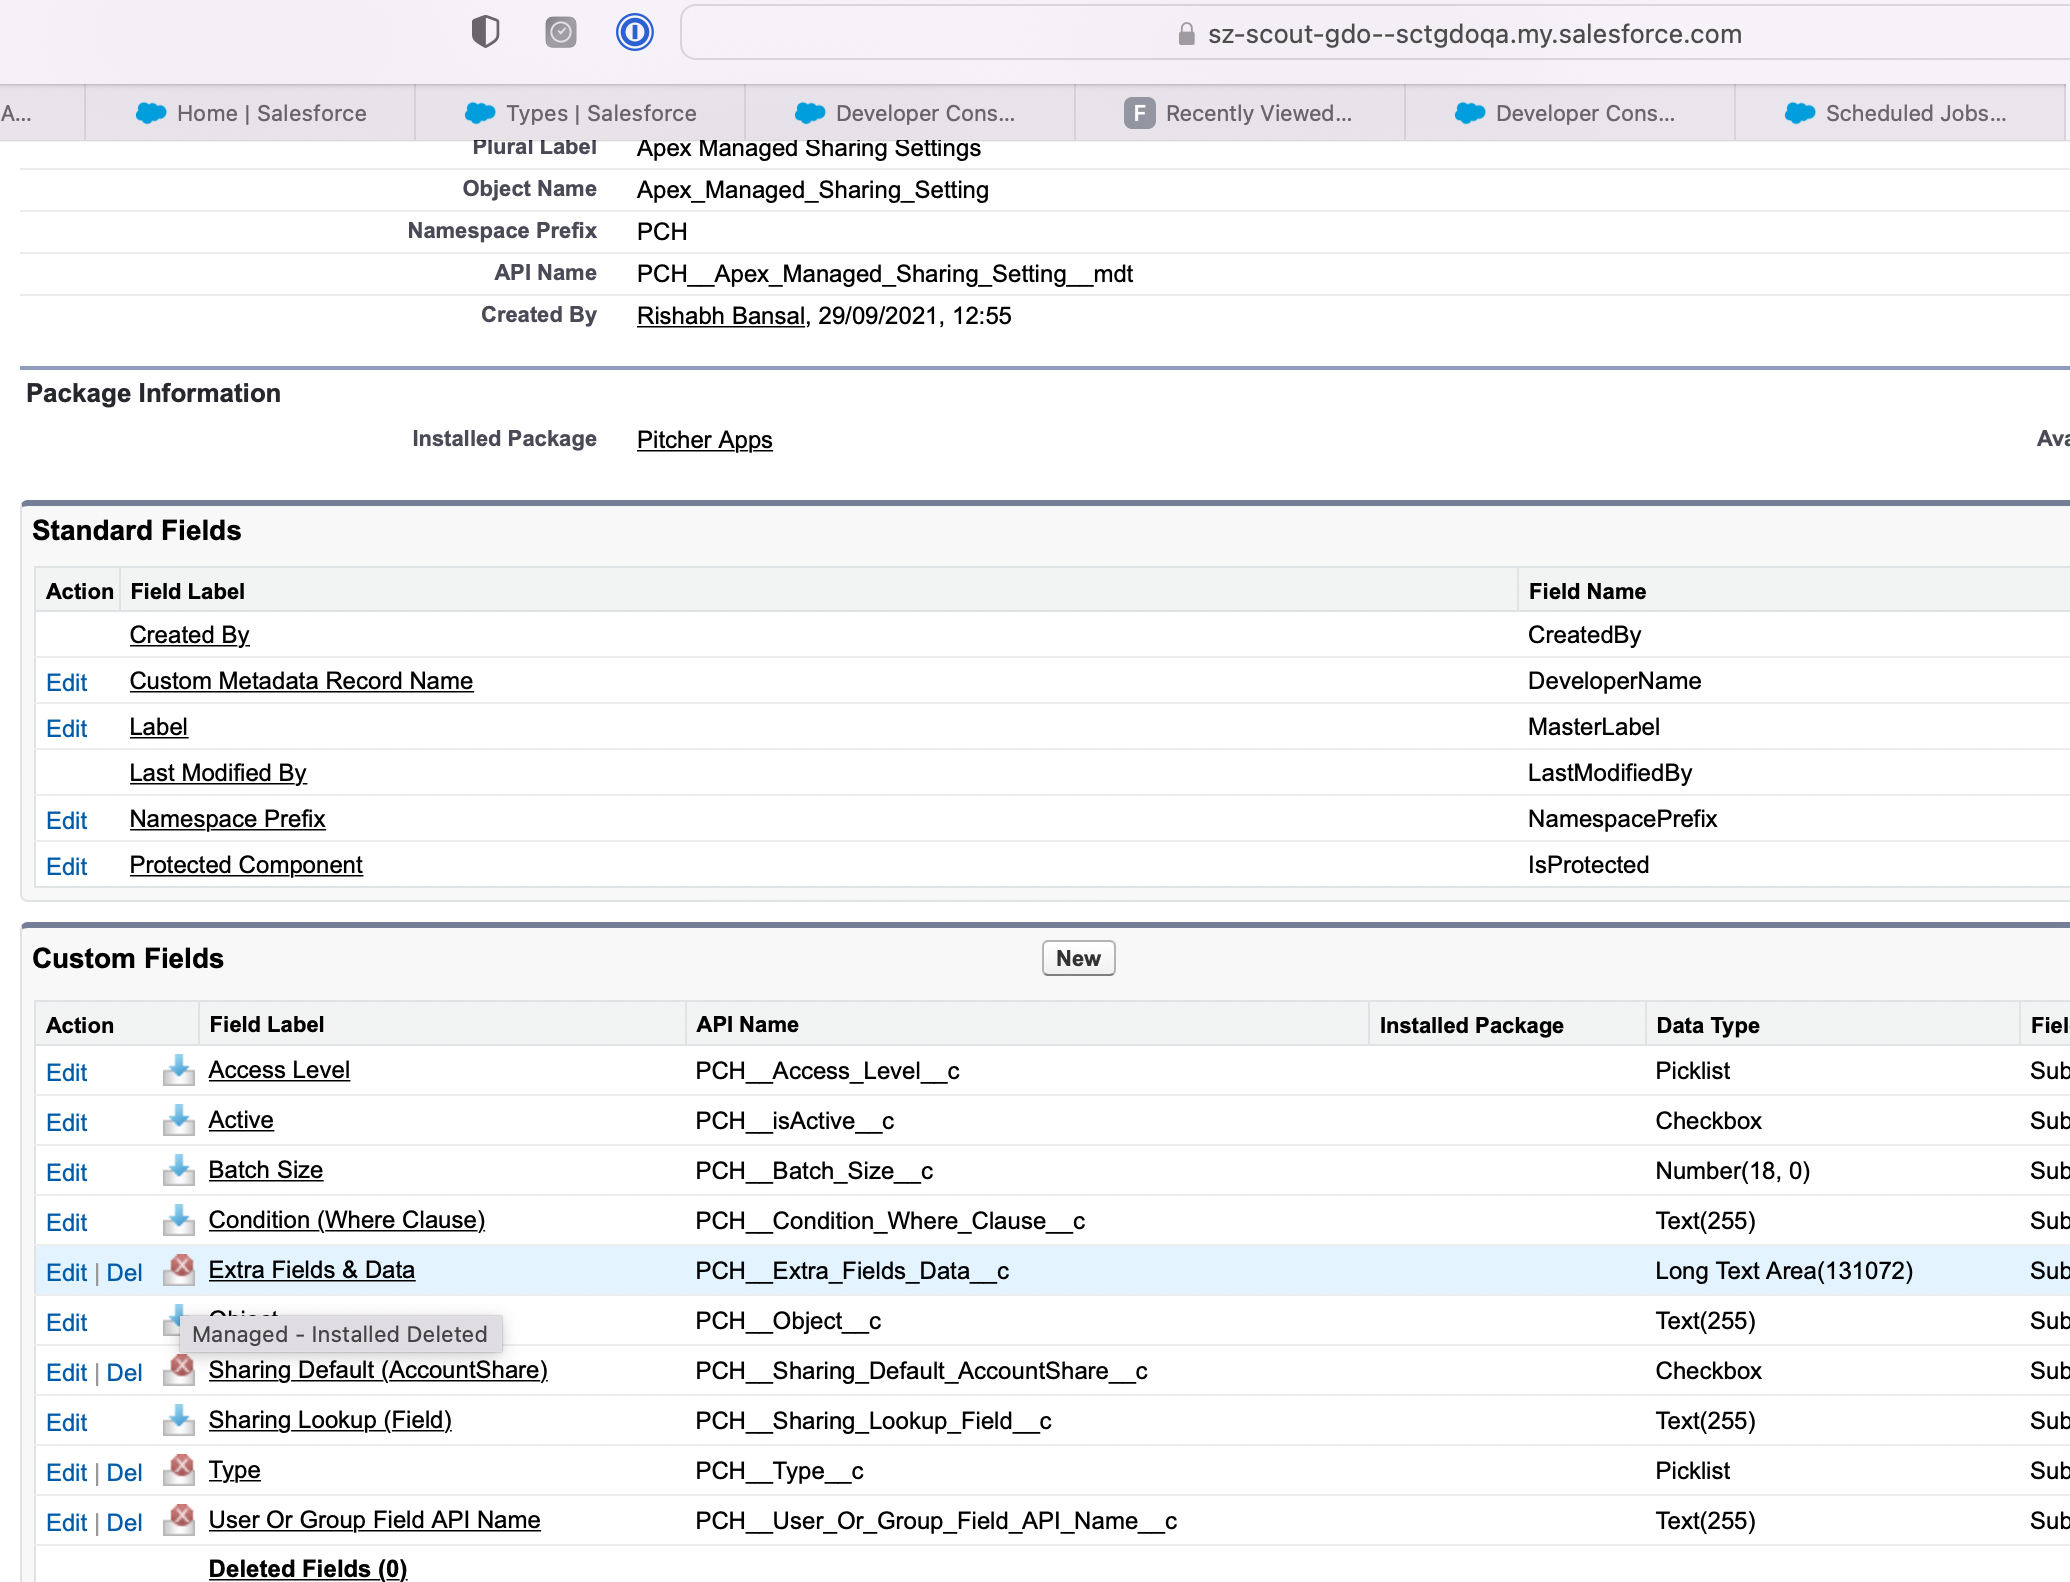
Step 5 - Remove “Managed - Installed Deleted” components
Go to Setup > Custom Metadata Types > Apex Managed Sharing Settings.
Follow the screenshot below.
If fields are AVAILABLE for deleting from the package
click Del for Managed - Installed Deleted fields and the validation rule.
If fields are NOT available for deleting, ignore this step
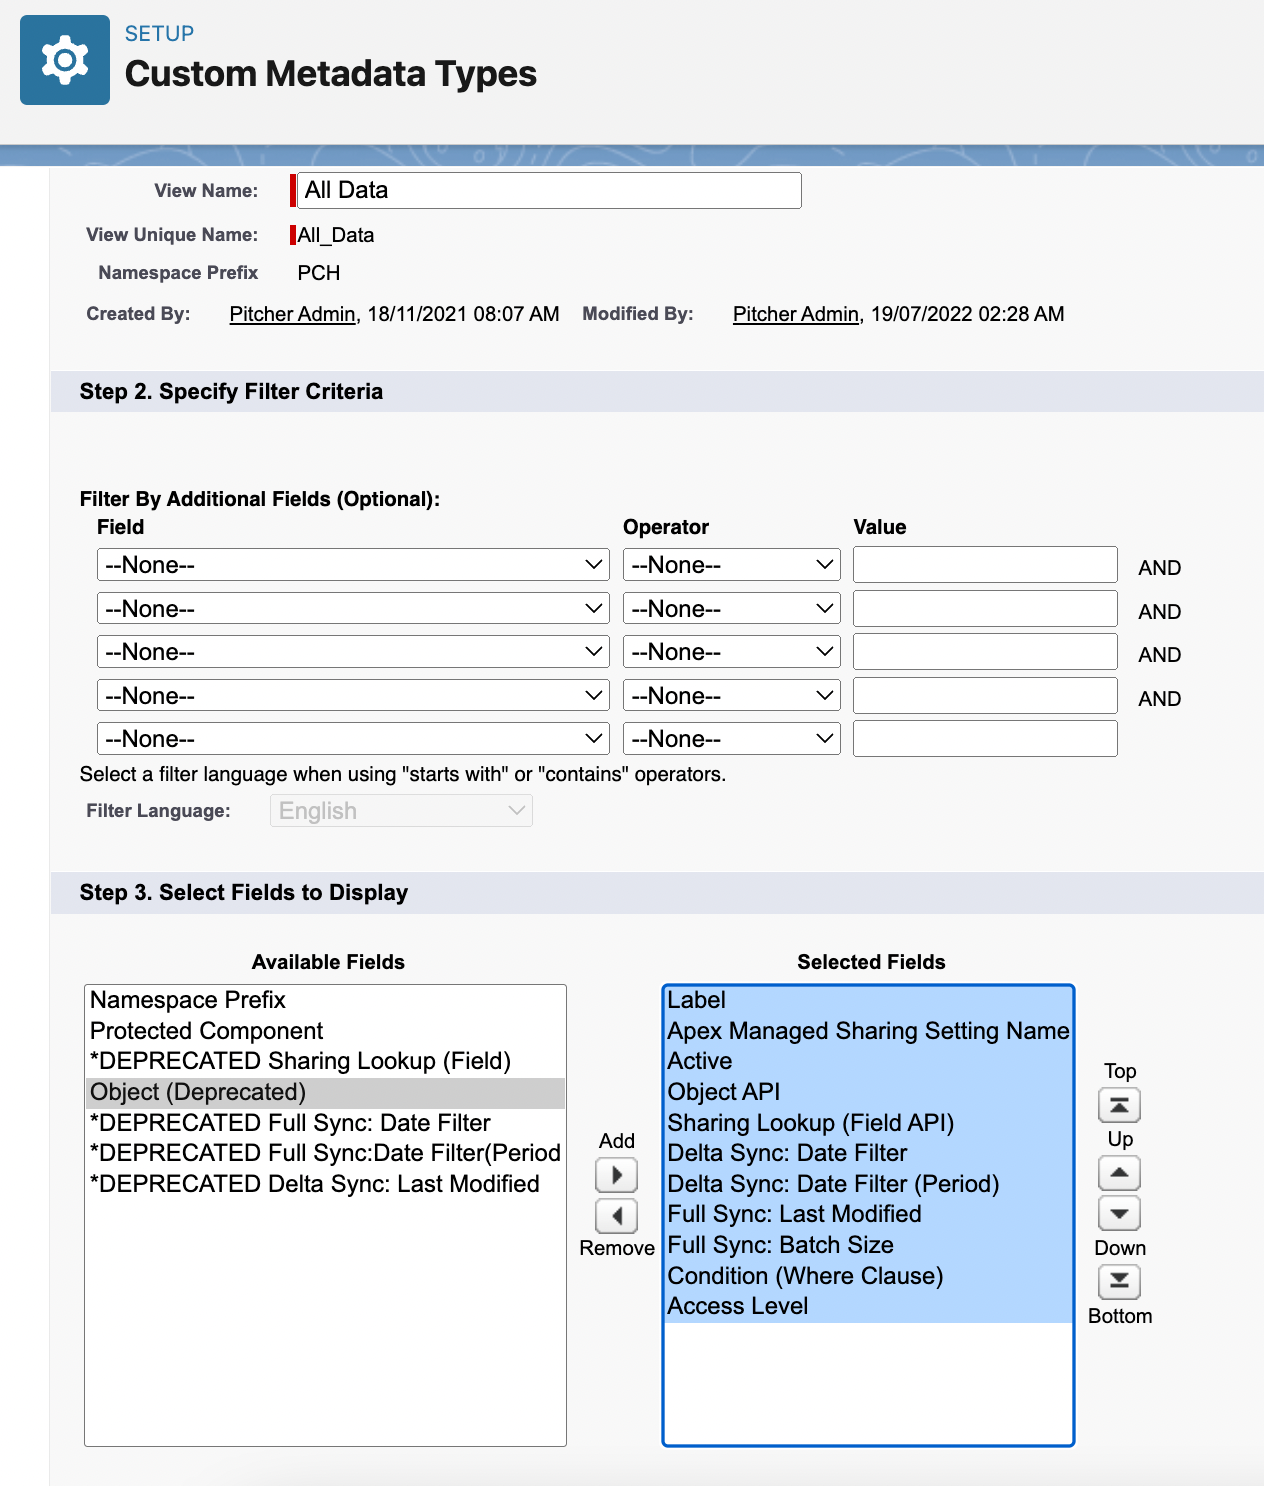
Step 6 - Update List View for “Apex Managed Sharing Settings”
This is a one-time manual step after upgrading to Apps 0.101 or higher
Setup → Custom Metadata Types
Click “Manage” for “Apex Managed Sharing Settings“
Now click “Edit” for the List View named “All Data”
Match the below “Selected Fields”, move deprecated fields to “Available Fields” and save
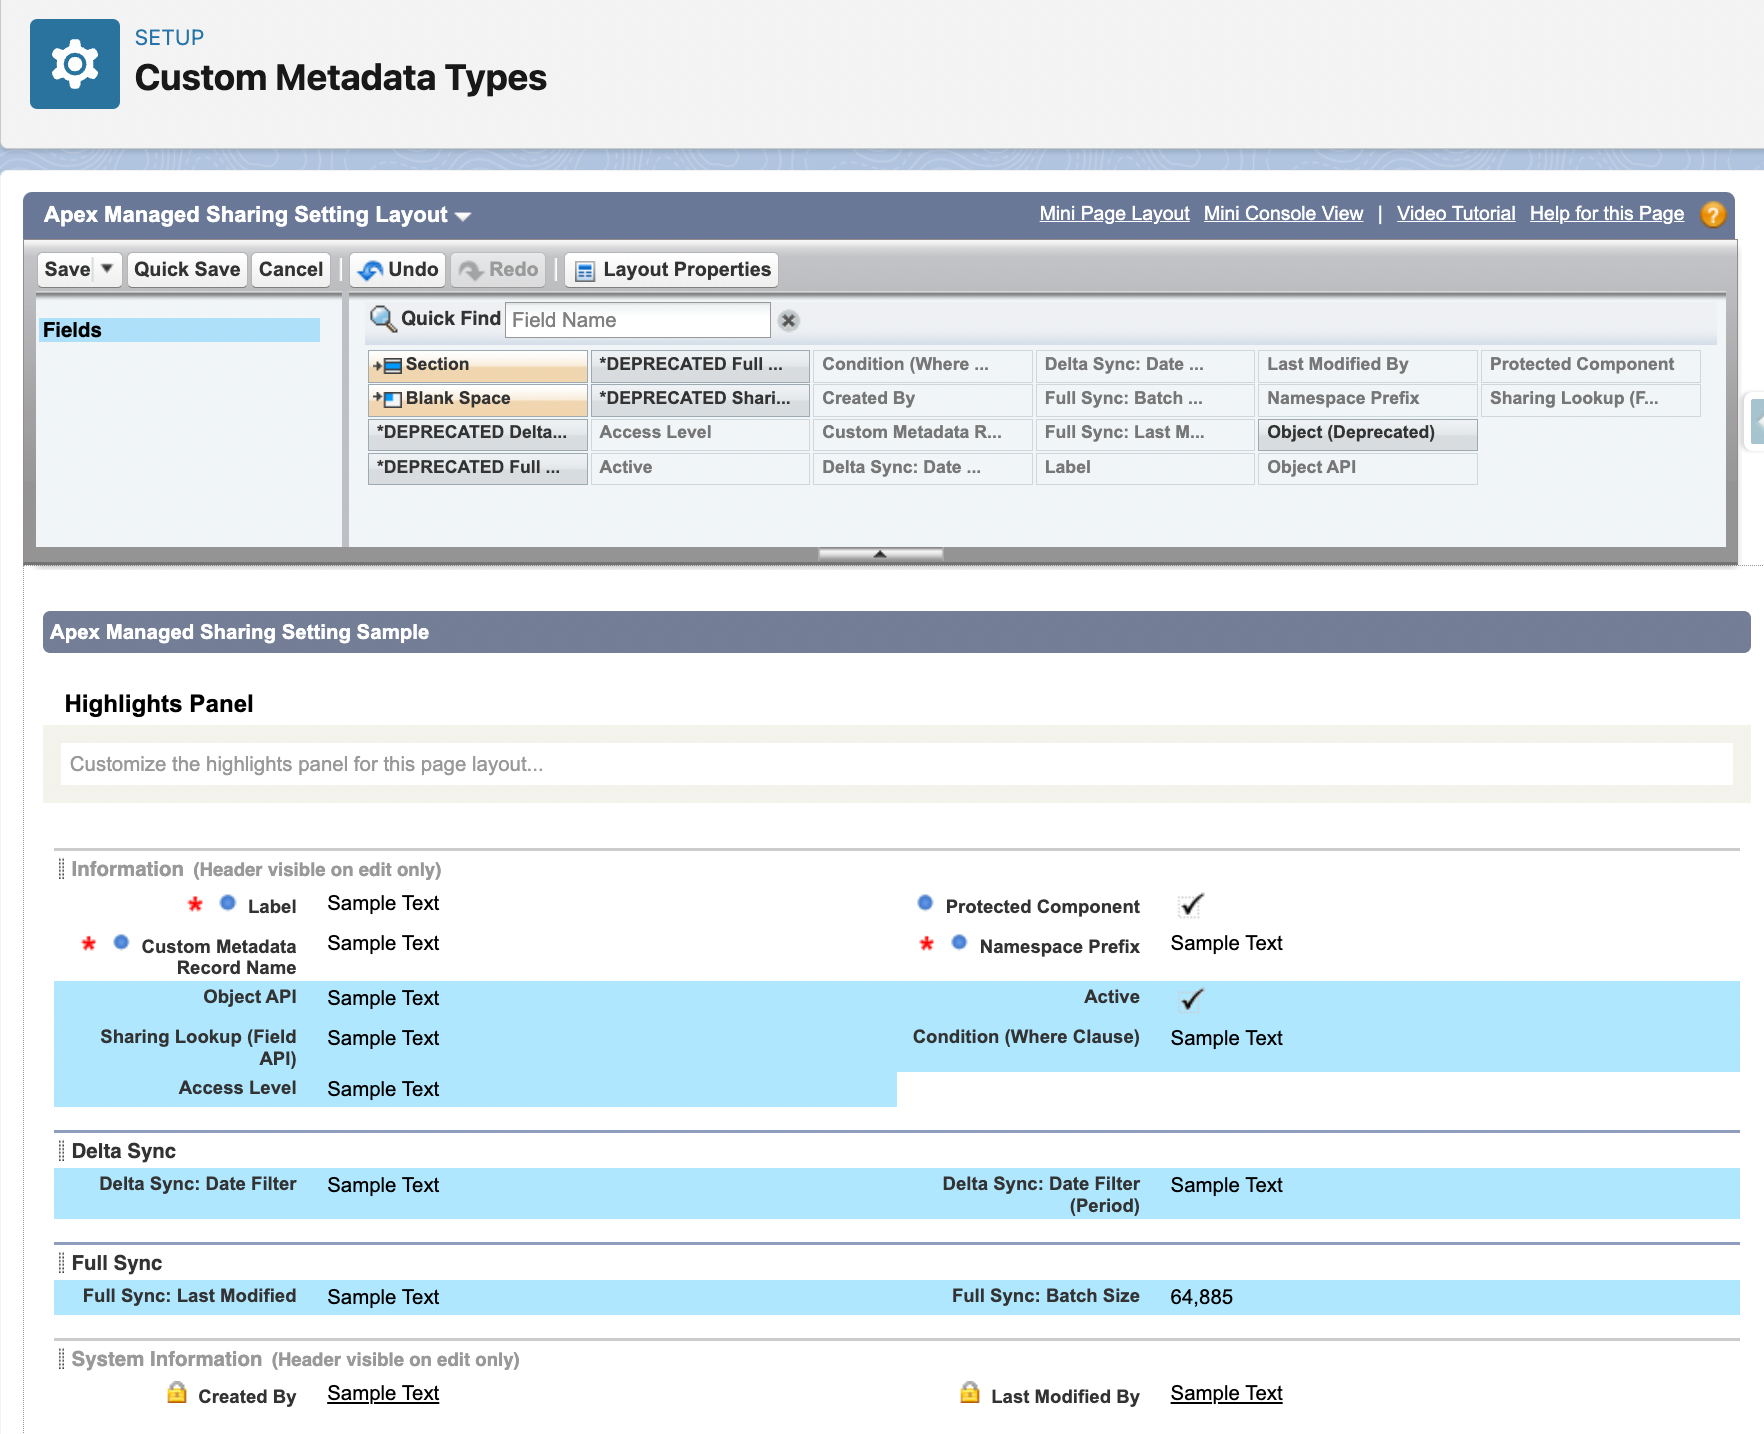
Step 7 - Update Page Layouts
1 - Update Page Layout for “Apex Managed Sharing Settings”
This step is needed only once after the upgrade
This is a one-time manual step after upgrading to Apps 0.101 or higher
Setup → Custom Metadata Types
Click “Apex Managed Sharing Settings”
Page Layouts → Click “Edit” for “Apex Managed Sharing Setting Layout”
Match the layout as below
Add two new sections “Full Sync”, and “Delta Sync“
Add drag new fields in new sections and below
Drag and remove deprecated fields from the layout
and save
2 - Update Page Layout “Tag Builder Layout”
This step is needed only once after the upgrade.
This is one time manual step when upgrading to Apps 0.102 or higher
Go to Setup → Object Manager → Tag → Layouts
Click “Edit” next to “Tag Builder Layout.”
Remove field Allocation Logic, click save and yes (overrides user’s local modifications)
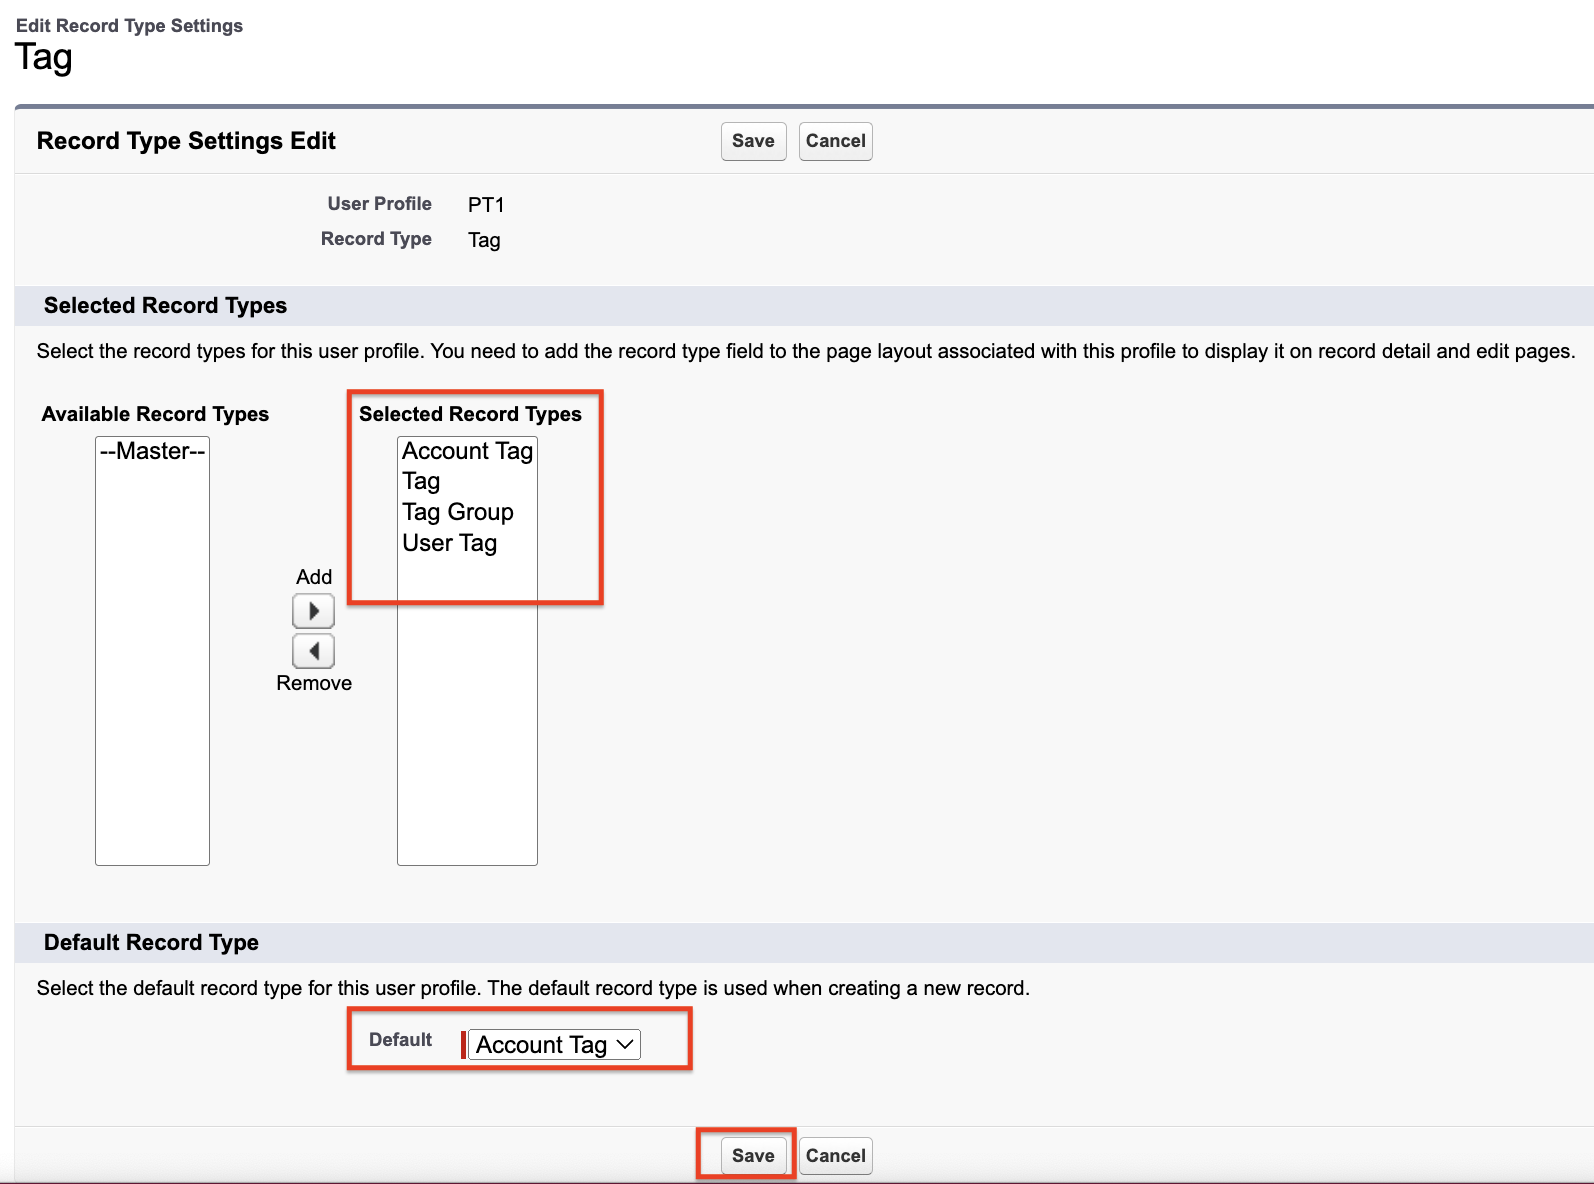
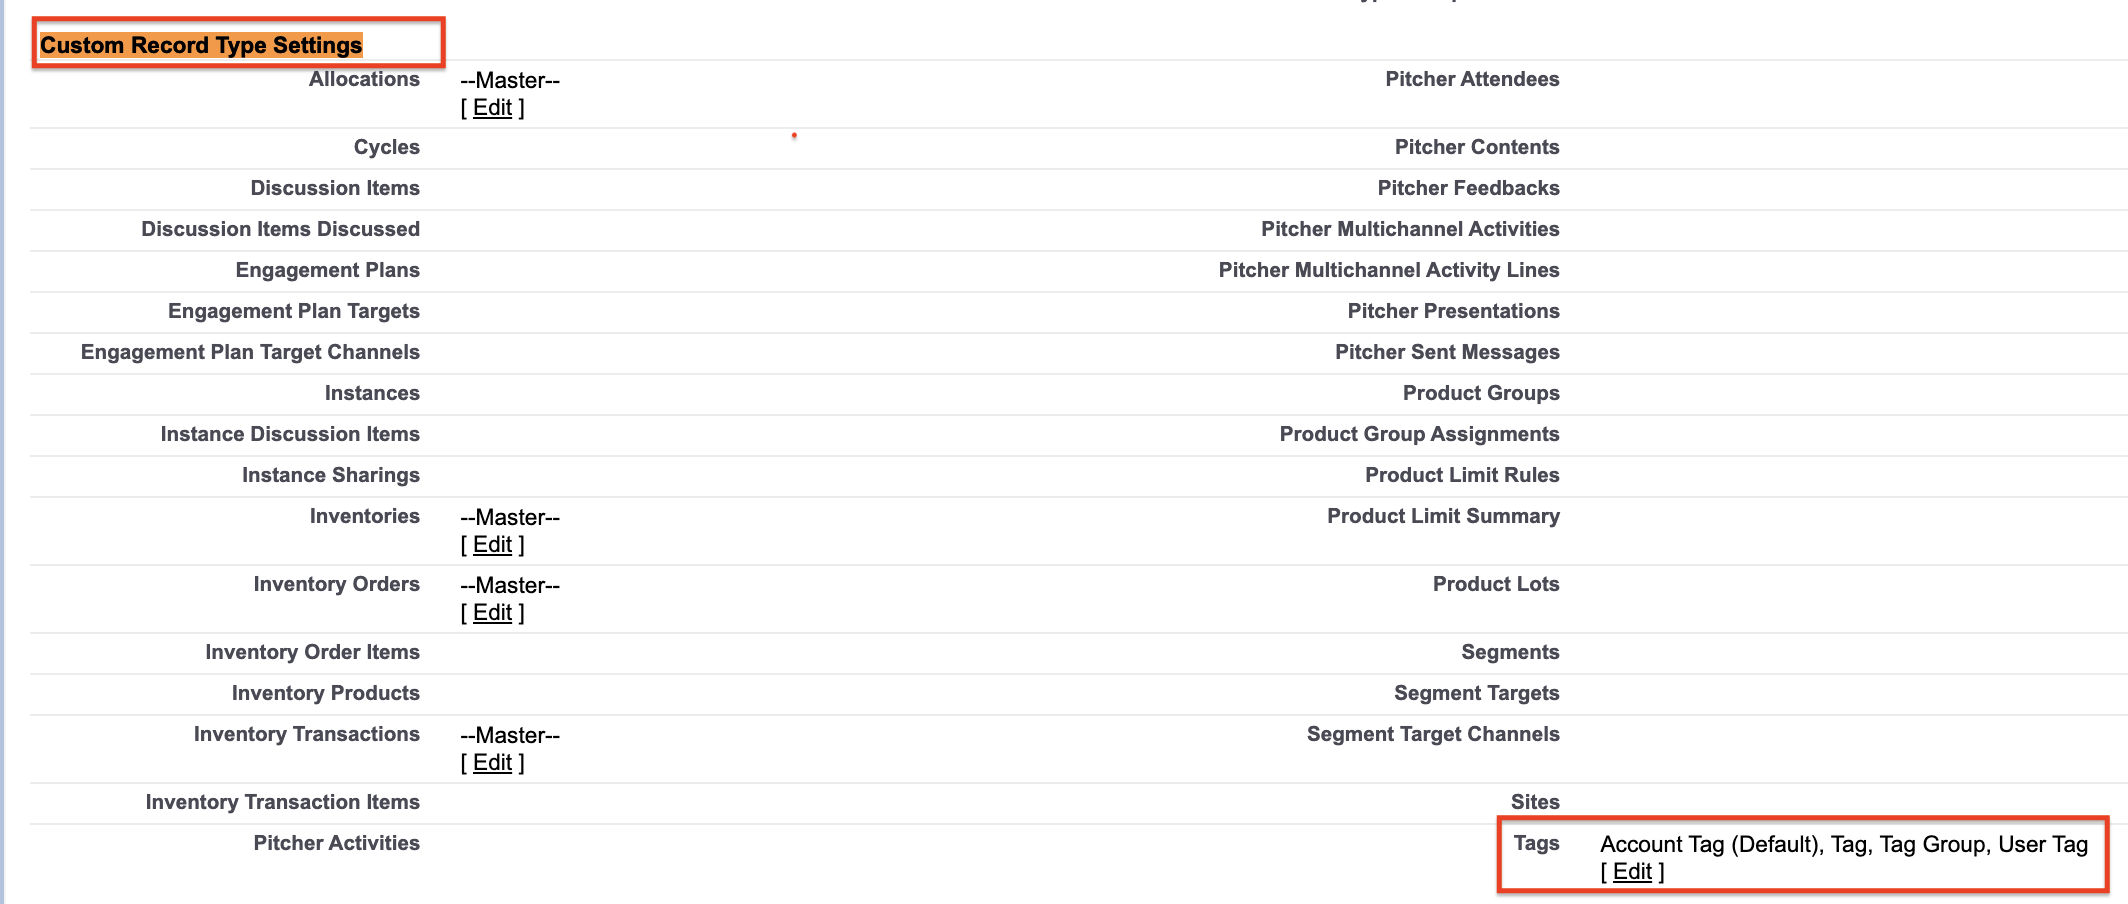
Step 8 - Record Type Permissions & Assignments
1 - Tag Record Type
Setup → Profile → Select the desired profile in the Subscriber org
On the selected profile → Go to “Custom Record Type Settings”
Click “Edit” on Tags and ensure that all record types are selected and save
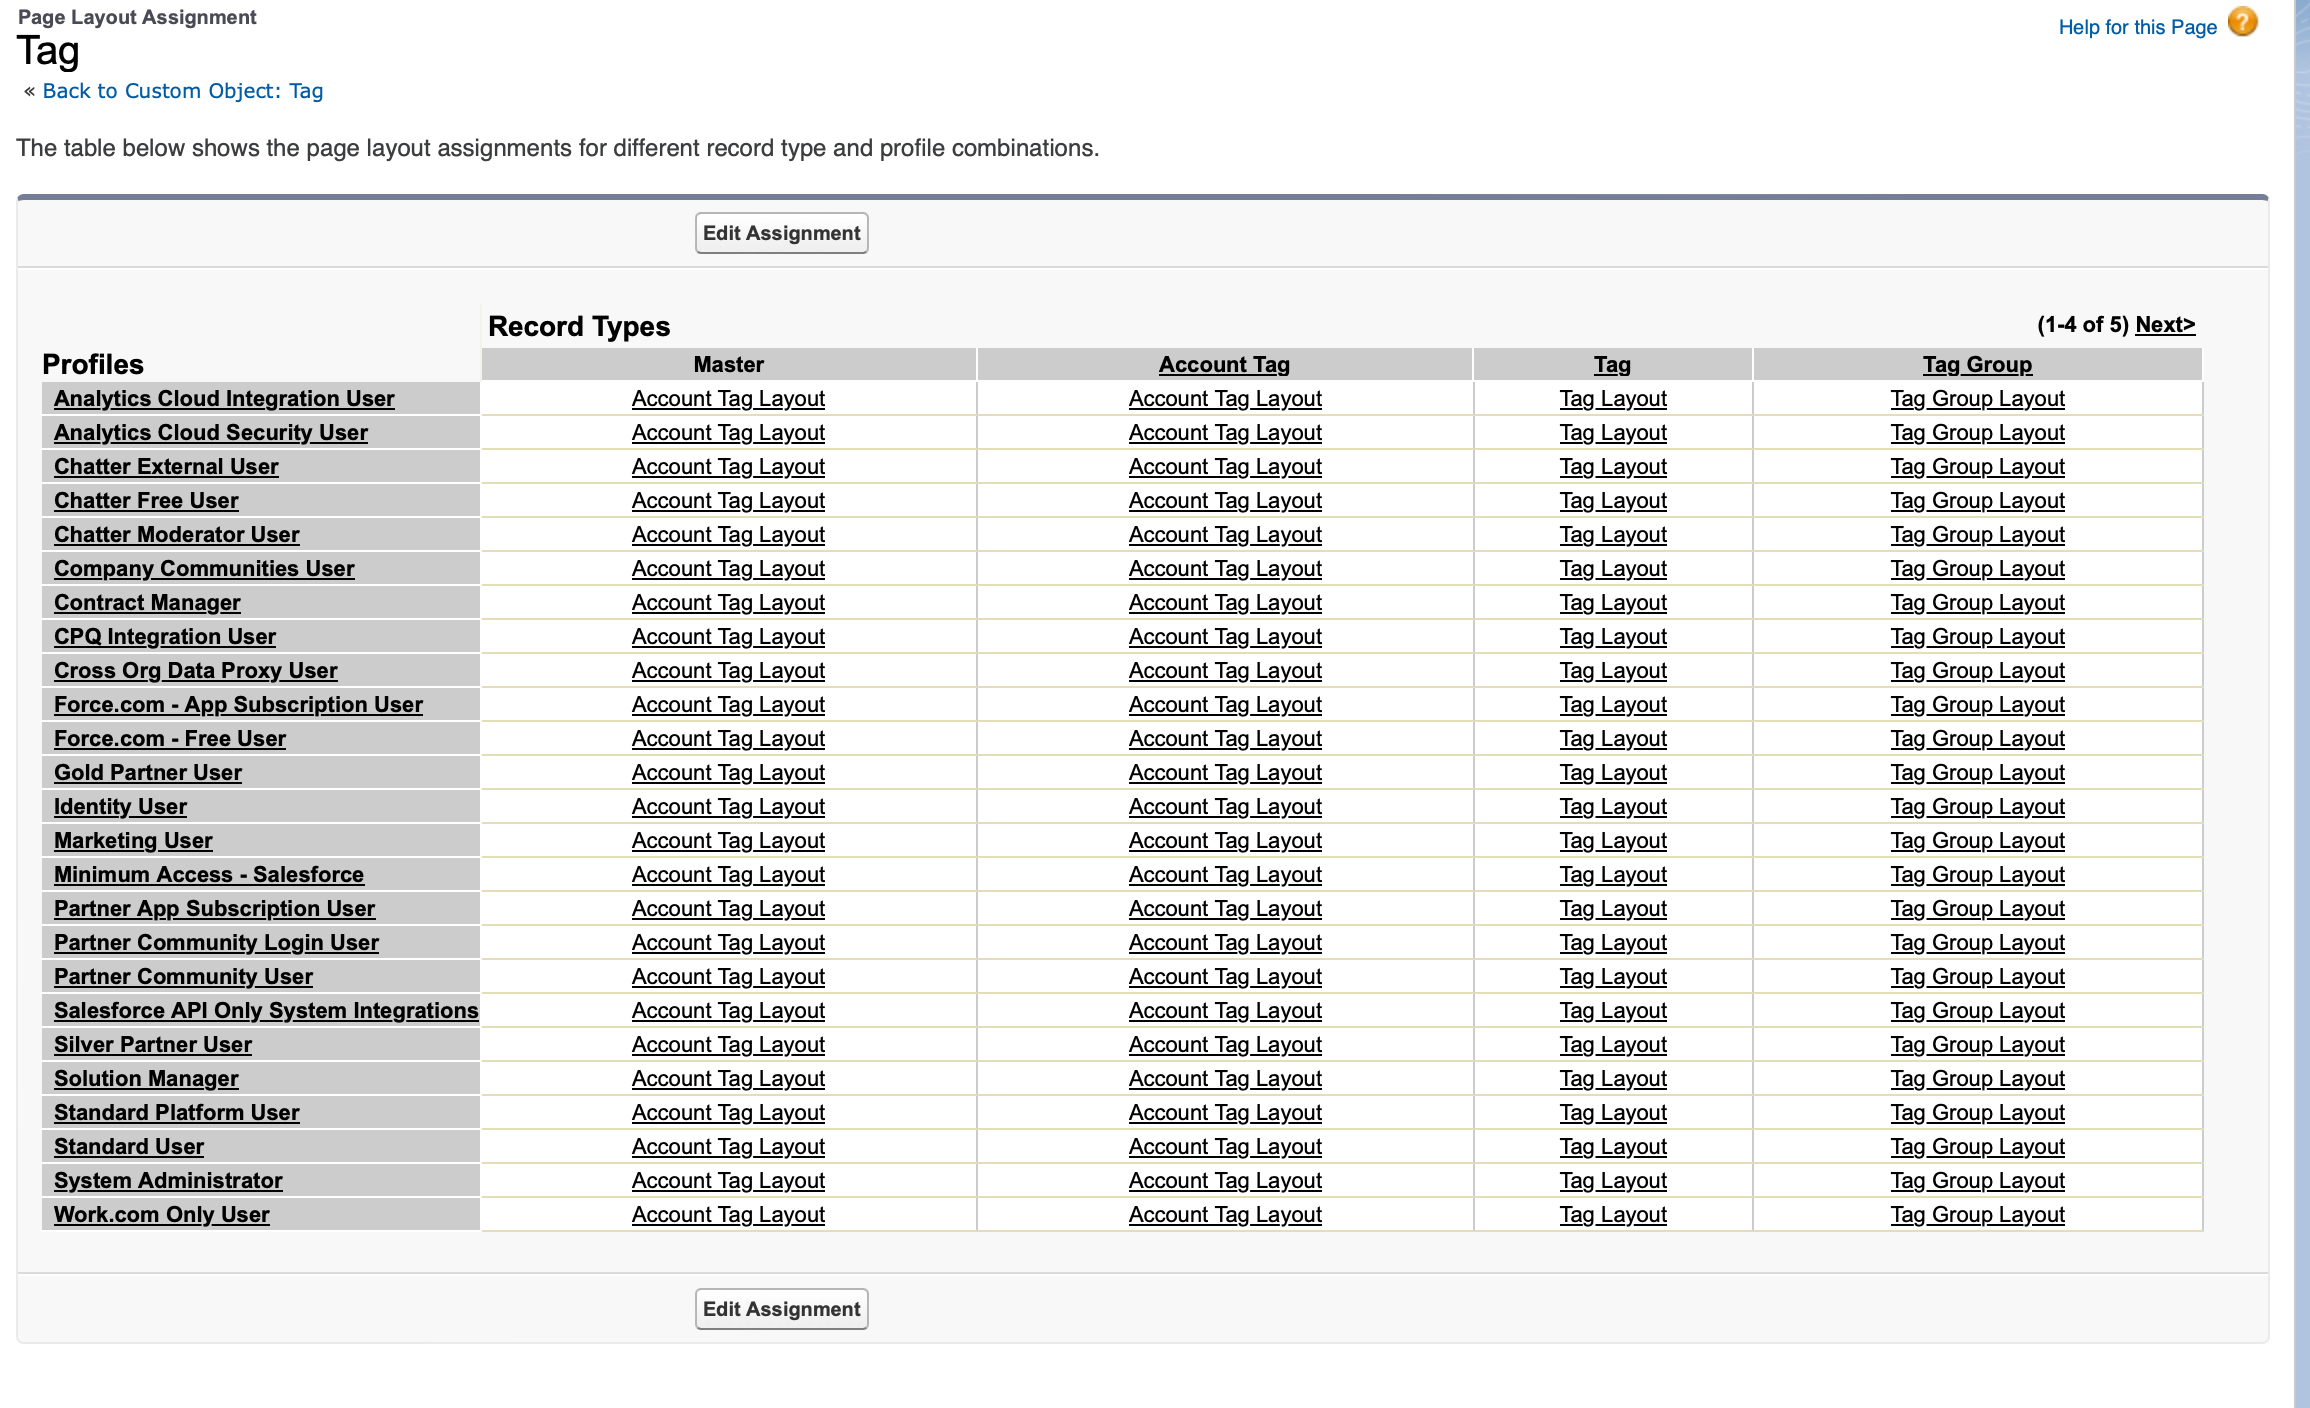
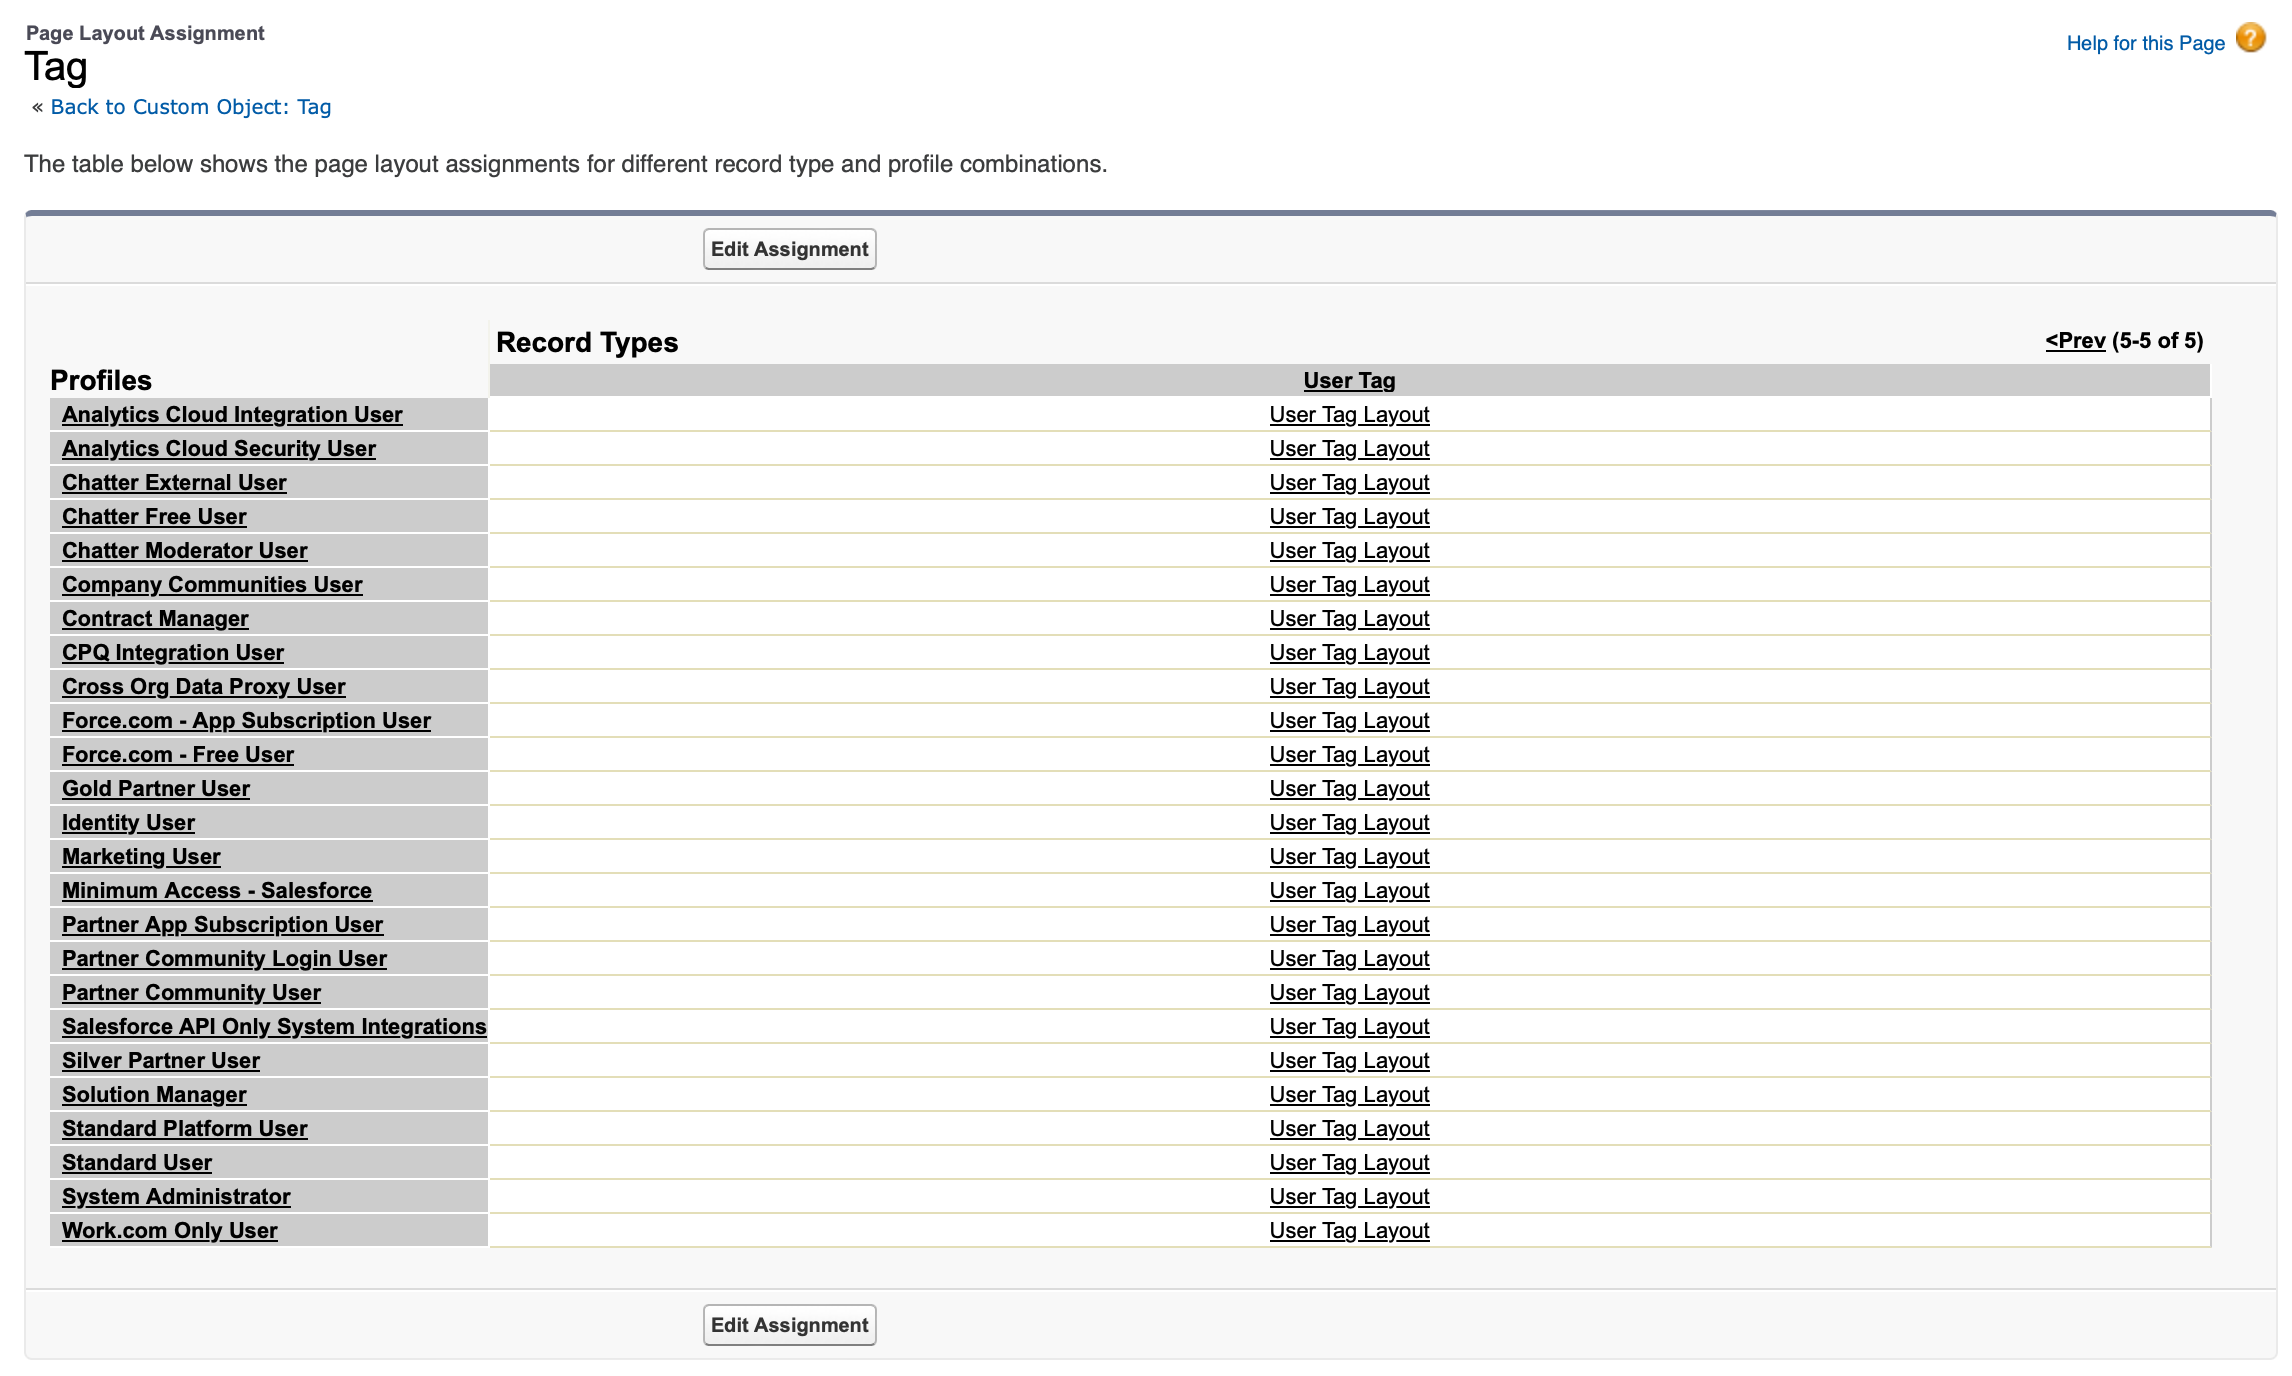
Now go to Object Manager → Select “Tag” → Go to “Record Types”
Click on “Page Layout Assignments” → “Edit Assignments” and select the assignments as below -
Account Tag → Account Tag Layout
Tag → Tag Layout
Tag Group → Tag Group Layout
User Tag → User Tag Layout
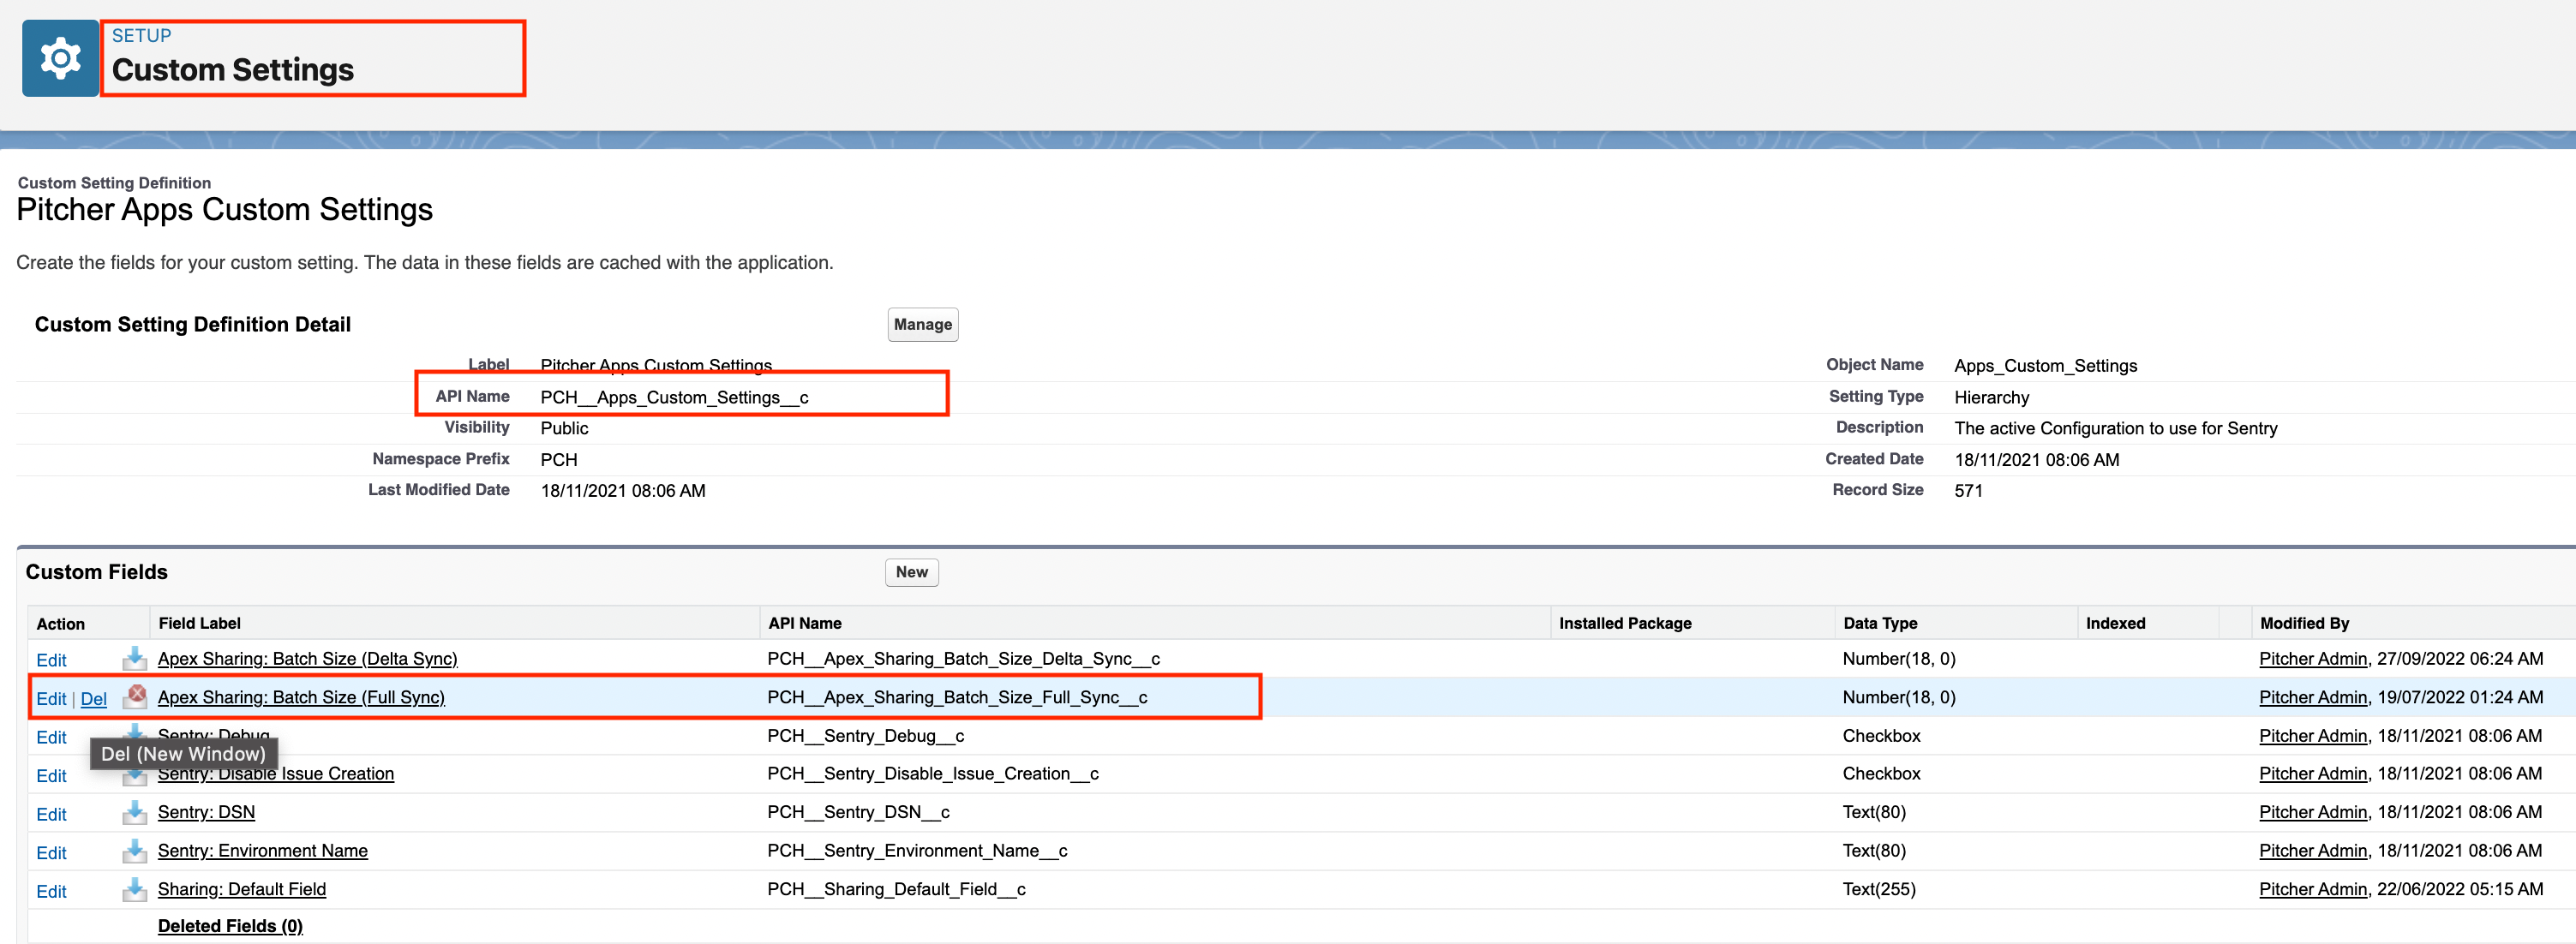
Step 9 - Delete the custom setting field.
This step is only valid while upgrading to Pitcher Apps 0.113
Set up → Custom Setting
Search → Pitcher Apps Custom Settings (PCH__Apps_Custom_Settings__c)
Now click delete (as per the screenshot below) for the below fields, which are deleted from the package but still available in the subscriber org -
Field 1 (Managed - Installed Deleted) -
Label Name - Apex Sharing: Batch Size (Full Sync)
API Name - PCH__Apex_Sharing_Batch_Size_Full_Sync__c
Step 10 - Updating action New configuration on Tag object
If you are installing (first time) any higher version than v0.121.0.0 then skip this step
If you are upgrading to v0.121.0.0 or the higher version only then follow this step
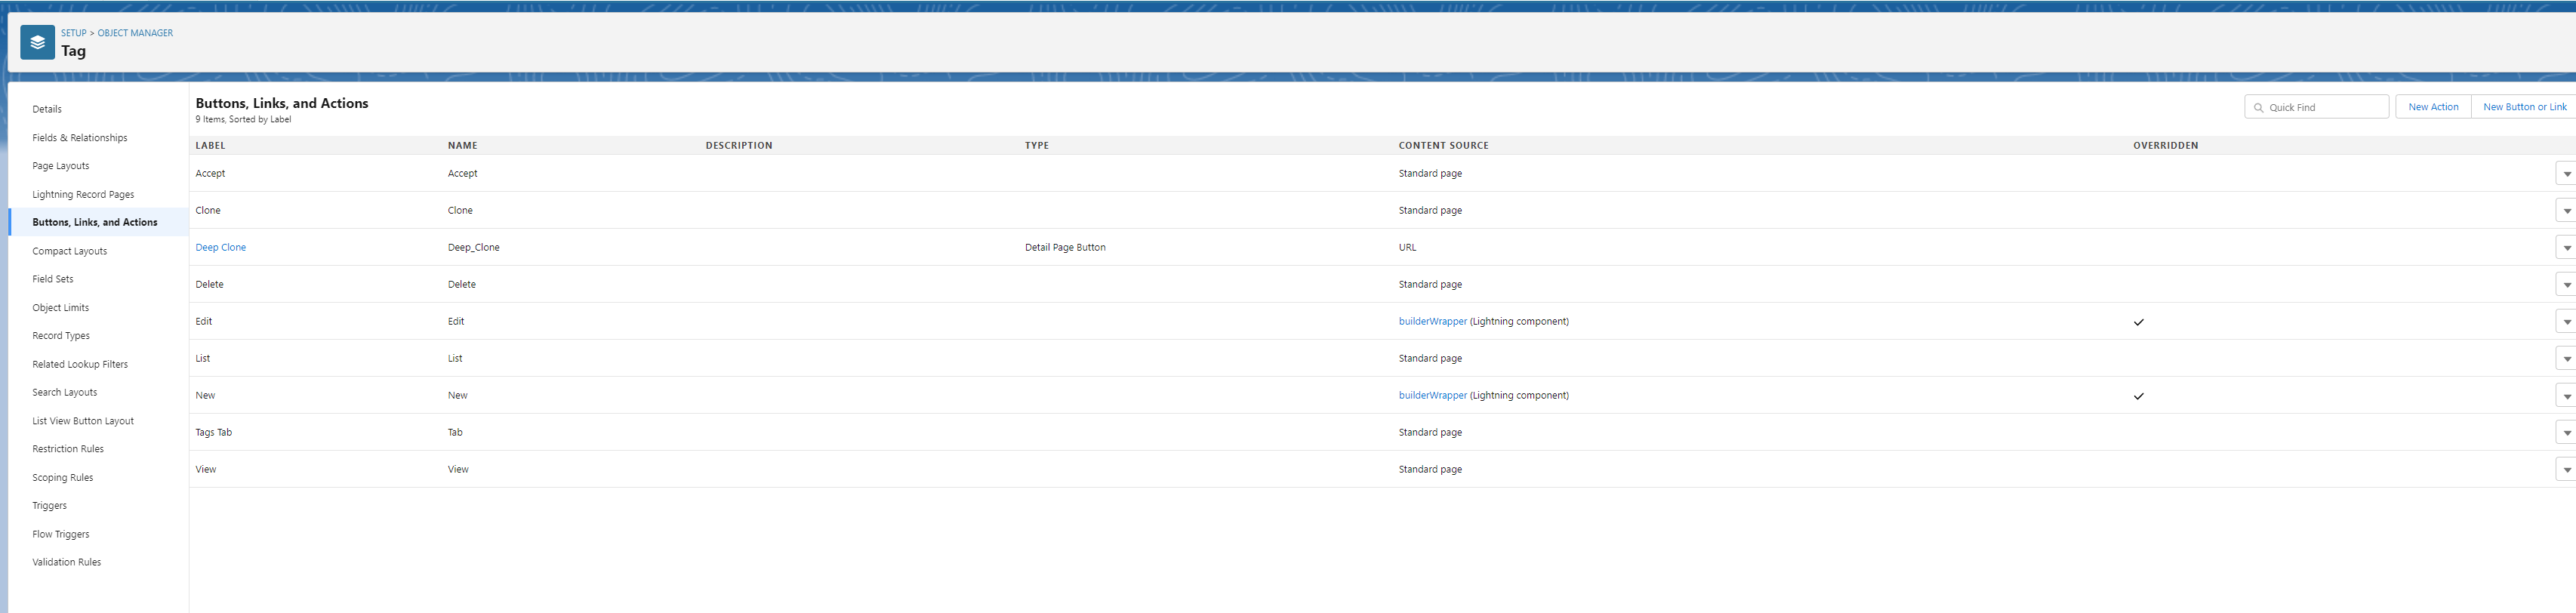
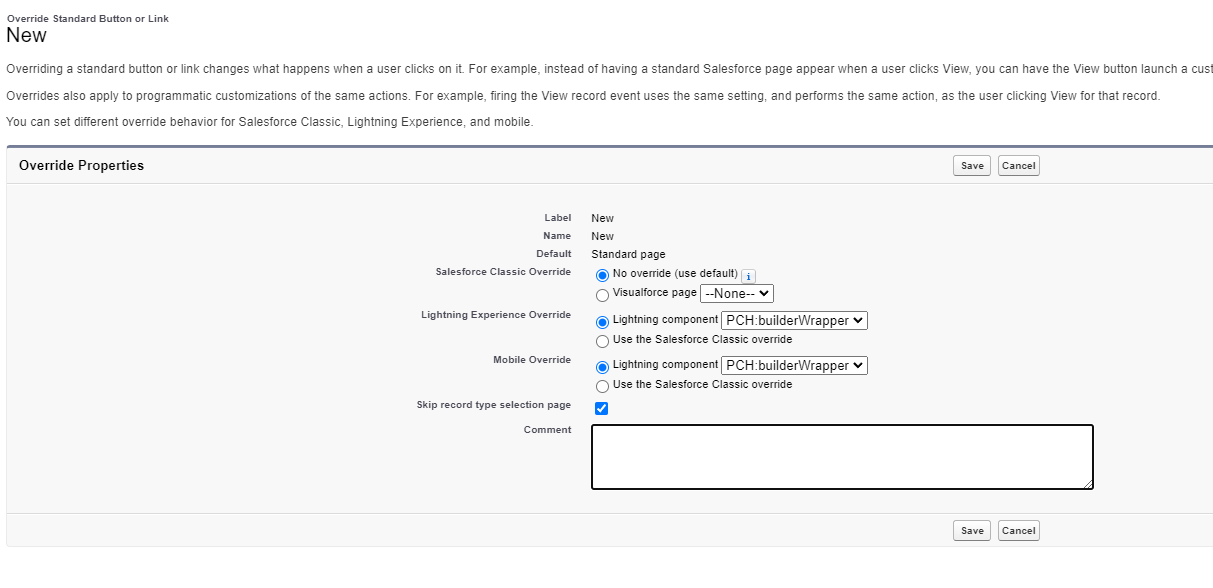
Go to Setup → Object Manager → Tag → Buttons, Links and Actions
Click triangle next to “New” → Edit
Check “Skip record type selection page” checkbox and click Save
Deprecated Steps
Post Installation Steps
1 - Schedule Apex Jobs
SCB_ApexSharingManager (v0.108.0.0 or below)
Login to destination org.
Go to the Developer Console.
From the Debug menu, click Open Execute Anonymous Window.
Paste the following apex code:
CODEPCH.SCB_ApexSharingManager mgr = new PCH.SCB_ApexSharingManager(); System.schedule('PCH.SCB_ApexSharingManager || Everyday 1 AM', '0 0 1 * * ? *', mgr);For testing, it can be scheduled earlier. For example, to schedule it at 12:10 AM, use the following code:
CODEPCH.SCB_ApexSharingManager mgr = new PCH.SCB_ApexSharingManager(); System.schedule('PCH.SCB_ApexSharingManager || Everyday 12:10 AM', '0 10 0 * * ? *', mgr);Click Execute.
Verify under Setup > Scheduled Job that the apex job
PCH.SCB_ApexSharingManageris scheduled to run daily at 1 am.