Installing the Zero Managed Package
Installation
Let us go through the below steps to install or upgrade the Pitcher Zero managed package in Salesforce.
Enter the Zero managed package installation link in a new browser window. This should redirect you to the login page of Salesforce.com. For Sandbox organizations, swap http://login.salesforce.com with http://test.salesforce.com in the URL.
Check the Third Party Access and click on Continue (Follow only for
Pitcher Zero v1.35. For higher versions, this step will be skipped automatically)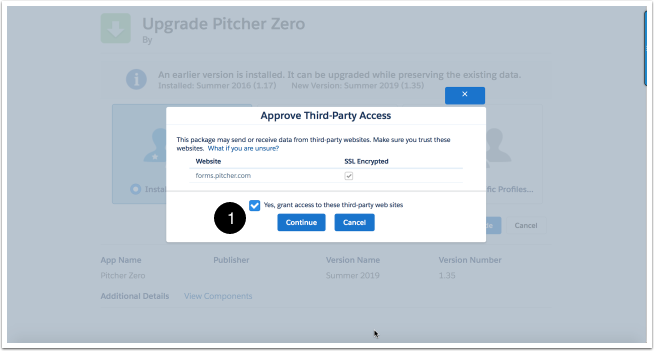
Approve Third-party Access
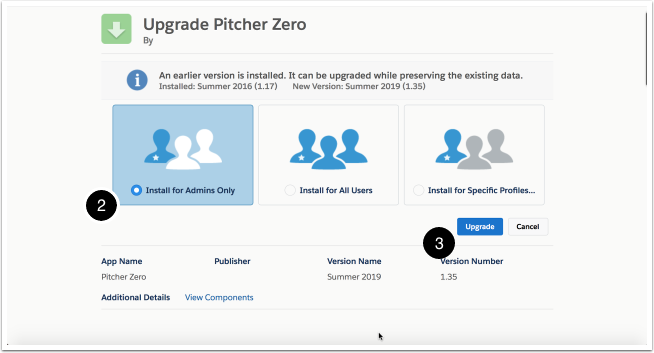
Select Install for Admins Only, or Install for All Users, or Install for Specific Profiles, depending on the need.
Pitcher Zero Installation
To verify the package components before installation/upgrade, click on the “View Components” link
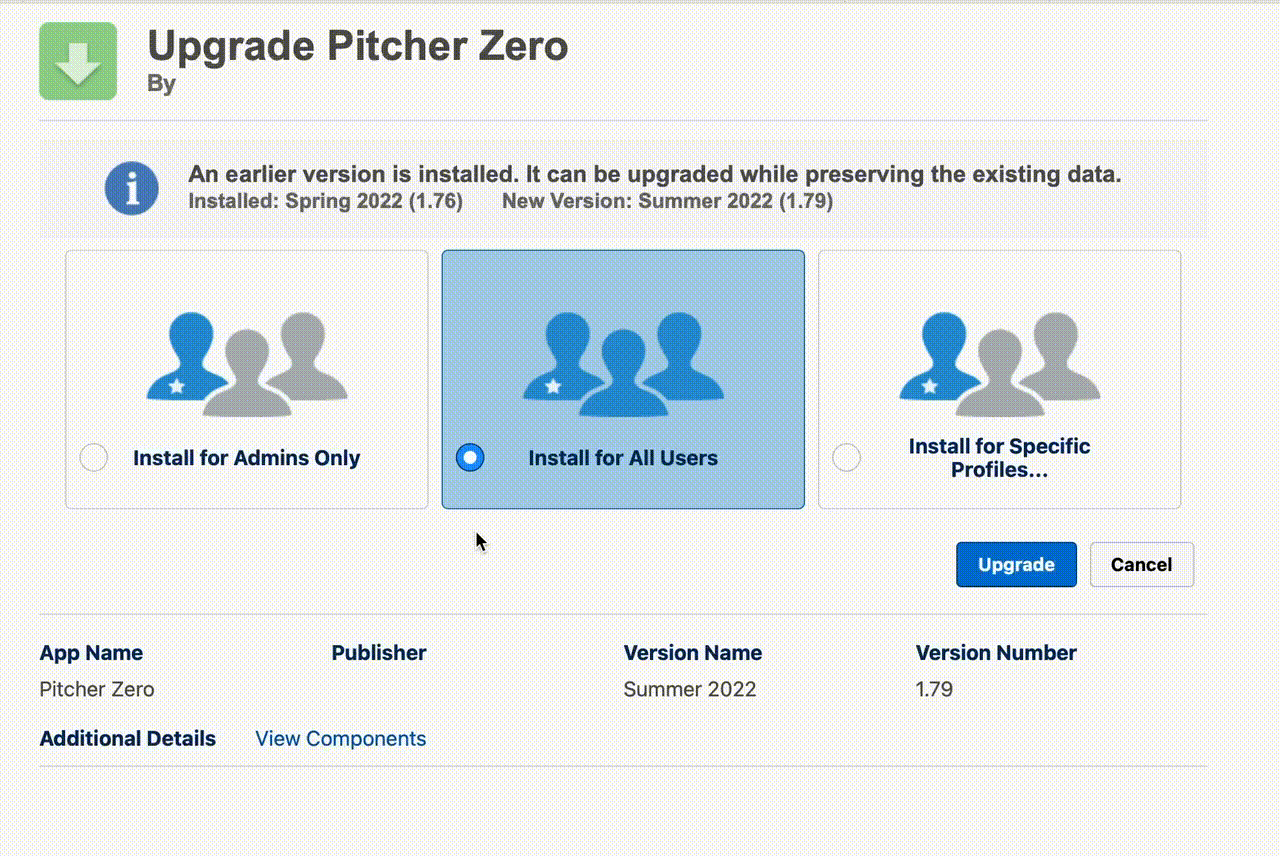
Check the acknowledgment and click Install or Upgrade to proceed.
Once installation is completed, the following screen appears:
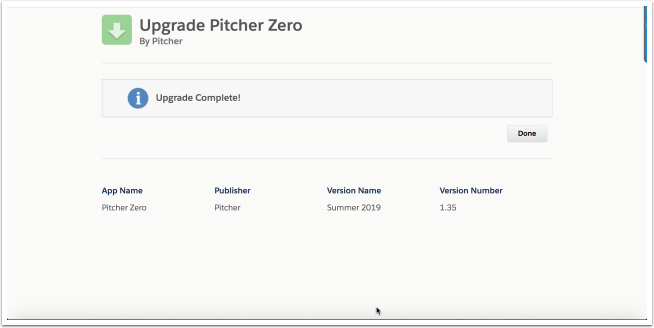
Complete Installation
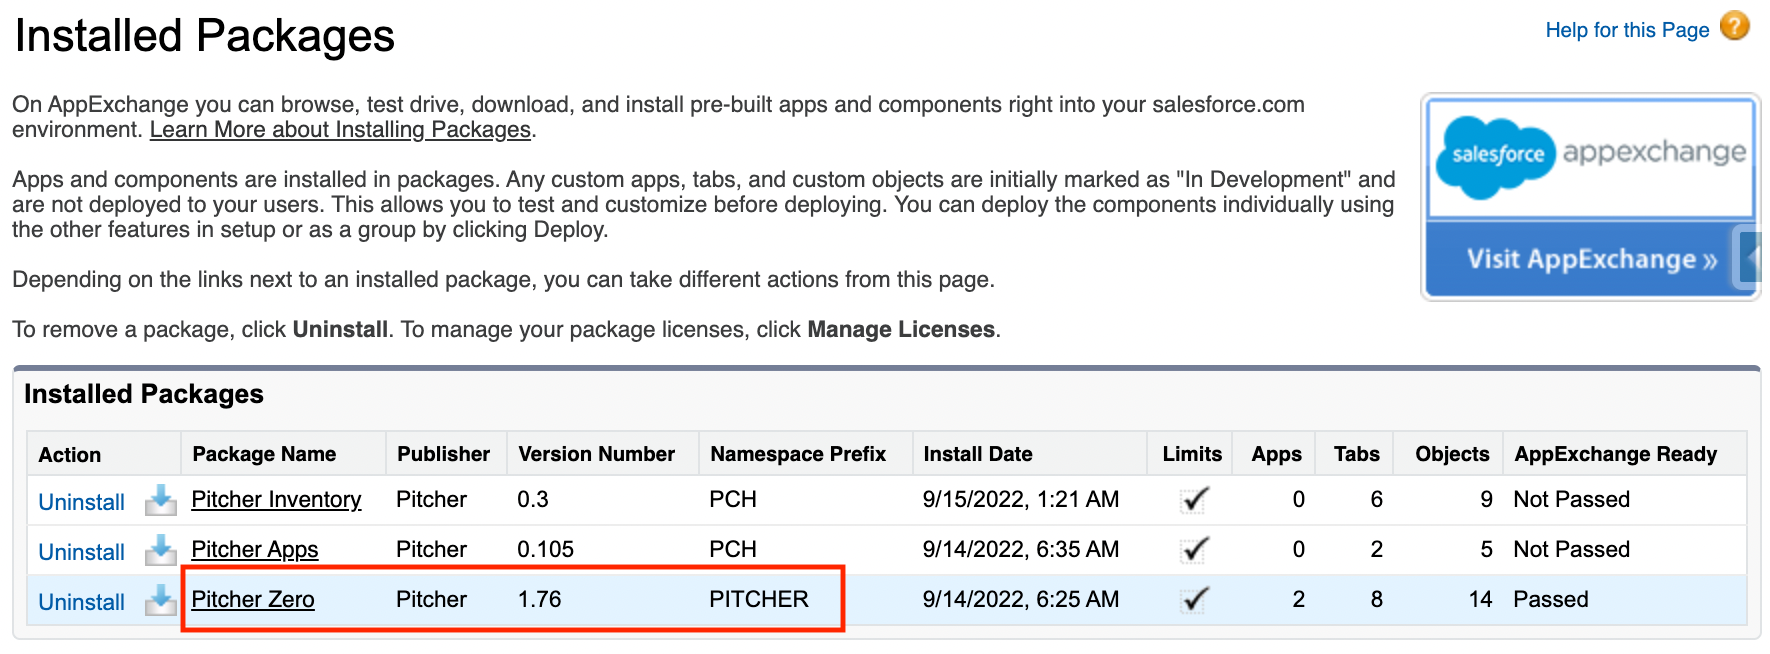
Check the installed packages on the Setup > Apps > Packaging > Installed Packages page to confirm the successful installation.
To verify the package components after a successful installation/upgrade, follow the steps shown below -

Post Deployment
Follow these steps after installing the Pitcher Zero managed package:
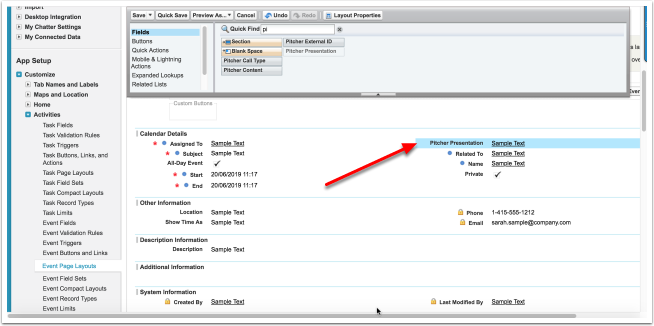
Step 1 - Add Pitcher Presentation Field to Events Layout
Go to Setup > Customize > Activities > Event Page Layouts.
Select the Event Layout page layout and click Edit.
Add the Pitcher Presentation field.
Note: In Lightning mode, search in Object Manager > Event.
Add Presentation Field
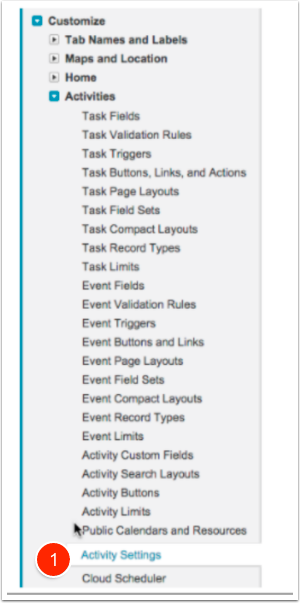
Step 2 - Configure Activity Settings
Go to Setup >Customize >Activities >Activity Settings.
Navigate to the Activity Settings page
Select Allow Users to Relate Multiple Contacts to Tasks and Events to activate, as shown in the screenshot below. You can not install the Pitcher Zero package without enabling this option.
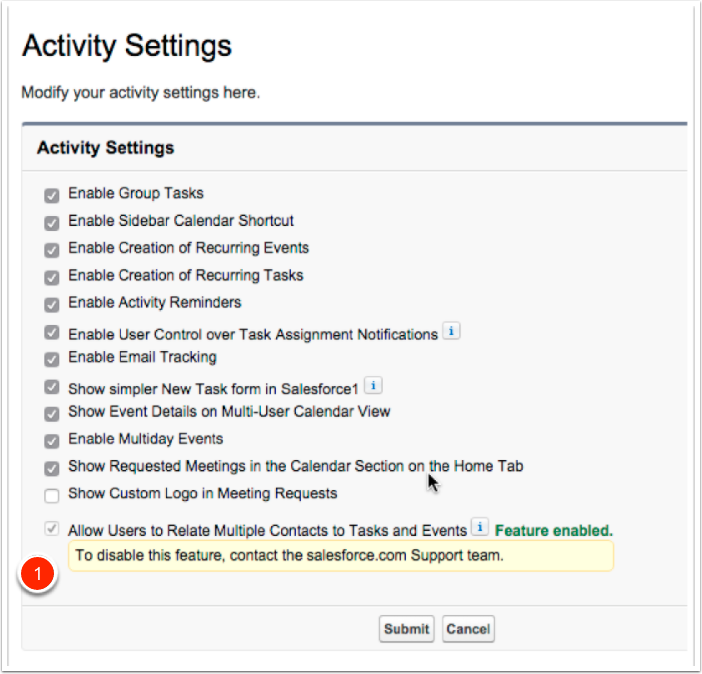
Configure the Activity Settings.
Step 3 - Add Permission Sets to Users
After installing Pitcher Zero, Admins can add and assign permission sets to individuals.
PITCHER-Zero Admin - User configuring Pitcher Zero & pushing updates out to mobile devices.
PITCHER-Zero Rep - Gives users offline capabilities (mobile devices) and enables the sync between CRM and mobile devices.
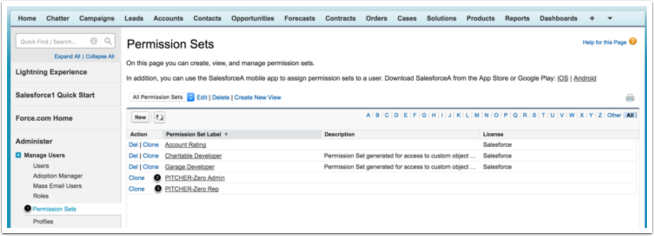
Pitcher Zero Permission Sets
Step 4 - Create and Activate Pitcher Zero Admin Users
You must have at least two system administrator users (Pitcher Admin User and Pitcher Zero User) for the Pitcher Zero Offline Account/Contact cards push mechanism to work.
You will need the two new admin users for the Staging and Prod environments.
Both users can use the same email address. For example, developer-one@pitcher.com.
Add the below credentials to 1password (Common Credentials vault)
Pitcher Zero User
Pitcher Admin User

Pitcher Zero Admin Users
If the Pitcher Zero push is managed only by the system administrator, you may omit to create a second system administrator.
Step 5 - Generate Token for Pitcher Zero User
Option 1
Search respective Pitcher Zero User (customer specific) in 1Password Common Credential vault
If the token is already updated on 1Password let's use it
Option 2
Login using Pitcher Zero User (1password, Common Credential vault)
Go to the top right user icon → Click on Settings
Now, on left sidebar, → Search
Reset My Security TokenClick on
Reset Security TokenNow check the registered email address and get the Security Token.
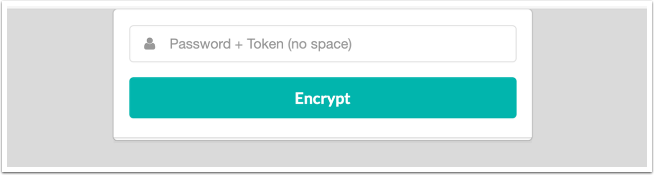
Step 6 - Generate Encrypted Password
Open the following link inside the Description of custom settings: https://content.pitcher.com/encrypt_token/ .
Enter the Password (available in 1password) and Token (using the above step)
Click Encrypt.
Copy and paste the encrypted password to the Second System Admin Password and Token inside Pitcher Custom Settings.
This password belongs to the second system admin, and this is usually an admin for the Pitcher Managed Package.
Generate Encrypted Password
Step 7 - Configure Pitcher Zero Settings
Contact your Pitcher representative to know your Consumer Key, Secret, and Instance ID.
Go to Setup > Custom Settings > Pitcher Zero Settings.
Click Manage.
Click New custom setting.
Add values the following values as provided by the Pitcher representative:
Name:
Pitcher Zero SettingsAPI Consumer key -
<provided by frontend team>API Consumer secret -
<provided by frontend team>Account Call Count Trigger Enabled
Additional Offline Objects
Discussion Item to Admin Trigger Enabled
Instance ID -
<provided by frontend team>Lead to ZeroDrive Activity Trigger Enabl
Second System Admin Username
Second System Admin Password + Token
Option 1 - Encrypted (Recommended)
Get the value (Password+Token) from Pitcher representative
Copy the encrypted value and now enter this into Second System Admin Password + Token field
Save the custom setting record
Option 2 - Un-encrypted
Get the value (Password+Token) from Pitcher representative
Enter the value into Second System Admin Password + Token field
Save the custom setting record
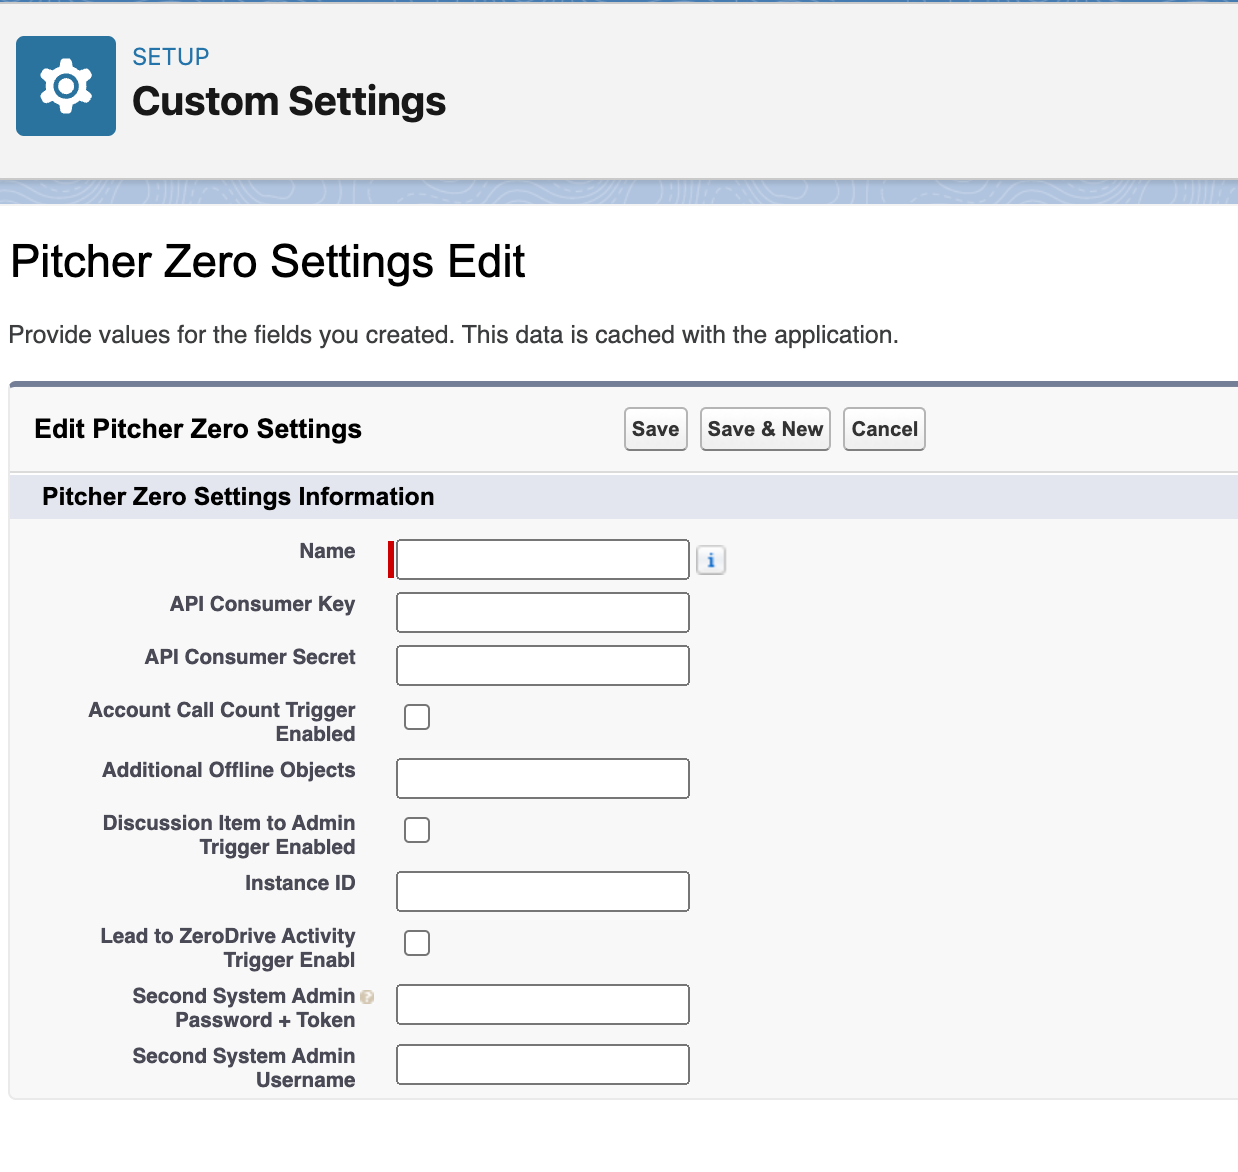
Pitcher Zero Settings
Step 8 - Generic Pitcher Zero Push
Here are the steps to perform a Pitcher Zero Push towards Pitcher Admin and Impact.
Login to Salesforce and go to All Tabs.
Salesforce: All Tabs
Locate and open Pitcher Zero.

Tab: Pitcher Zero
Click the Update Pitcher Zero link.

Update Pitcher Zero
On the Pitcher Zero Push Selection page:
Profile -
System Administrator
Permission Sets -
PITCHER Zero - Admin
PITCHER Zero - Rep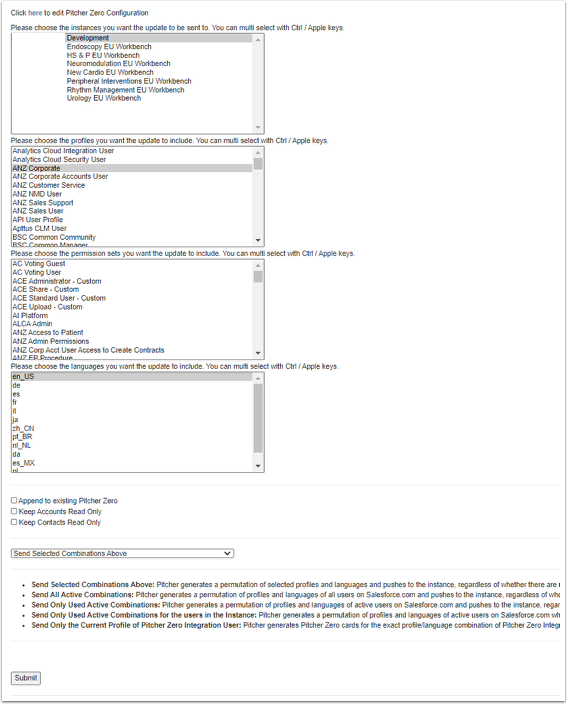
Pitcher Zero Push Selection Page
Please select the Pitcher Admin and Impact instances you would like to distribute the push in the first section. You can multi-select with Ctrl / Apple keys.
In the second section, please select the multiple profiles of the users that will use Pitcher Impact. You can multi-select with Ctrl / Apple keys.
In the third section, please select the multiple permission sets to which users (which are Pitcher Impact users) are assigned. You can multi-select with Ctrl / Apple keys.
Please select the SFDC languages that the Pitcher Impact users will leverage in the fourth section. You can multi-select with Ctrl / Apple keys.
You will be presented with a message to wait patiently. If the process continues to run after >2h, please contact PITCHER support.
Once the process is completed, a successful message appears, and the tab might automatically close itself. You can also review the history of previous pushes on the Pitcher Zero Push Selection page.

Push History
Step 9 - Download Pitcher Zero File
Open Pitcher Impact.
Validate your Pitcher Impact credentials.
Select your instance if you have access to more than one instance.
Once you select the instance to connect, Salesforce will present you with a pop-up window message indicating that you have now available for download a new file, "Pitcher Zero Files."
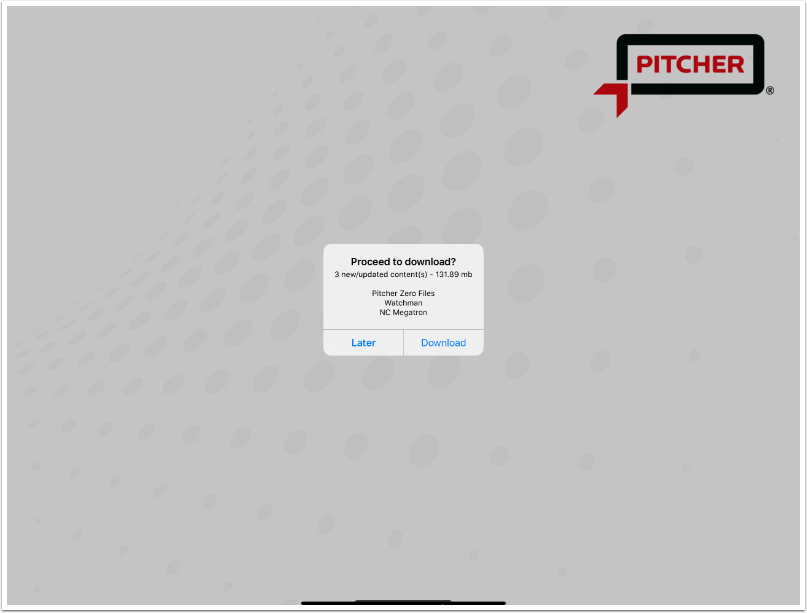
Download Pitcher Zero File
Step 10 - Schedule Apex Jobs
Schedule Apex Jobs are background jobs. For example, a scheduled job can also have some considerable calculation logic or timely integration with external systems.
PITCHER.PIT_AccountCallScheduleBatch
Skip the step, if this scheduled job is already set up.
To verify existing scheduled jobs
Set up → Scheduled Jobs → Search the scheduled jobs for the apex class PIT_AccountCallScheduleBatch
This scheduled job updates the account fields like Calls This Week, Calls This Month, Calls This Quarter, and Calls This Year.
Login to destination org.
Go to the Developer Console.
From the Debug menu, click Open Execute Anonymous Window.
Paste the following apex code based on the scheduled time as per customer need:
For 1 AM, use the following code:
CODEPITCHER.PIT_AccountCallScheduleBatch mgr = new PITCHER.PIT_AccountCallScheduleBatch(); System.schedule('PITCHER.PIT_AccountCallScheduleBatch || Everyday 1 AM', '0 0 1 * * ? *', mgr);For 12:10 AM, use the following code:
CODEPITCHER.PIT_AccountCallScheduleBatch mgr = new PITCHER.PIT_AccountCallScheduleBatch(); System.schedule('PITCHER.PIT_AccountCallScheduleBatch || Everyday 12:10 AM', '0 10 0 * * ? *', mgr);
Click Execute.
Verify under Setup > Scheduled Job that the apex job
PITCHER.PIT_AccountCallScheduleBatchis scheduled to run daily at the scheduled time.
OR,
Go to Setup > Apex Classes.
Use the Schedule Apex button to schedule the job.
Select the
PITCHER.PIT_AccountCallScheduleBatchapex class.Set any suitable time. For example, 1 AM.
Set the name of the job as
PITCHER.PIT_AccountCallScheduleBatch.