Using Annotations in PDF
Annotations
An object can be added to a PDF page without altering any of the page content, thanks to a rich set of objects defined by the PDF specification. This type of item is known as an annotation, and it can be used for various purposes, from highlighting material to creating interactive elements like forms.
This user guide will give a walkthrough of various annotations that can be applied to the PDF page. To know more about using the Annotations toolbar, refer to this link
To apply annotations on the PDF page, the zoom-out function can be used.
The normal PDF page will appear as shown below:
%20-%202022-07-11%20at%2012.03.38.png?inst-v=973f3c37-d617-4a1c-9816-b97ed52324dd)
However, if the page is double tapped it will appear as shown here:
%20-%202022-07-11%20at%2012.03.43.png?inst-v=973f3c37-d617-4a1c-9816-b97ed52324dd)
The annotations tool bar consists of various tools which will help to annotate the PDF page.
%20-%202022-07-11%20at%2011.12.14.png?inst-v=973f3c37-d617-4a1c-9816-b97ed52324dd)
Annotations Toolbar Legend
Text Highlighter
Text
Note
Drawing Tool
Eraser
Line Tool
Image Tool
Selection Tool
Color panel (activates when one of the tool is selected)
Undo Tool
Redo Tool
Close Annotation Toolbar
Drag and drop Annotation tool using the two bar icon.
Highlight, Underline, Strikeout, Squiggle
The first tool in the annotations toolbar can be used to highlight, underline, strikeout and squiggle the text.
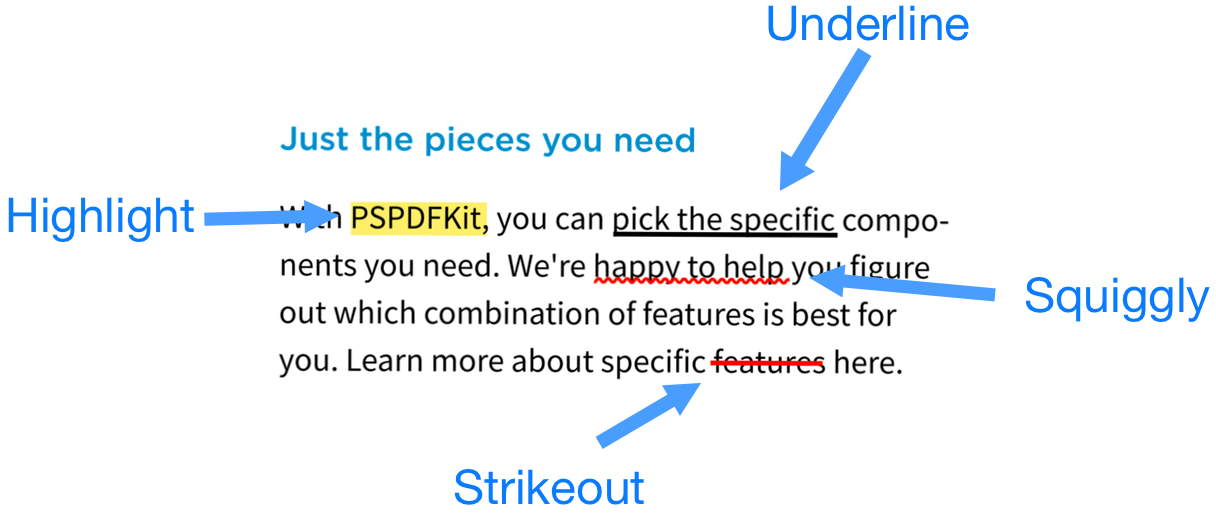
image source: pspdfkit
Using this tool a text or set of texts or paragraphs can be highlighted. To use the text highlighter single tap on the tool.
%20-%202022-07-11%20at%2011.29.17.png?inst-v=973f3c37-d617-4a1c-9816-b97ed52324dd)
By Default, text highlight tool will always be activated on the single tap on the tool.
Text Highlight
To highlight the text, activate the text highlight by tapping on the icon and then proceed to make a selection of the text or the paragraph that is desired to be highlighted. A default color will be applied on the highlighted text area.
%20-%202022-07-11%20at%2011.22.28.png?inst-v=973f3c37-d617-4a1c-9816-b97ed52324dd)
Text highlighter tool behavior:
Text highlighter tool when selected will become completely blue in color
A color panel will become active with the default color
An example of highlighted text area.
Text Underline
To underline the text, underline tool should be used. To use the Underline tool, long tap on the Text Highlight tool and then tap on the Underline tool
%20-%202022-07-11%20at%2012.10.10.png?inst-v=973f3c37-d617-4a1c-9816-b97ed52324dd)
Text underline tool behavior:
The icon will change to reflect an underline icon which is different from the text highlighter icon. It indicates the underline tool is active.
The color panel will be activated with default color (black in this case).
After selecting the text area, the entire area would be underlined.
Text Squiggle
Squiggle is a curly underline option that can be applied to the text area. This tool can be selected in a similar way to that of underline tool.
%20-%202022-07-11%20at%2012.13.28.png?inst-v=973f3c37-d617-4a1c-9816-b97ed52324dd)
Squiggle tool behavior
The icon changes to show the curly line below the alphabet indicating squiggle tool is active.
The color panel with default color will be activated (maroon in this case).
Example of selected text after squiggle is applied.
Strikethrough Text
To strike out the text, strikethrough tool is used.
%20-%202022-07-11%20at%2012.15.47.png?inst-v=973f3c37-d617-4a1c-9816-b97ed52324dd)
Strikeout tool behavior:
Icon changes to reflect strikethrough tool selection.
Default color panel is activated (maroon)
A text area is selected and strikethrough is applied.
Text Tool
This tool is used to write text and also provides few more options. By default the text tool is selected on single tap. To activate this tool tap on the tool.
%20-%202022-07-15%20at%2013.13.17.png?inst-v=973f3c37-d617-4a1c-9816-b97ed52324dd)
To check other features long tap on the tool and it will open options as shown in the image below:
%20-%202022-07-18%20at%2010.43.49.png?inst-v=973f3c37-d617-4a1c-9816-b97ed52324dd)
Following options are provided by the Text Tool:
Text tool
Callout
Signature
Add Text to the PDF Page
By default Text tool will be enabled unless you want to use other options. To use text tool tap on the tool and along with the text tool default color palette will be enabled as shown here.
Tap anywhere in the page where you want to add text. A small square box will appear that will allow you to add text. Along with the box, text editing tools will also be activated which can be used to format the text.
%20-%202022-07-15%20at%2012.47.59.png?inst-v=973f3c37-d617-4a1c-9816-b97ed52324dd)
Add Callout
Callouts are text notes on the page with arrows pointing in one direction or another at any point in the document. A text box is automatically generated when the callout is placed on the page, and it contains the text. As soon as the arrow or box is in position, you can resize or move it to reflow the text within it.
%20-%202022-07-18%20at%2011.00.51.png?inst-v=973f3c37-d617-4a1c-9816-b97ed52324dd)
After long tap callout option can be selected which will be activated with new icon as shown in the above image. Default color palette would also be activated, dark blue being the default color here. Proceed to tap on the desired spot and a text box will be created with an arrow pointing to the spot.
%20-%202022-07-18%20at%2011.02.02.png?inst-v=973f3c37-d617-4a1c-9816-b97ed52324dd)
Simultaneously, text editor would appear below the screen.
Adding Signature To The PDF Page
You can add signature to the pdf page quite easily.
%20-%202022-07-18%20at%2011.06.18.png?inst-v=973f3c37-d617-4a1c-9816-b97ed52324dd)
Again long tap on the text tool and select the signature option. It is worth noticing that the icon would change on the annotations tool panel and this time no color palette would be activated. A new window would appear and here are the details:
Signature tool icon
Signature area
Delete signature
Store signature
Color palette with default color (black)
Once the signature is added it will appear on the pdf page as shown below:
%20-%202022-07-18%20at%2011.06.48.png?inst-v=973f3c37-d617-4a1c-9816-b97ed52324dd)
The signature box can be placed at the desired location within the page by dragging and dropping it. It also allows user to edit the details using inspector, add note, copy signature and delete the signature.
Open Inspector
Inspector tool further allows to edit the signature box by opening a drawing window.
%20-%202022-07-18%20at%2011.14.19.png?inst-v=973f3c37-d617-4a1c-9816-b97ed52324dd)
Using the inspector, default color can be changed, background color can be customized. The tool also allows to edit features such as blend mode, opacity, thickness, order and color preset.
Add and Update Note
The Note option opens a drawing window and users can add note to the signature as shown below:
%20-%202022-07-18%20at%2011.14.32.png?inst-v=973f3c37-d617-4a1c-9816-b97ed52324dd)
Copy Signature
This feature will copy the signature and you can apply the customized signature to other pages as well.
Add Note To The PDF Page
With the help of note tool notes can be added to the PDF Page. To add note tap on the note tool as shown in the image below.
%20-%202022-07-18%20at%2011.23.22.png?inst-v=973f3c37-d617-4a1c-9816-b97ed52324dd)
Then tap the desired spot to add note.
%20-%202022-07-18%20at%2011.23.31.png?inst-v=973f3c37-d617-4a1c-9816-b97ed52324dd)
A note icon will appear on the spot along with a window to add note. Add the note.
To edit the note paint brush tool (right bottom of the notes window) can be used that will open a tool bar as shown here
%20-%202022-07-18%20at%2011.23.42.png?inst-v=973f3c37-d617-4a1c-9816-b97ed52324dd)
Drawing Tool
This tool provides the user to apply drawing, freeform highlight and magic ink.
%20-%202022-07-18%20at%2011.30.49.png?inst-v=973f3c37-d617-4a1c-9816-b97ed52324dd)
When tapped a pencil icon would be activated along with the default color. Long tapping will display all the other options provided by the drawing tool.
%20-%202022-07-18%20at%2011.30.55.png?inst-v=973f3c37-d617-4a1c-9816-b97ed52324dd)
Options provided by the drawing tool:
Drawing Tool by default
Freeform highlight
Magic Ink.
Drawing Tool
By default drawing tool is the enabled when tapped. The default color being dark blue.
%20-%202022-07-18%20at%2011.31.23.png?inst-v=973f3c37-d617-4a1c-9816-b97ed52324dd)
To apply drawing first select the drawing tool and then tap on the spot where drawing is desired to be applied. Draw using freehand and then unselect the drawing tool when done.
To edit and remove the drawing, tap anywhere near the drawing area and a box will appear with various options.
%20-%202022-07-18%20at%2011.31.37.png?inst-v=973f3c37-d617-4a1c-9816-b97ed52324dd)
The options are quite similar to previous options where Inspector can be used to apply color presents, change the text color, background color, opacity changes, etc. To remove just tap on the delete icon.
Freeform Highlight Tool
This tool allows the user to apply freeform highlight in the pages unlike text highlighter where you have to select the text, this tool allows you to highlight any spot in the page.
%20-%202022-07-18%20at%2011.32.05.png?inst-v=973f3c37-d617-4a1c-9816-b97ed52324dd)
To edit and remove the highlighted section in the page, unselect the highlight tool and tap near the highlighted area.
%20-%202022-07-18%20at%2011.32.18.png?inst-v=973f3c37-d617-4a1c-9816-b97ed52324dd)
Magic Ink
The ink tool can be used to draw on a PDF. Shape detection will begin as soon as the drawing is finished. A shape annotation will substitute the drawn ink annotation if a shape can be reliably discerned. Otherwise, the drawing is left as it was before the edits were made.
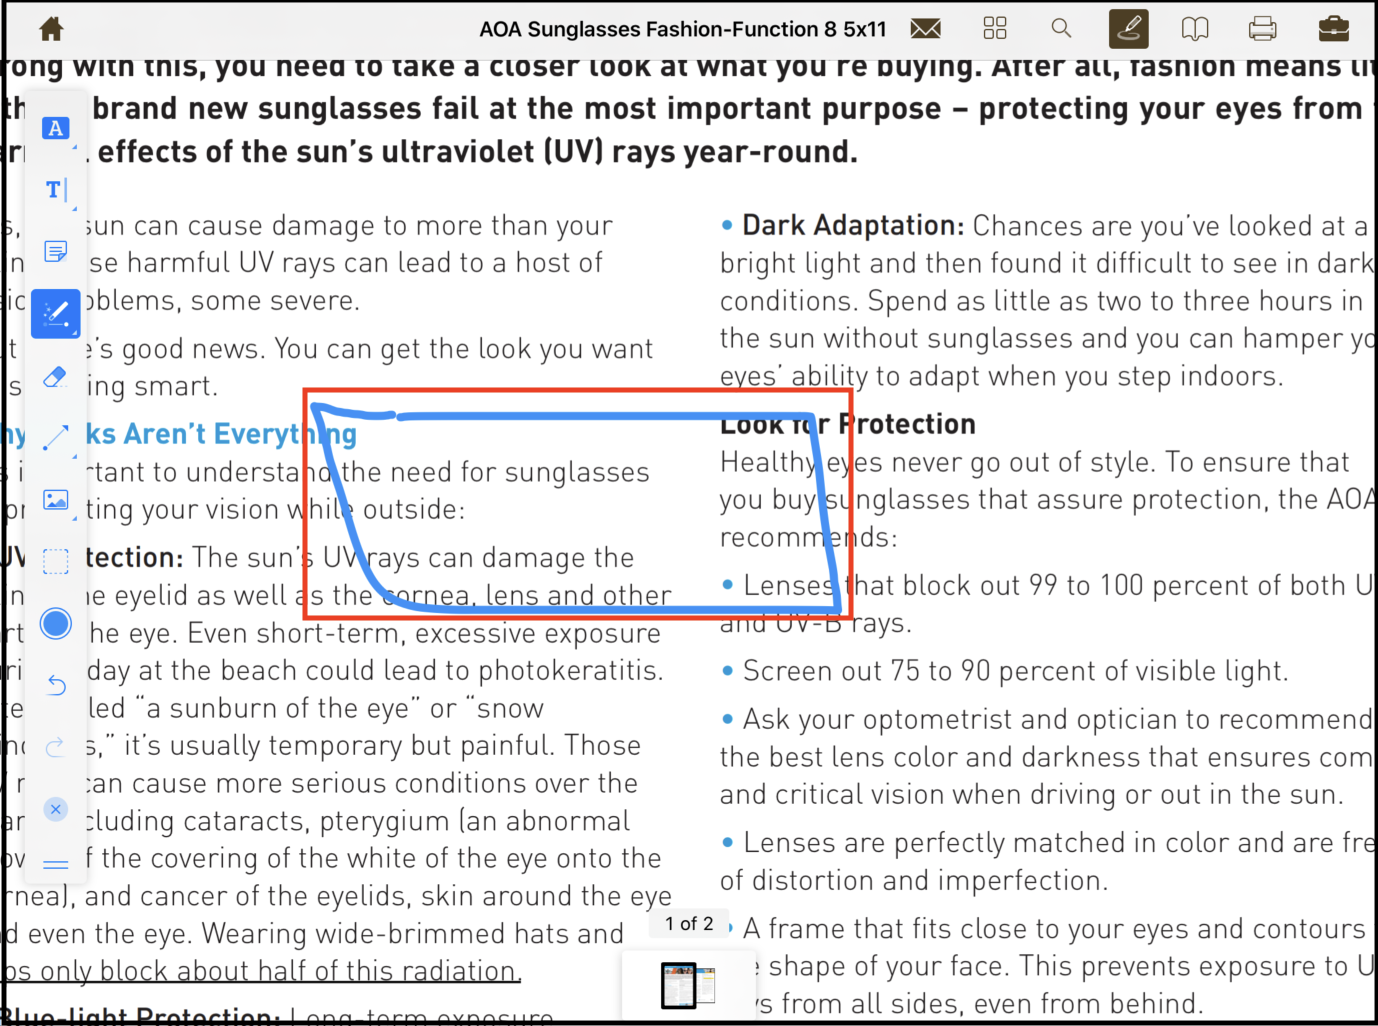
To create image using ink tool, select the ink tool after long tap on the drawing tool and then draw any image on the desired spot in the PDF page. For example, in the above image a freehand rectangular shape is drawn which is recognized by the tool as a rectangle and the tool creates a perfect rectangle as shown below.
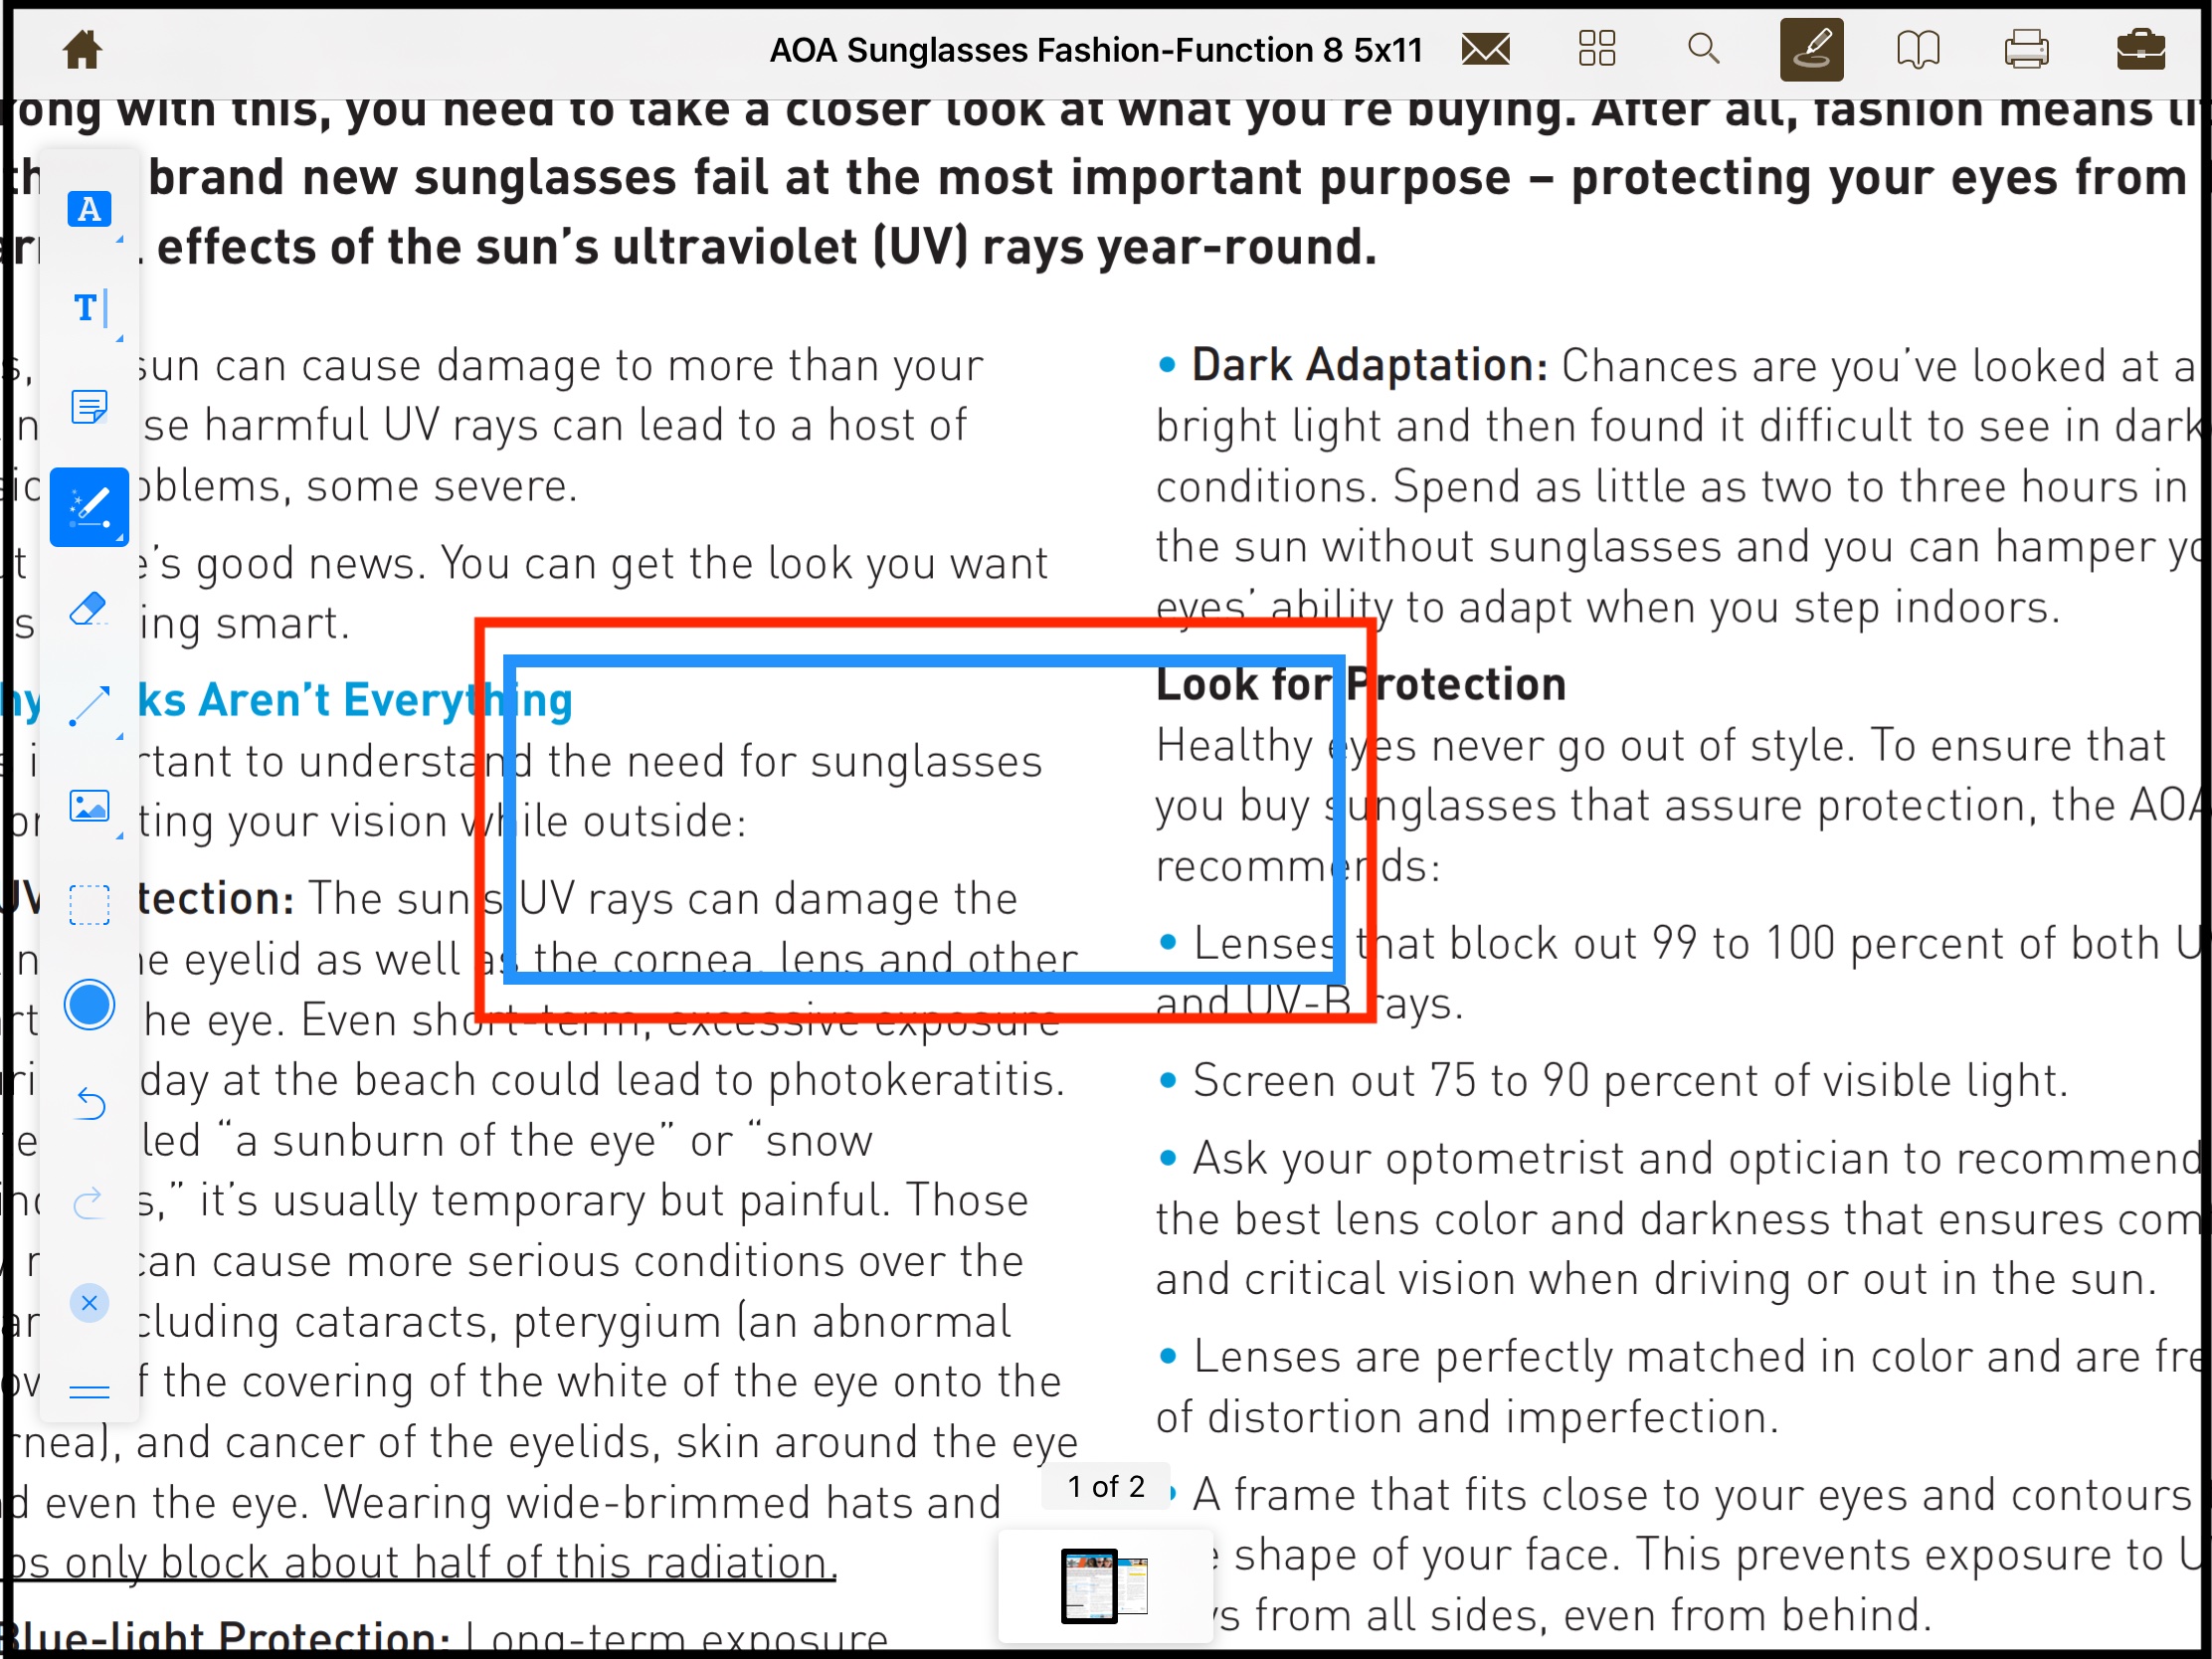
If the freehand image is not recognized by the tool then it is left as it is.
Geometrical Shape Tool
With this tool the user can create arrow, Ellipse, Rectangle, Line, Polyline, Polygon, cloud. Long tap on the desired tool and then tap on the desired spot in the page to generate the shape.
%20-%202022-07-18%20at%2012.29.26.png?inst-v=973f3c37-d617-4a1c-9816-b97ed52324dd)
Image Tool
This tool offers the user to add image, stamp, check saved annotations, add link to the text, add recorded audio to the text.
%20-%202022-07-18%20at%2012.37.07.png?inst-v=973f3c37-d617-4a1c-9816-b97ed52324dd)
Following options are offered by the image tool:
Add and edit image from existing picture gallery
Add and edit stamp from existing list of stamps
Check and edit existing list of annotations
Add link anywhere in the page.
Provide audio recording anywhere in the page.
Add and Edit Image in the PDF
The images are not embedded in the PDF rather they are created on the top of the existing page.
%20-%202022-07-18%20at%2012.37.23.png?inst-v=973f3c37-d617-4a1c-9816-b97ed52324dd)
Tap on the image tool and a small window will pop up with the category of the images. Tap on the category that is desired. Further list of all images will be displayed from the selected category.
%20-%202022-07-18%20at%2012.37.45.png?inst-v=973f3c37-d617-4a1c-9816-b97ed52324dd)
Select the image and proceed to adjust it’s size.
%20-%202022-07-18%20at%2012.37.50.png?inst-v=973f3c37-d617-4a1c-9816-b97ed52324dd)
Size of the image can be adjusted by dragging the marked boundary around the image. Alternatively, Done button will allow the user to select one of the sizes as shown below.
%20-%202022-07-18%20at%2012.38.02.png?inst-v=973f3c37-d617-4a1c-9816-b97ed52324dd)
The image will be placed on the PDF page and will allow the user to add a note, copy and delete image. Further, image size can be reset by dragging the boundaries here as well as shown below.
%20-%202022-07-18%20at%2012.38.12.png?inst-v=973f3c37-d617-4a1c-9816-b97ed52324dd)
Add and Edit Stamp
Stamp Tool allows the user to add stamp to the PDF Page. Simply long tap the image tool and select stamp tool.
%20-%202022-07-19%20at%2011.30.26.png?inst-v=973f3c37-d617-4a1c-9816-b97ed52324dd)
A list of stamp designs would appear. Also, the user can create custom stamp as well.
To create custom stamp. Tap on Custom Stamp option on the top right of the window.
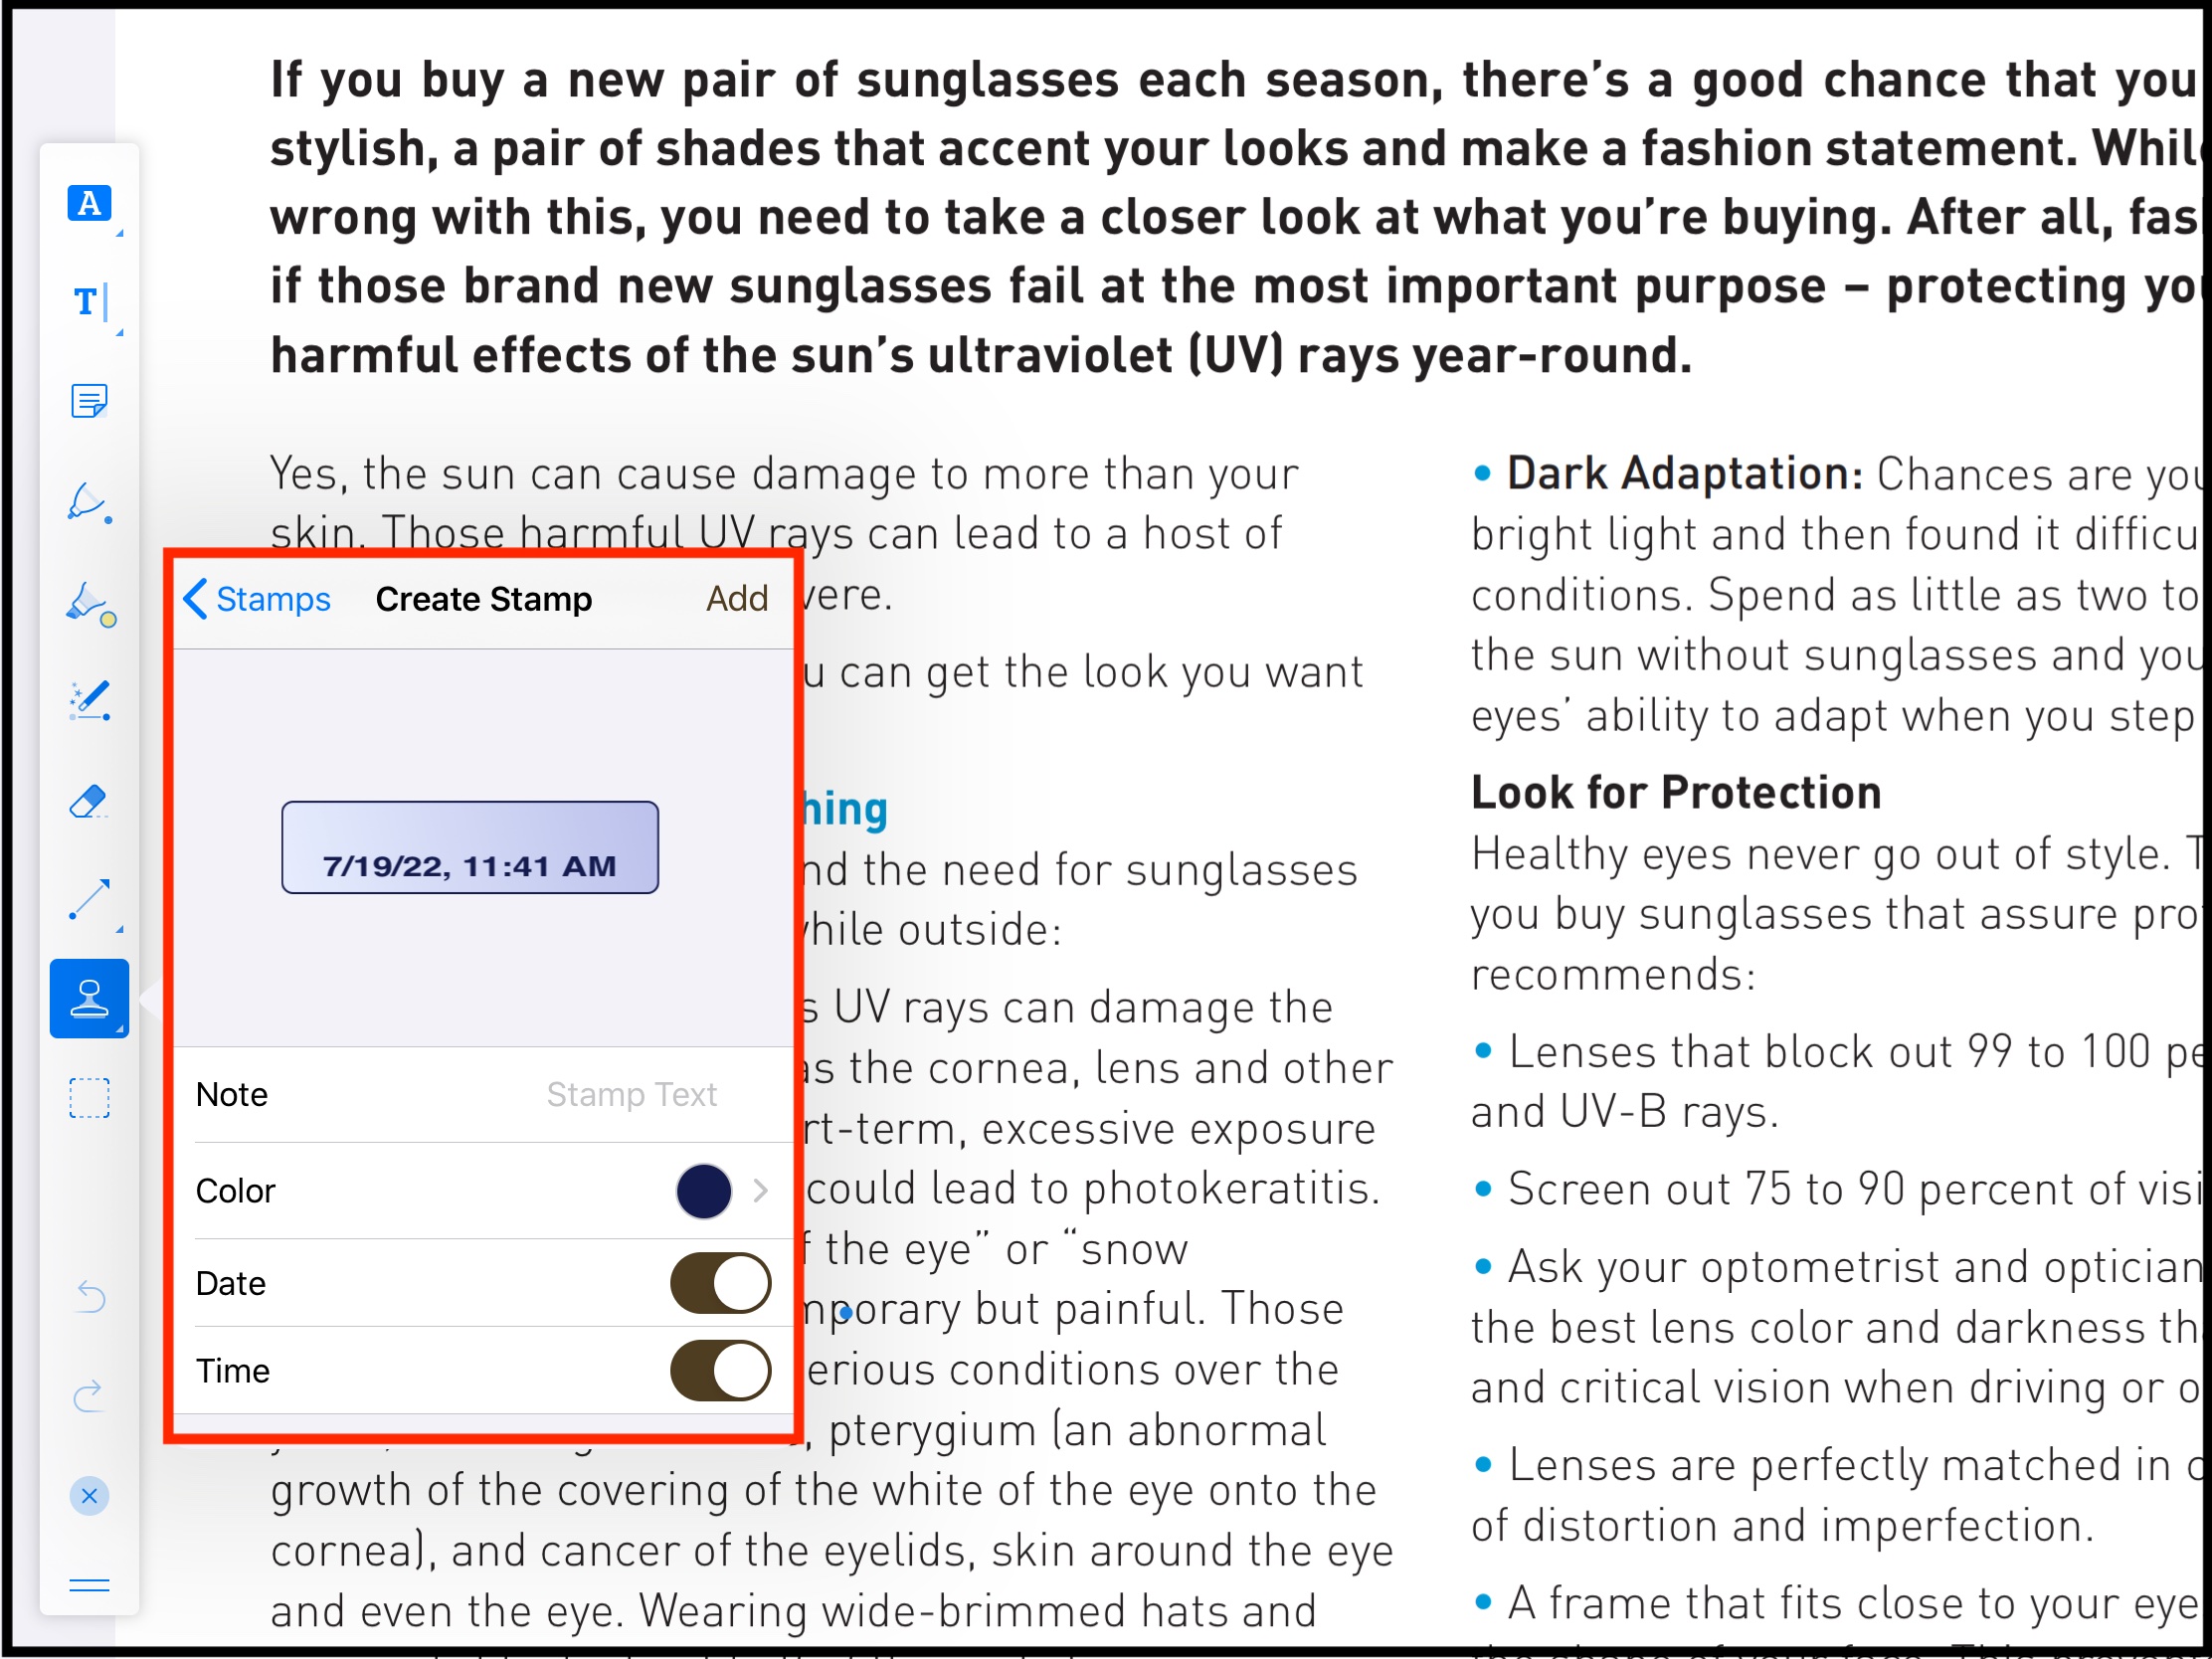
A new window will open where Stamp text can be given and various other properties can be edited. Finally, user can add the stamp to the PDF Page.
%20-%202022-07-19%20at%2011.44.05.png?inst-v=973f3c37-d617-4a1c-9816-b97ed52324dd)
After the stamp is added on the desired spot in the PDF page, the user can add note, copy or delete the stamp. A single tap anywhere in the page would remove the editable boundaries around the stamp.
%20-%202022-07-19%20at%2011.44.11.png?inst-v=973f3c37-d617-4a1c-9816-b97ed52324dd)
Add Link
A link can be a web page link or link to another page. This tool allows user to add link in the PDF Page. To use the tool long tap on the image tool and then select the link tool.

Next select the text where link is to be added. On the selection of the text or line, a window will appear.
%20-%202022-07-19%20at%2011.52.01.png?inst-v=973f3c37-d617-4a1c-9816-b97ed52324dd)
The user can select another page as a link or can provide link to website.
Add Sound
This tool allows user to add recorded audio in the PDF Page. To use this tool, select the tool.
%20-%202022-07-19%20at%2012.01.26.png?inst-v=973f3c37-d617-4a1c-9816-b97ed52324dd)
Next select particular text or line of text. An audio icon will appear along with
%20-%202022-07-19%20at%2012.01.38.png?inst-v=973f3c37-d617-4a1c-9816-b97ed52324dd)
The user will see:
Audio icon appearing over the selected text or line.
Recording button
Stop button.
It may be noted that application might require device mic access for the first time for the recording feature to work.