Managing Inventory
As a Sales Representative, you can view and manage your inventory on the My Inventory page; click the View My Inventory button at the top of the Samples home page to get started.
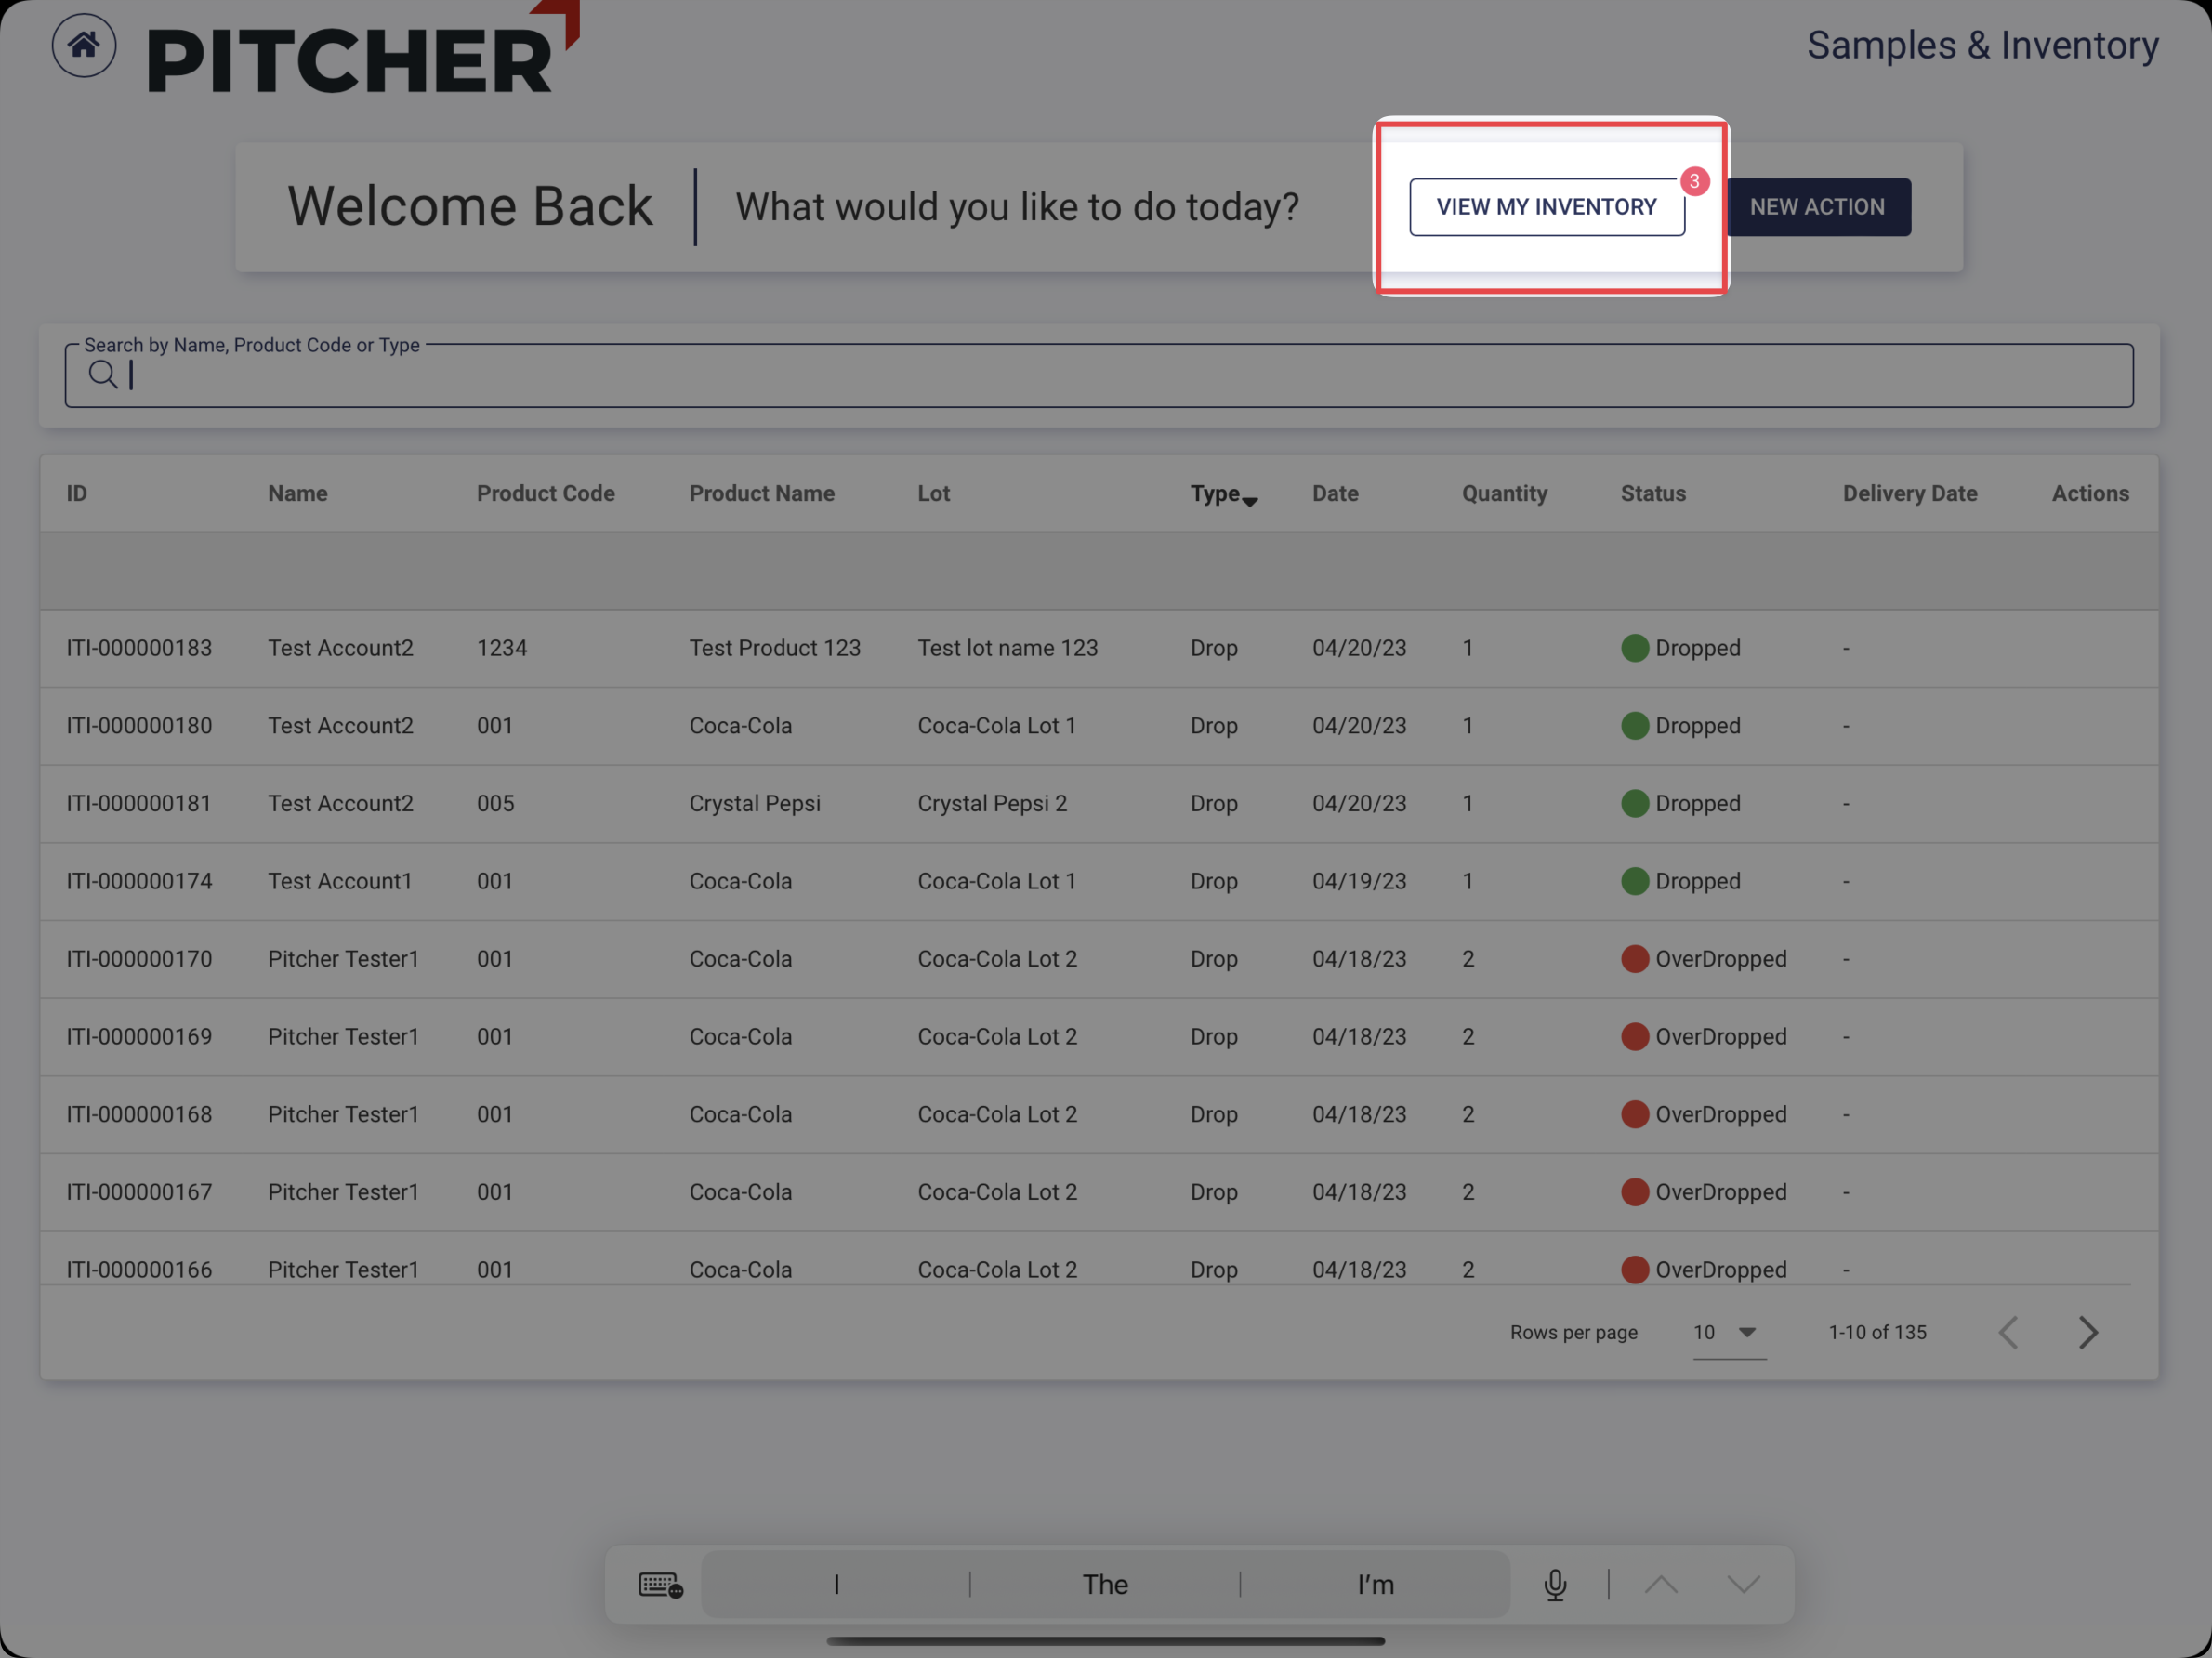
Pitcher Samples home page
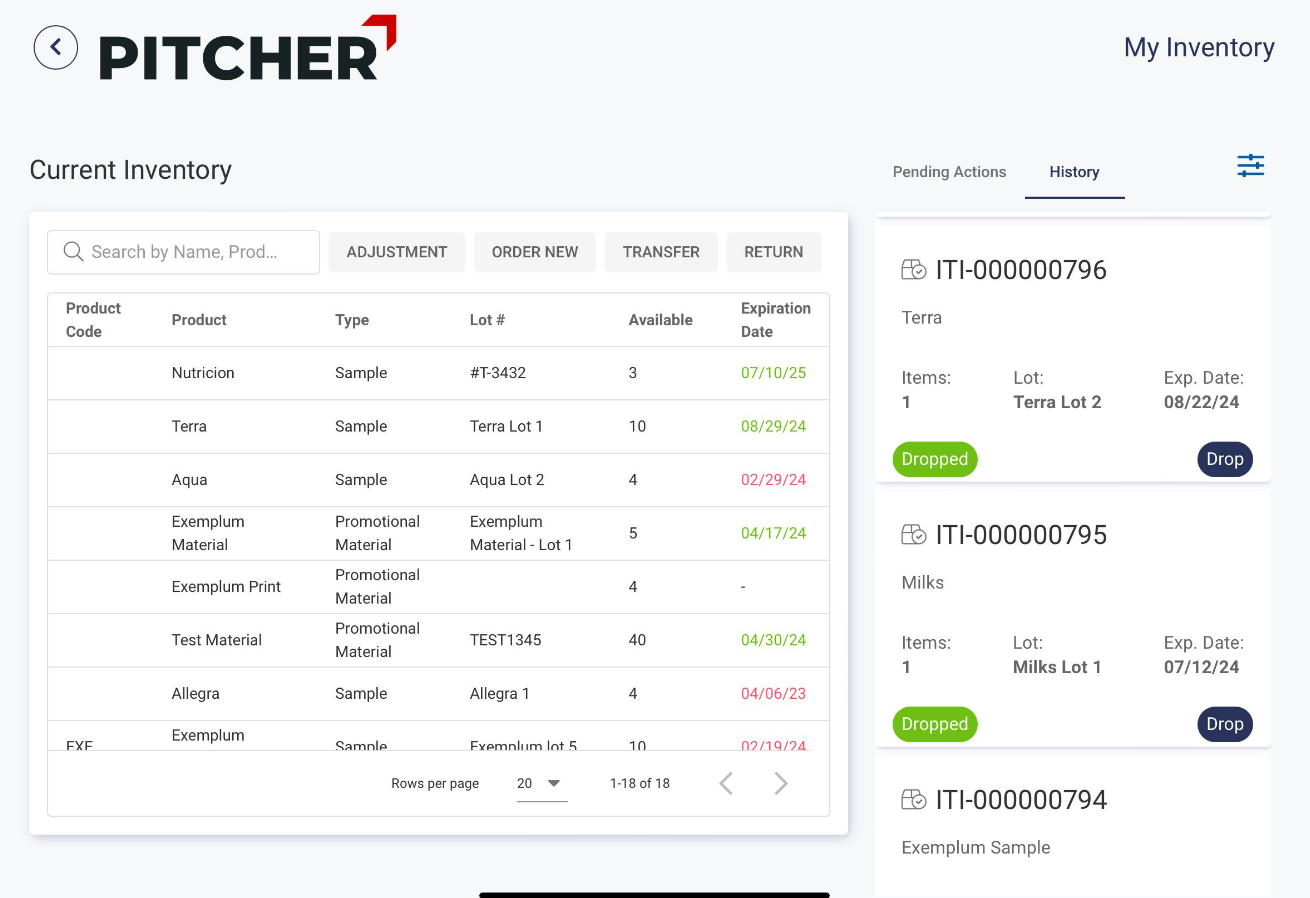
My Inventory
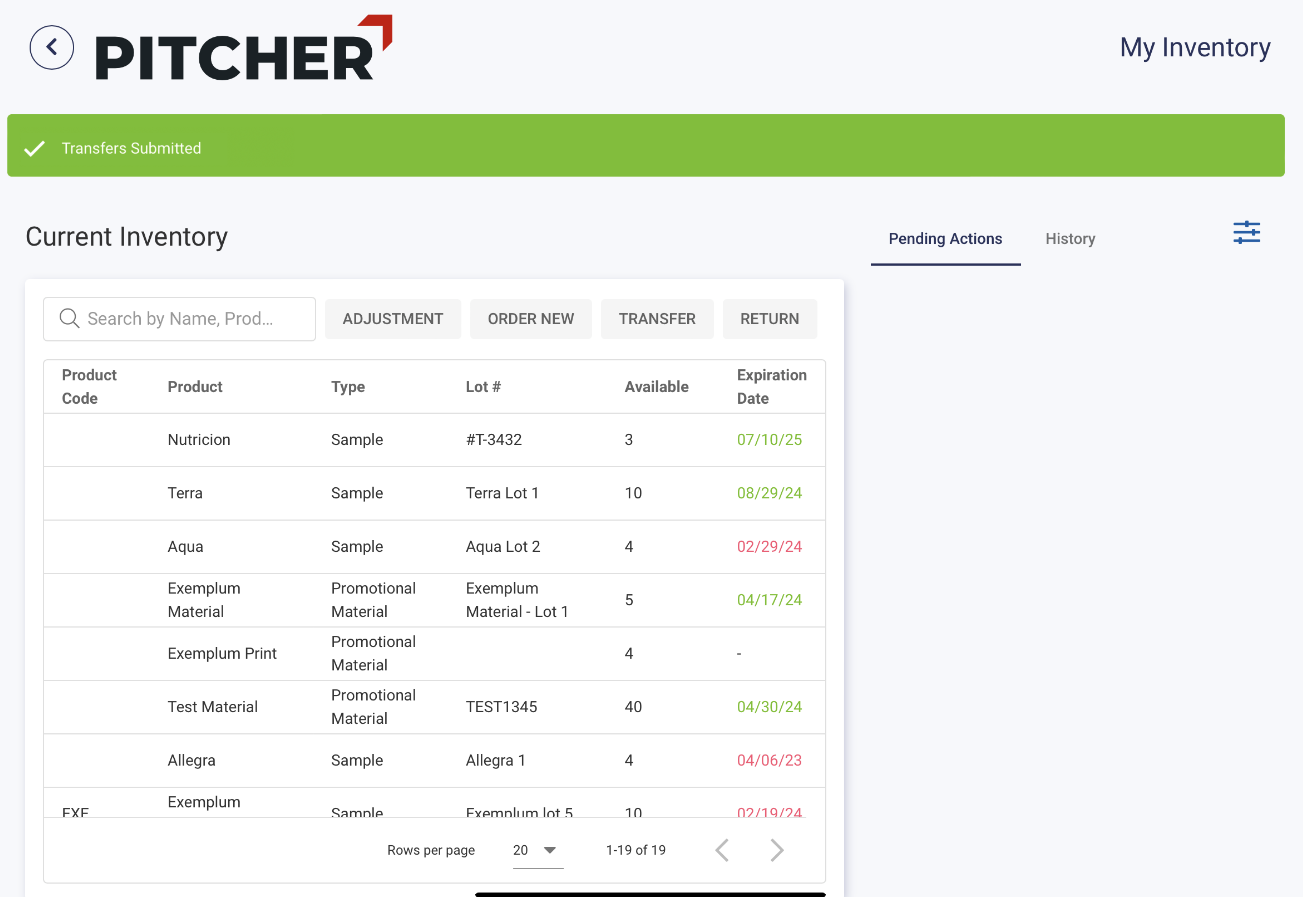
View Current Inventory
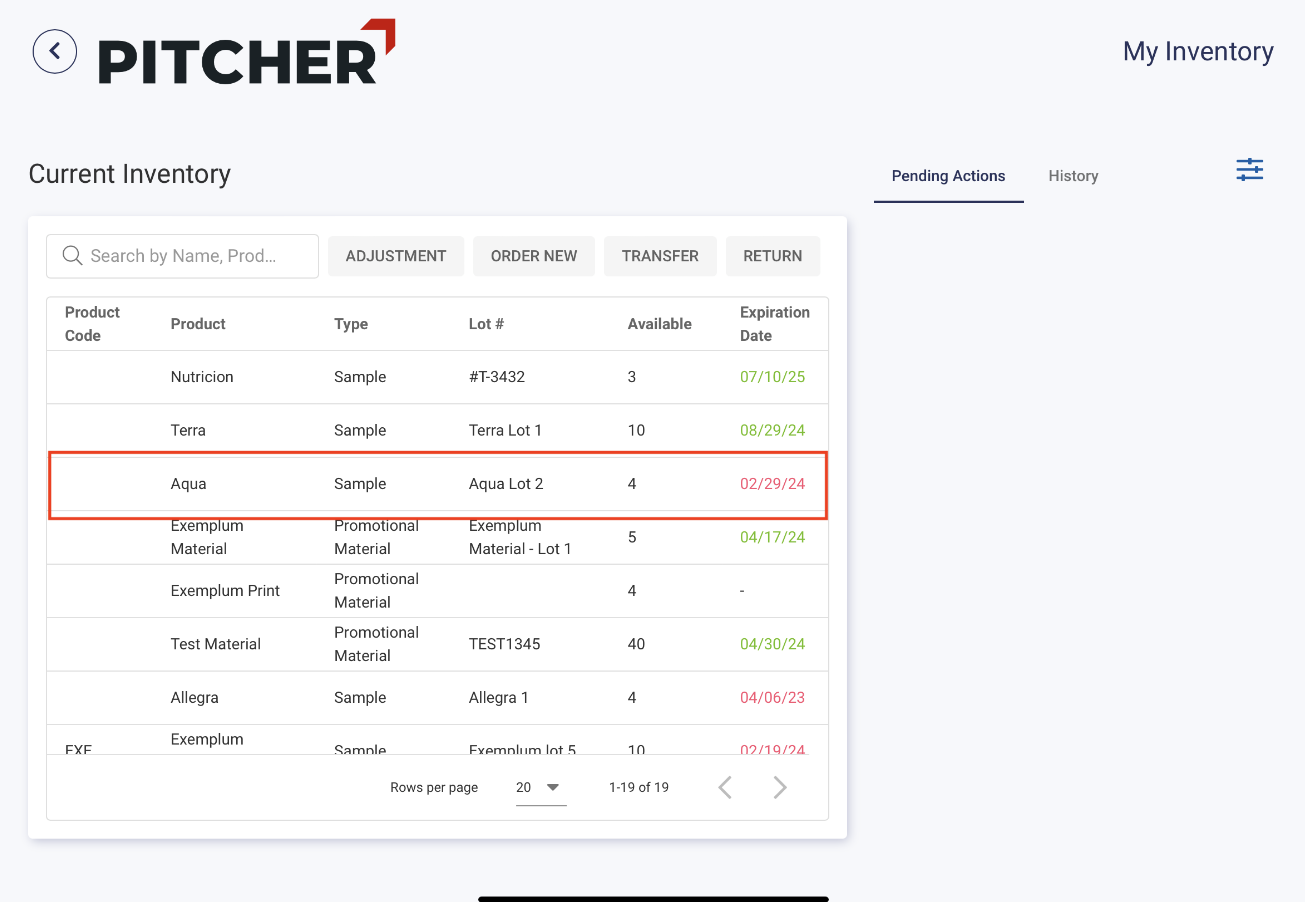
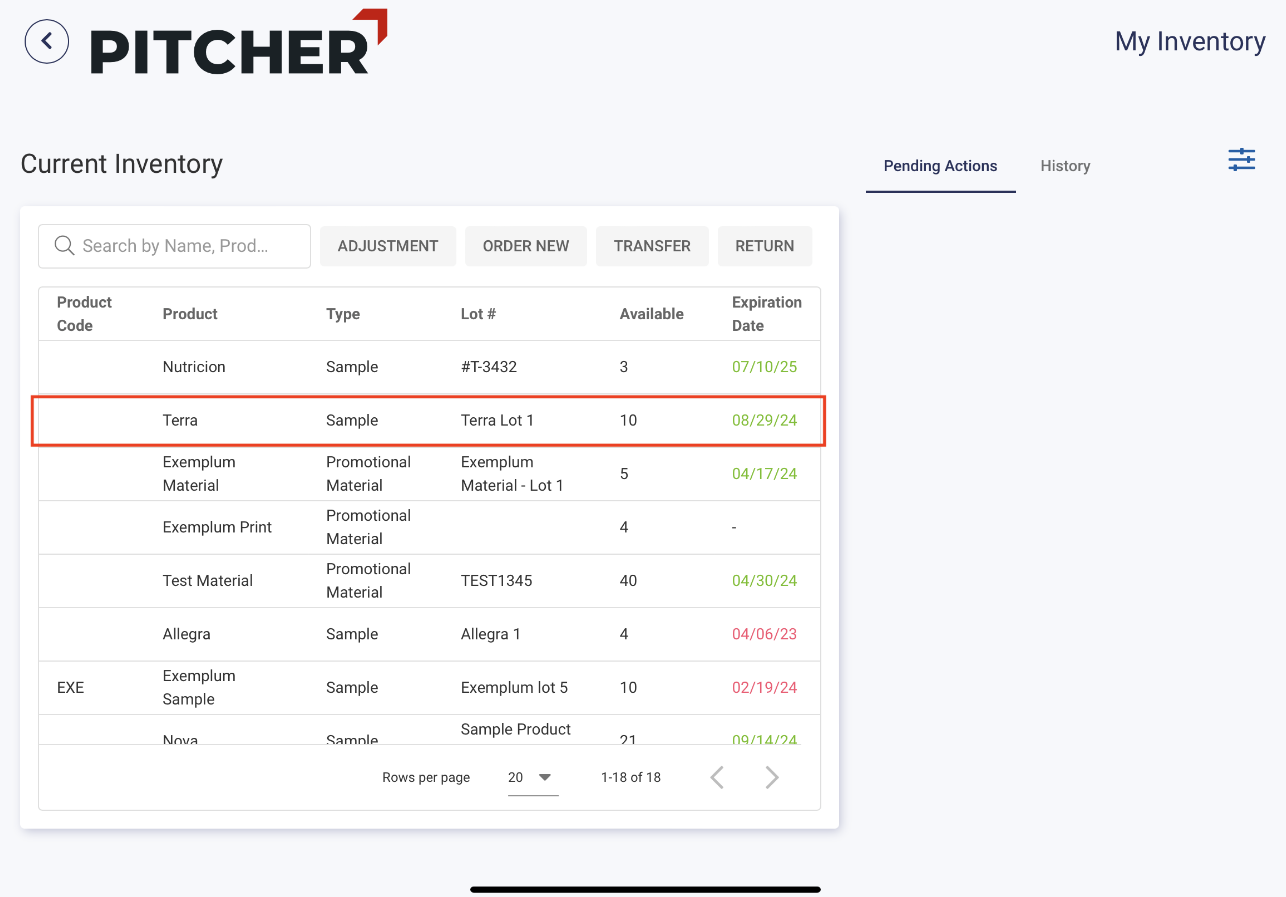
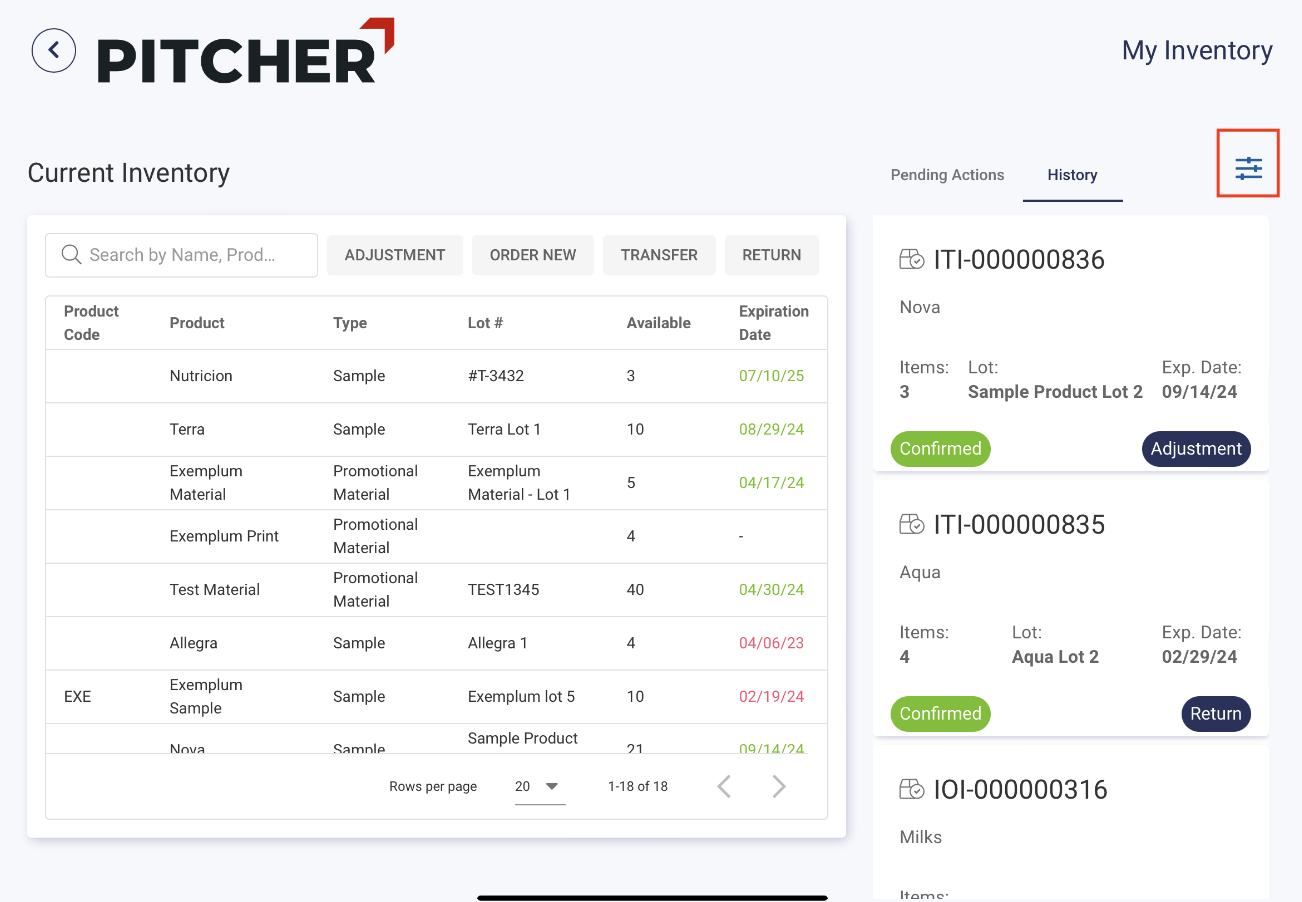
The My Inventory page contains a table that shows your current inventory status. The table includes the following information:
Product Code: The Product Code, as stored in Salesforce.
Product: The name of the product.
Type: The Product Type can be either Samples or Promotion Material.
Lot #: The Lot the product belongs to (as defined in Salesforce).
Available: The available quantity for the item type.
Expiration date: The expiration date for the item type (As defined by the Salesforce Admin). The expiration date is colour coded:
Green - Well within expiry.
Yellow - Nearing expiry.
Red - Expired and not available for customer drops.
The table records are paginated; you can change the number of records displayed on a page. You can also use the search bar to filter records based on the type, product code and product name.
Inventory operations
Several inventory actions allow you to manage your inventory effectively. Let us look at each of them in detail.
Order new inventory items.
You can request new Samples or Promotion Materials by clicking the Order New button and completing the new order form. Follow these steps to complete the form:
Select the required products(1) on the new order form. You can select more than one product for order here or remove previously chosen products by clicking the x or “Delete” buttons (3).
Add the required quantity to all selected products(2). Note that the quantity requested must be less than the available quantity.
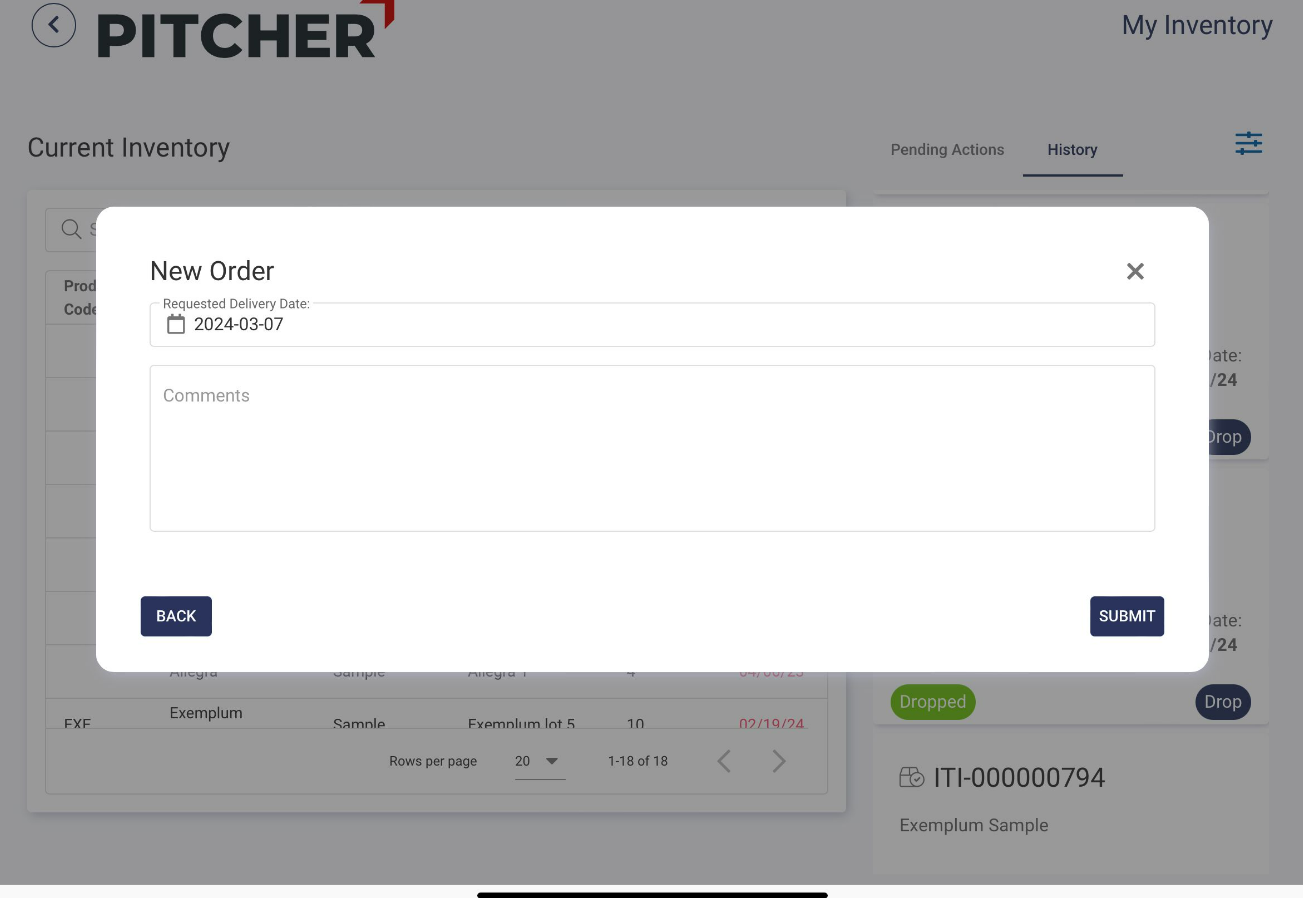
Click Next(5) to go to the next step and specify a future delivery date for the new order(6).
Optionally, you can comment on the new order request(7).
Click Submit(8) to submit the new order request.
The new order requests are not instantly approved and require admin approval. You will see incoming inventory items in the “Pending Actions” tab.
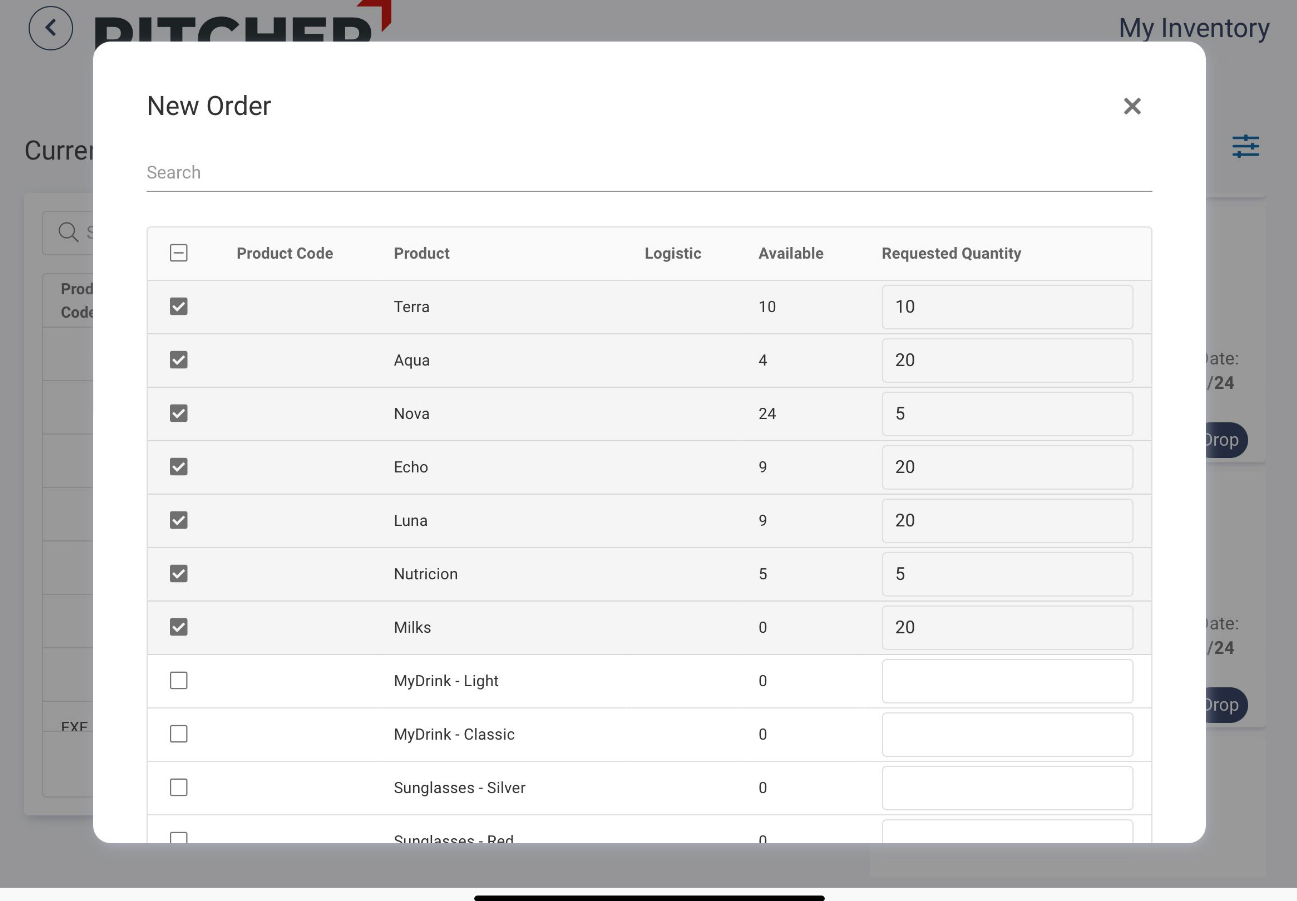
Product selection
Submit the order
Order confirmation
Return inventory items
You can return samples and materials to the warehouse if you no longer need them. Click the Return button and follow these steps to complete the return form:
Select the products(1) from the lot you want to return. You can select more than one product for return here or remove previously chosen products by clicking the x or “Delete” buttons (3).
Add the return quantity to all selected products(2). Note that the return quantity must be less than the available quantity in your inventory.
Click Next(4) to go to the next step.
Click the Handover To dropdown(5) and select the warehouse to which these items should be returned.
Select the reason for return from the Reason dropdown(6).
Optionally, you can comment on the return request(7).
Click Submit(8) to submit the return request. You should see a confirmation message, and the quantity should now be updated in your current inventory.
The product we are going to return
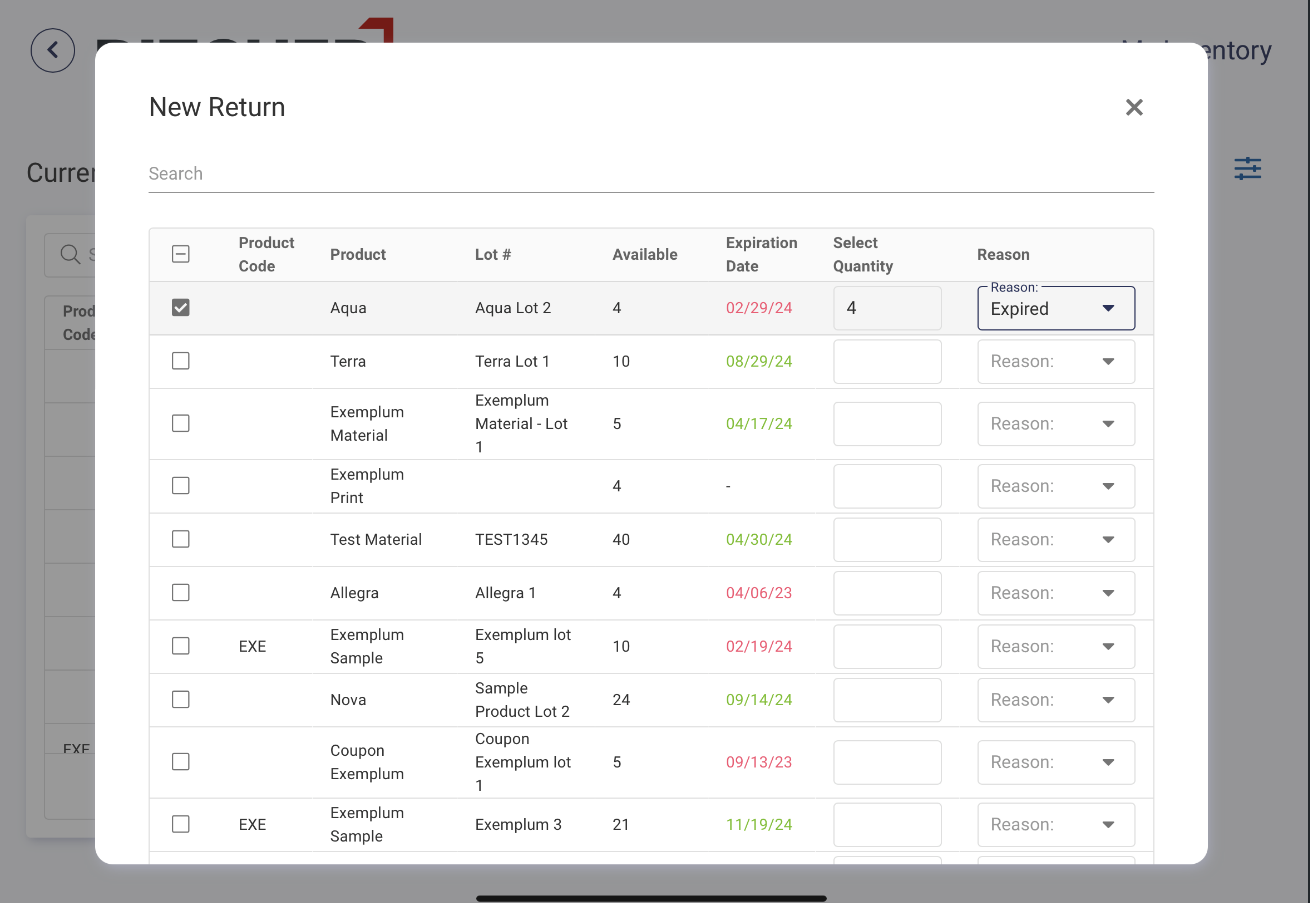
Select Reason for return
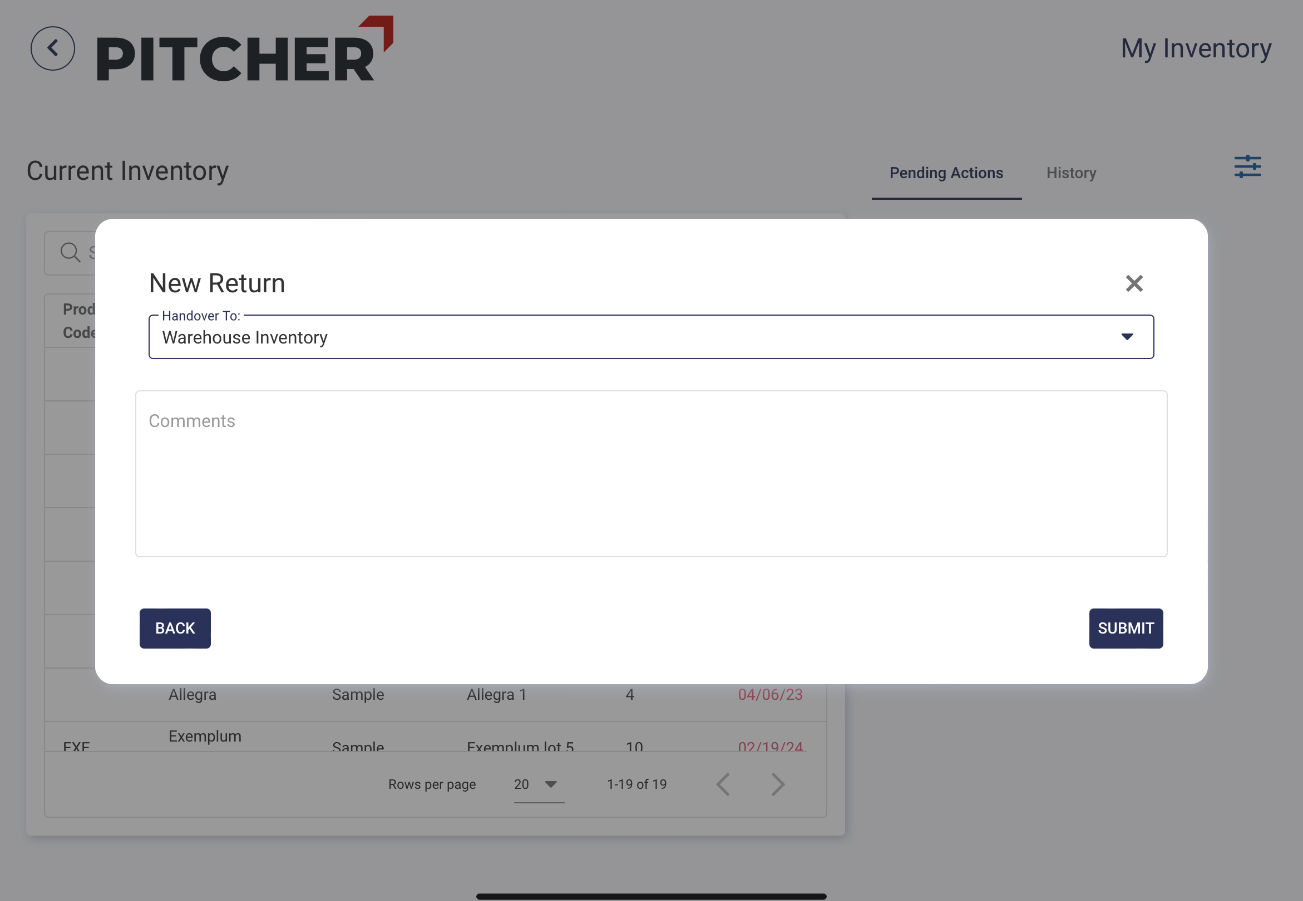
Select Warehouse handover in case applicable.
Return submitted
Adjust or correct inventory item count
If your current inventory stock does not match the quantity of the items you have, you can adjust the numbers by clicking the Adjustment button and completing the adjustment form.
Follow these steps to complete the adjustment form:
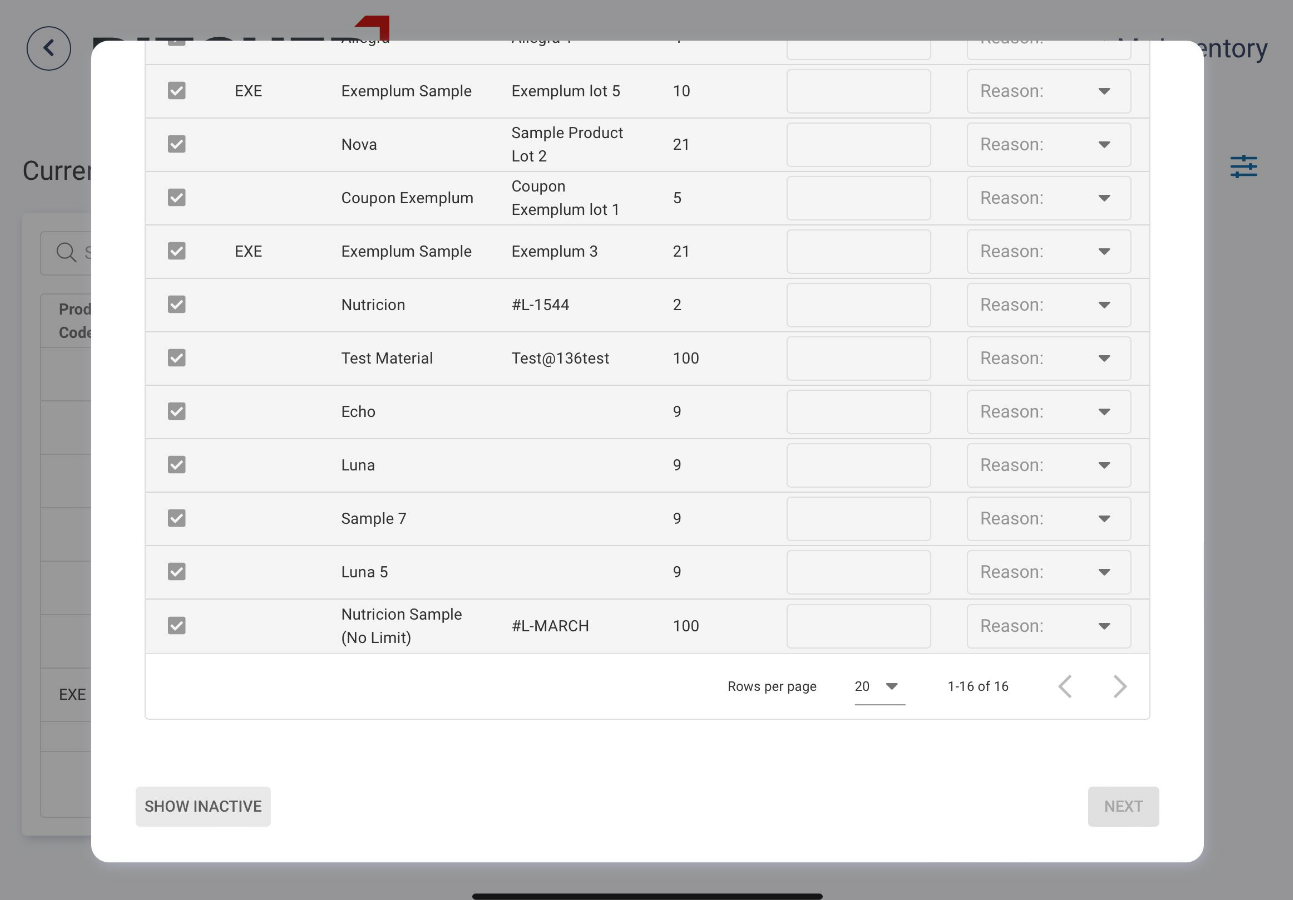
Select the products(1) from the lot whose quantity you want to adjust. You can select more than one product for adjustment here or remove previously chosen products by clicking the x or “Delete” buttons (3).
Add the new quantity to all selected products(2).
Click Next(4) to go to the next step.
Optionally, you can comment on the adjustment request(5).
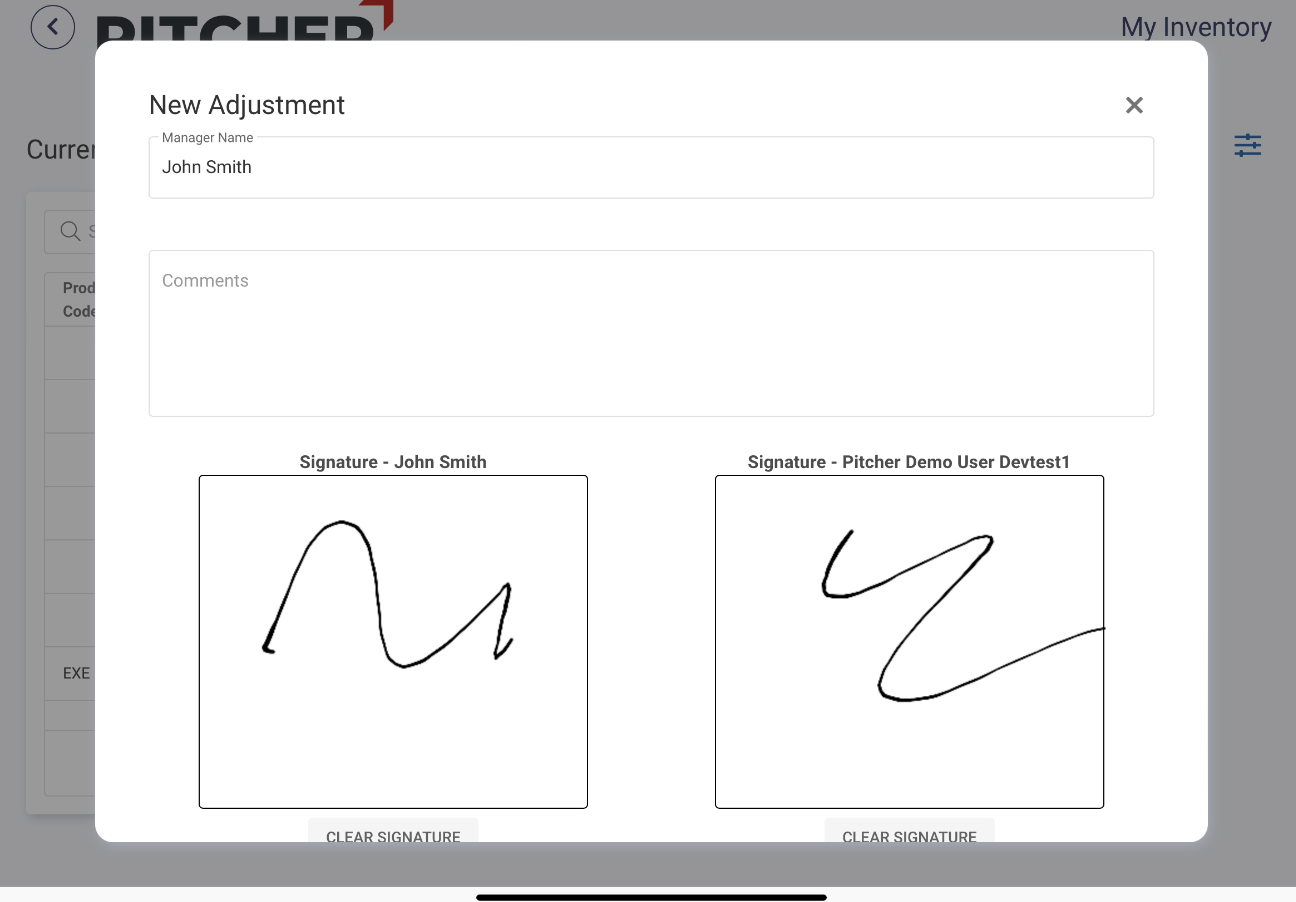
Optionally, you can add manager name performing the adjustment with signature mandatory.
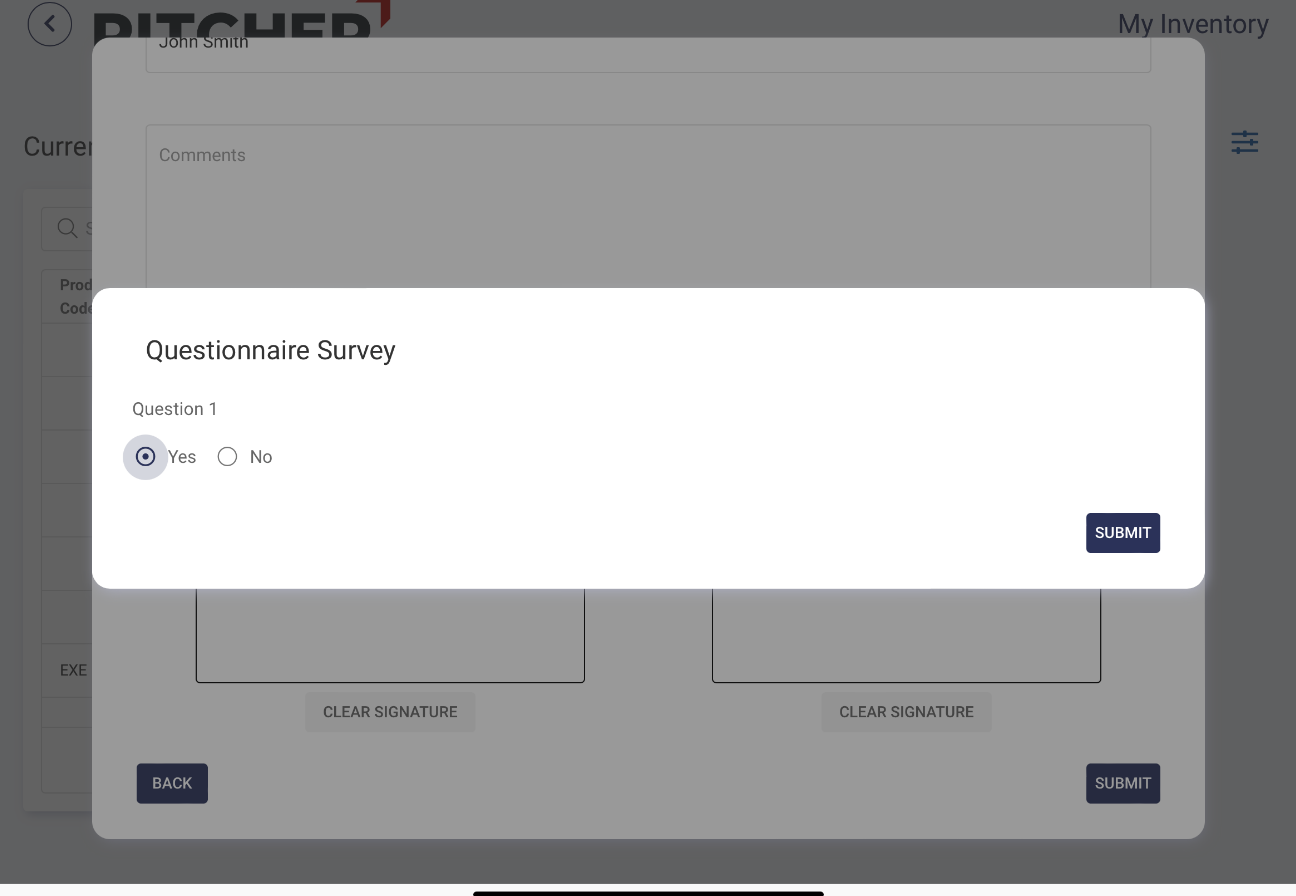
Click Submit(6) to submit the adjustment request. You may see a questionnaire form
You should see a confirmation message, and the quantity should now be adjusted in your current inventory.
You can increase, decrease or leave same quantity
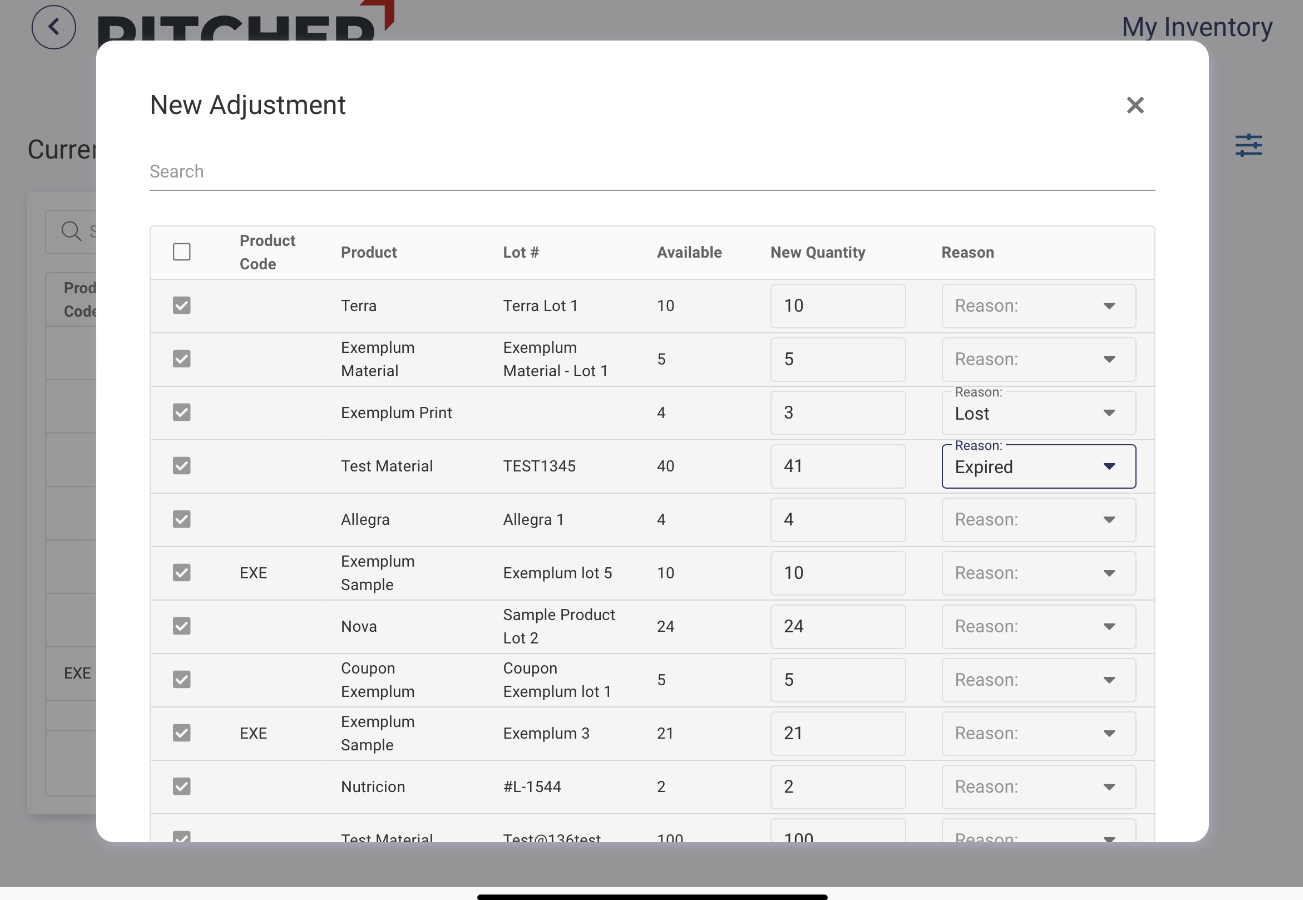
Select products that require adjustment
Add comments

Adjustments submitted
Mandatory Adjustments
Sometimes, adjusting all products based on configuration from your Admin may be mandatory. In such cases, the product list is launched with all products, and the option to unselect the products is disabled. Products with quantity 0 needs to be confirmed too and will be automatically marked as inactive.
Users can show inactive products with Inactive filter button
Adjustments are made in SFDC too if the new and current quantities are the same for a product. All items will be available inside PDFs for admin review.
Use the search box to filter products by name, lot number, or product code.
If product is market as License Validation as false then this product will not be required.
Adding Manager
Adjustments can be done together with a Manager where will be required to enter Manager name together with the signature of both. PDF will be attached in SFDC with the signatures
Filling the Questionnaire
You may see a questionnaire form when submitting the adjustment form. Please fill out the questionnaire to submit the form.
Transfer inventory items
You can also transfer your inventory items to another Sales representative. Click the Transfer button and follow these steps to complete the return form:
Select the products(1) from the lot you want to transfer. You can select more than one product for transfer here or remove previously chosen products by clicking the x or “Delete” buttons (3).
Add the transfer quantity to all selected products(2). Note that the transfer quantity must be less than or equal to the available quantity in your inventory.
Click Next(4) to go to the next step.
Click the Handover To dropdown(5) and select the Sales Rep. to which these items should be returned.
Select the delivery method from the Delivery Method dropdown(6).
Optionally, you can comment on the transfer request(7).
Click Submit(8) to submit the transfer request. You should see a confirmation message, and the quantity should now be updated in your inventory.
Product to be transfered
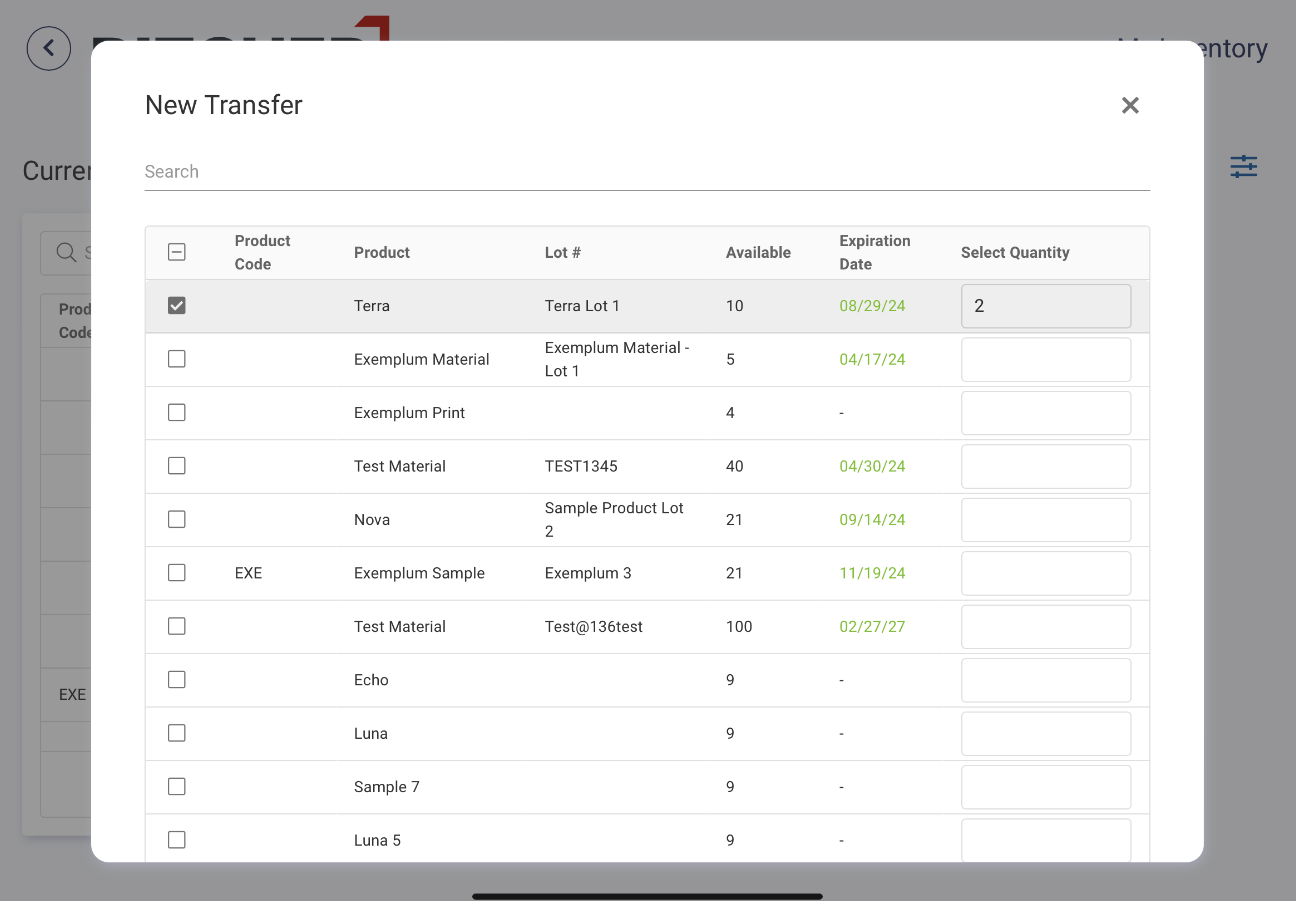
Select Product
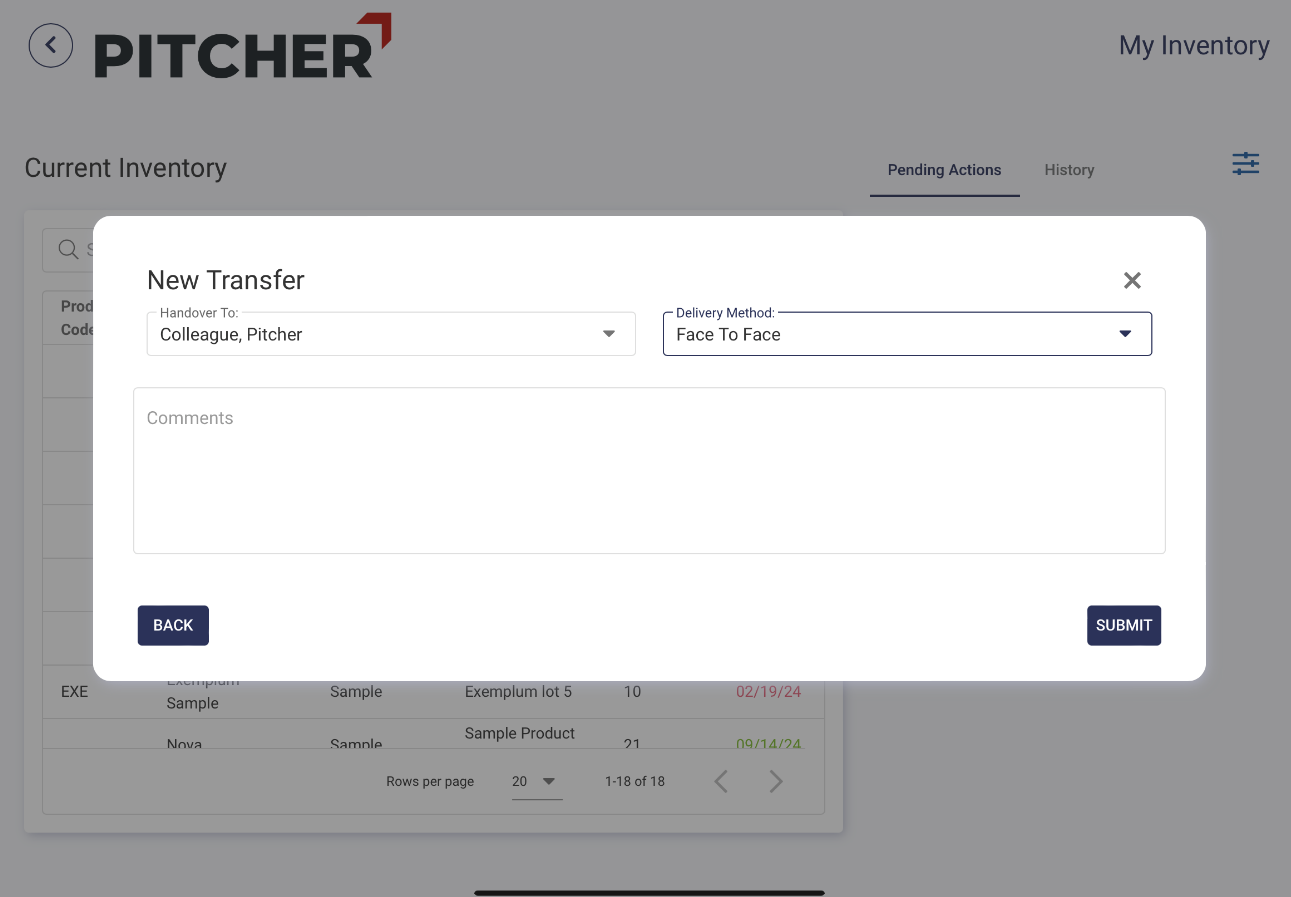
Select handover colleague
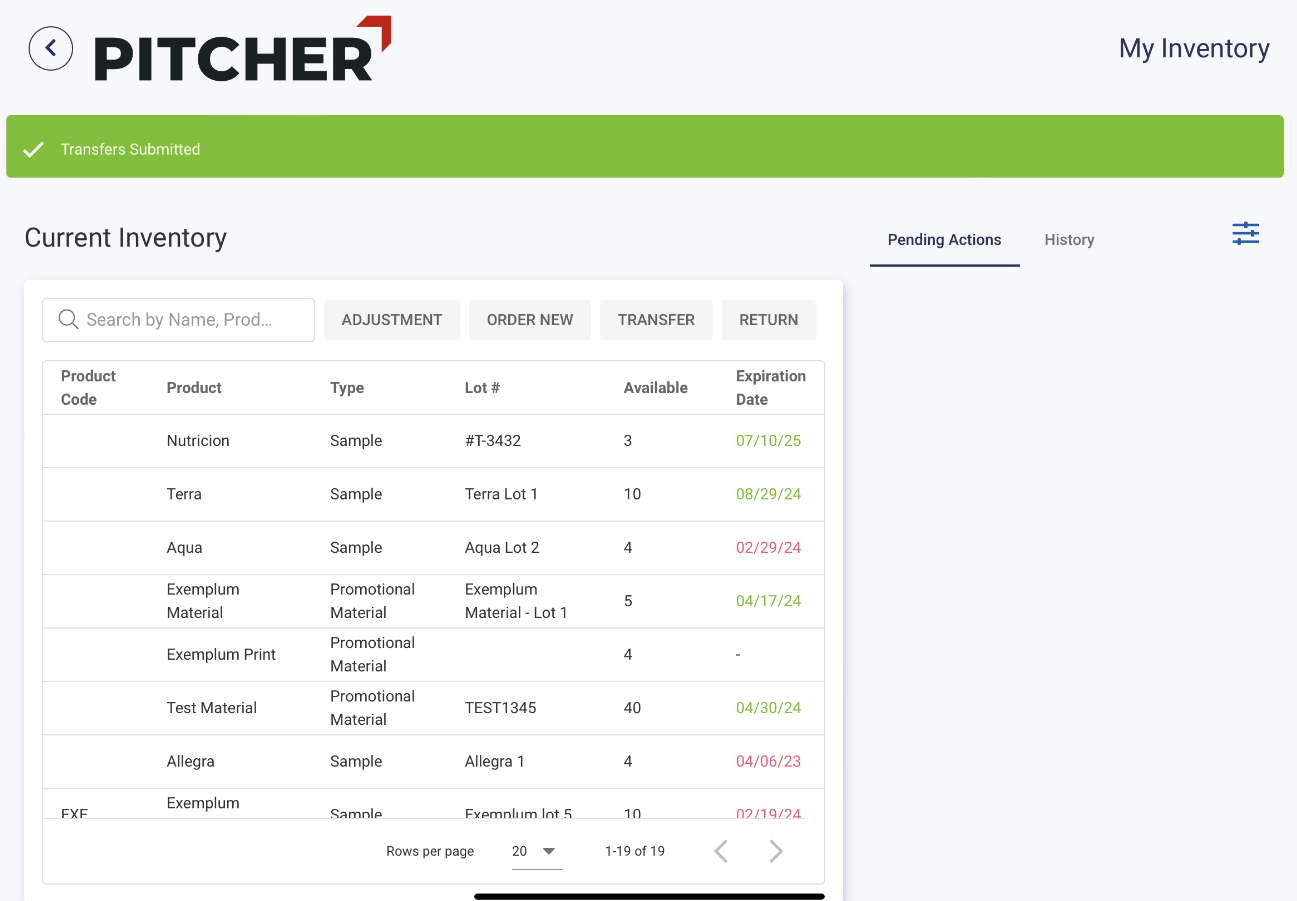
Transfer Submitted
Accept incoming Samples or Materials (Pending Actions)
The pending actions section lists any incoming inventory items sent by the admin (in response to your new order request) or transferred by another sales representative. The pending action items contain the product name, item count, lot name and expiry date.
You can take the following actions on a pending action.
Confirm - Confirming the action item will add the Sample/Material to your inventory.
Reject - Rejecting the action item will remove the pending item, and there will be no changes to your current inventory.
Select - Clicking the partial select will open the Partial Confirmation popup, where you can change the incoming order quantity. After confirmation, only the selected quantity will be added to your inventory.
The pending actions may also contain badges to indicate an inventory load or transfer.
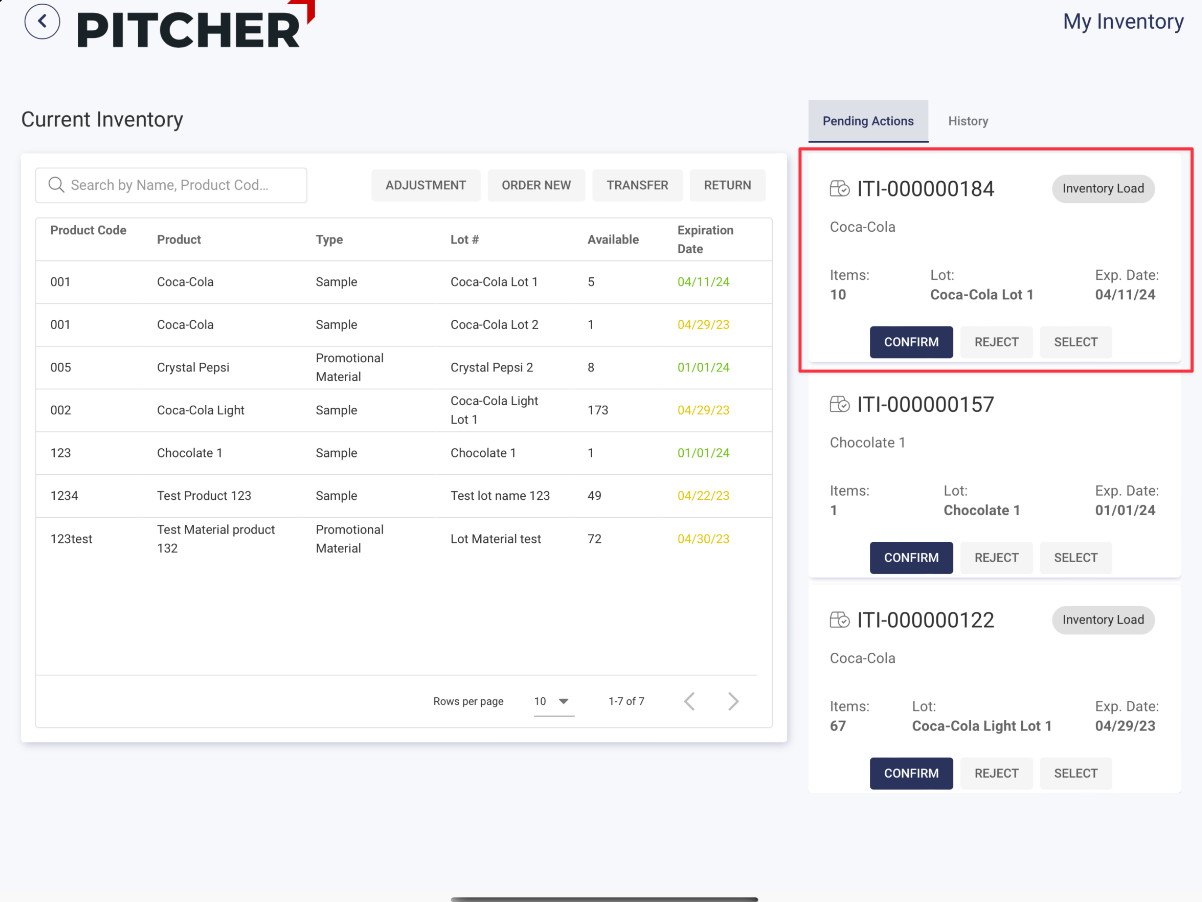
Pending Actions
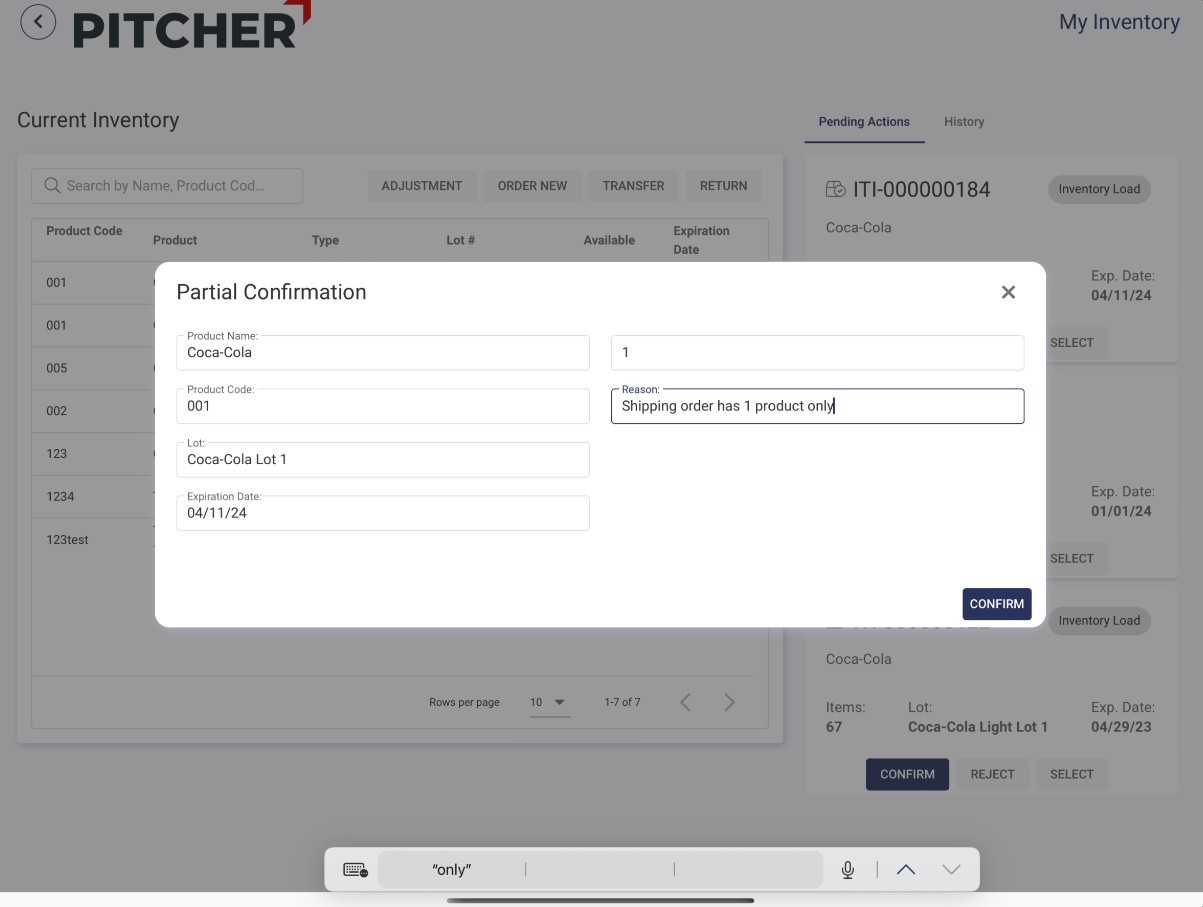
Partial Confirmation
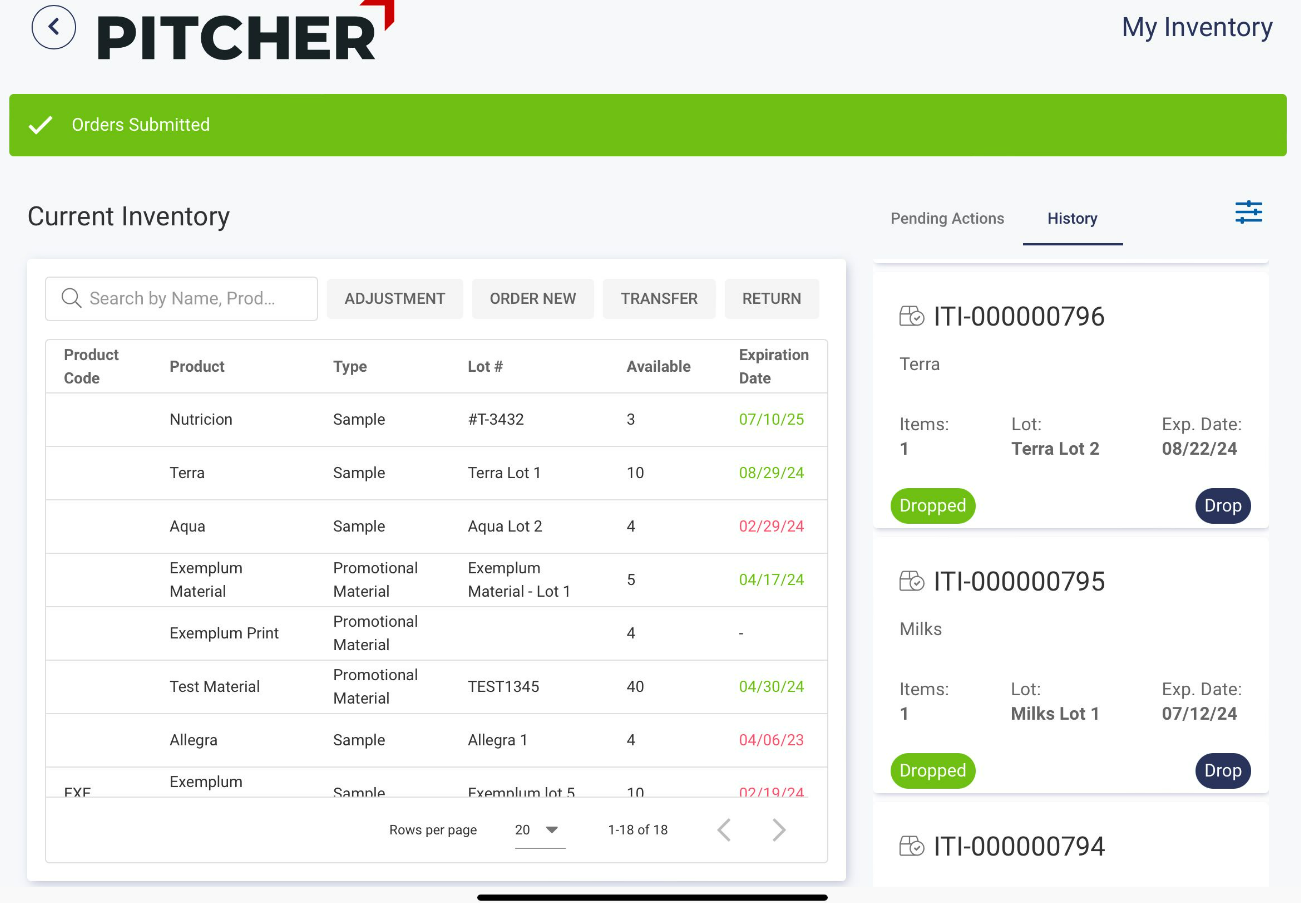
View inventory history
Click the History tab to view your inventory history. Here, you can see a list of all previous adjustments, returns, new orders, transfers and actions taken on the incoming inventory items. Each history item contains the product name, request identifier, request type and date.
Inventory History
Click the filters button at the top right to bring up the filters for the inventory history. Here, you can use the Search to find specific history items or apply product and transaction type filters to filter items based on different product and transaction types.

Filter by History Tab
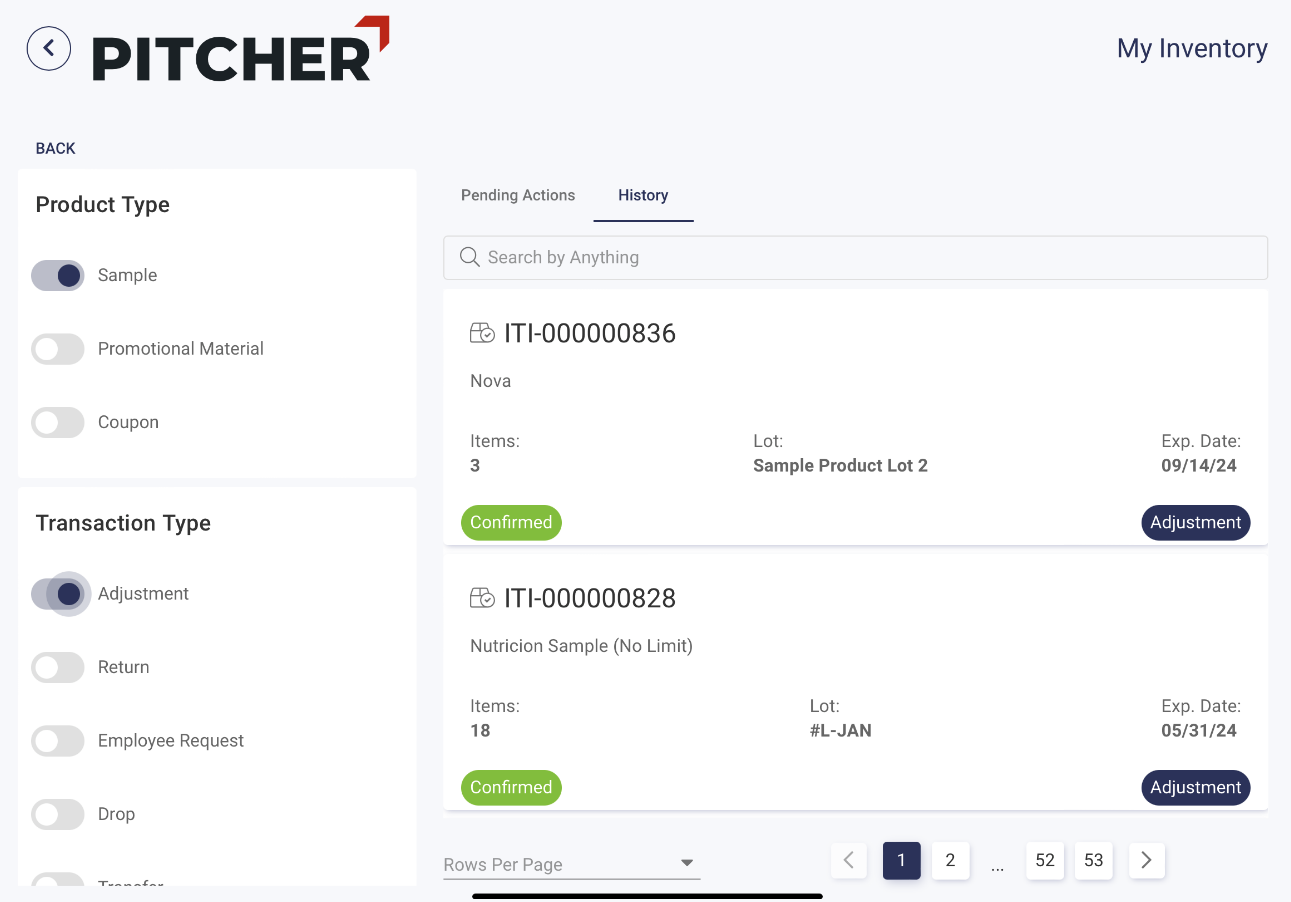
Filter History Tab View